DIY Paper Box Template – Treat and Favor Gift Box Craft
This post may contain affiliate links that won’t change your price but will share some commission.
Making paper boxes is a fun way to add custom details to a party or a celebration. These paper box templates are super cute and very simple to craft. All you need is your favorite craft paper, liquid glue, and a pair of scissors or a Cricut machine.
Thinking of getting a Cricut but not sure which one is best for your needs? I can help with that here.
Whether you prefer to hand cut with scissors or use a cutting machine, PDF and SVG cut files are provided in the free paper box templates below. I recommend using a scoring board if you are cutting with scissors.
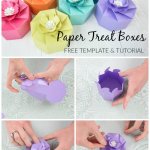
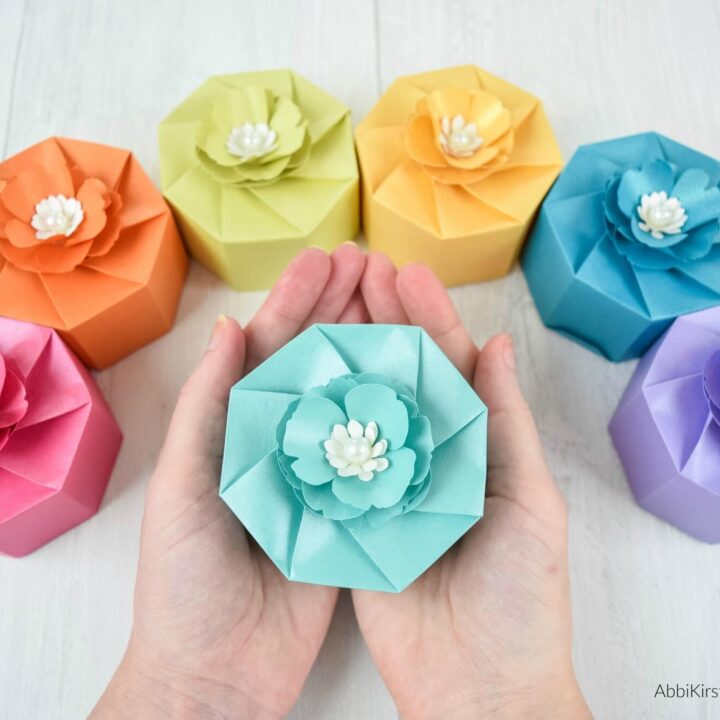
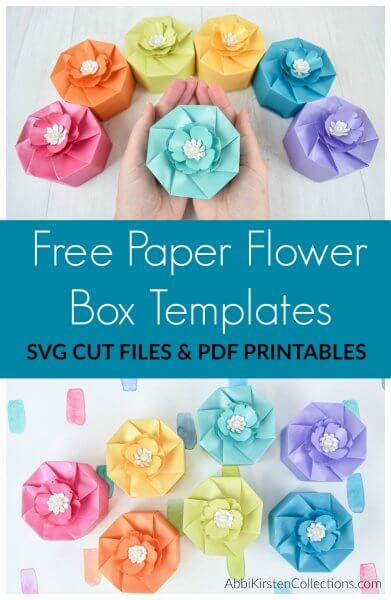
These DIY paper box templates are ideal for small treats like candy or small favors. And they are quite addicting to make, especially when you get to the fun twisty top of the box! You all know how much I love color, so I made one box in each color of the rainbow! That’s how easy and beautiful these small paper treat boxes are to make.
I am no stranger to paper crafts on the blog, so be sure to check out other freebies and designs in my freebies vault. Plus, if you have a special request for a project, I would love to hear from you! Leave me a comment below!
Love rainbows like me? You will adore my Unicorn Rainbow Paper Flowers!
If you’re looking for larger DIY box templates, you will love my stacking tower explosion box tutorial here!
DIY Flower Paper Box Tutorial
Watch my YouTube tutorial on how to create a paper box, or follow the steps listed below.
Step 1: Paper Box Supplies
Below are the supply resources I used to create these colorful paper boxes. Gather all the materials you need before starting.
- Paper box and flower template – FREE inside the subscriber vault via the form below. Find it by searching ‘boxes’ in the top search bar. The template is available in SVG or PDF. If you are already a member, log in right here. Need help entering the vault? Read this helpful post here.
- Scissors or cutting machine. Cricut Maker makes this job much easier with the rotary blade.
- Textweight metallic paper or any 65-pound cardstock. Note: The metallic paper I use is labeled as 80 lb text weight, which is similar to a 50 lb cover weight, which can work for these boxes too.
- Glue. I recommend a glue gun orTombow liquid glue.
- Small pearls or other decorations for the optional flower center on top of the gift box.
- Scoring stylus or scoring wheel (If you are not using a cutting machine, I recommend this scoring board option.)
- Slender wood dowel for curling the petals of your flowers (optional.)
- Flower punch (optional.)
- Goodies, favors, or treats to fill the paper flower box (optional.)
Download The Free Paper Box Templates
You can grab all three free paper box template SVG files in my Freebie Vault. Just pop in your name and email in the form below to set up a free account! Once inside, search the keyword “box’ or design #92 to find these files. Already joined Abbi Kirsten’s community? Log in here and search the keyword “#92” to find and download the files.
You may also love these Candy Filled Easter Egg Templates and my Candy Filled Hearts!
Step 2: Cutting Out the Paper Gift Box
Follow the instructions below based on your cutting method.
Scissor Instructions: If you are using scissors, use the free PDF file found in the freebies vault. Once your template is printed, cut around the outside of the design, and score the inside lines with your scoring stylus or scoring wheel if you have one. Then go to step 3.
Cricut Instructions: It is vital that the Cricut machine cuts the template correctly. The Cricut will cut every line it sees – and we don’t want that because your gift box will come out in pieces. We want to cut out the box as a whole and then score other areas for easier folding.
- Upload the free SVG template to Design Space.
- Select your image and click “UNGROUP” from the upper right-hand corner.
- There will be three options under the “UNGROUP” button. You need to change some of the inner box lines to scored lines. Select the inner box area with all the lines (the middle option.)
- Go to “Operation” in the menu across the top and select “SCORE.”
- Then select the option with the octagon shape.
- Go to “Operation” in the menu across the top and select “SCORE” again.
- Your three options on the right-hand side should read:
- Top Option: “PAPER FLOWER SWIRL BOX” score
- Middle Option: “PAPER FLOWER SWIRL BOX” score
- Last Option: “PAPER FLOWER SWIRL BOX” cut (This should be the green part of the design)
- Changing these first two options ensures your Cricut machine will only cut the outline of the paper box template and score the inner lines.
- The final Cricut step is to attach everything so it prints and cuts correctly. Select your whole image (you can use your mouse to highlight all the elements,) then click the “ATTACH’ button on the bottom right-hand side.
- Once all layers are attached, you can scale the paper box to any size you like. I scale mine to roughly 10.8” by 7.4”.
As you can see on the file, I also include the template for the optional flower element at the top of the box. I scale the flowers to about 2” by 1.9”.
Step 3: Assembling the Paper Gift Box
Now that your paper flower gift box is cut out (whether with a Cricut or scissors), it needs to be assembled by folding the scored lines and gluing the box together.
- Fold the center line found in the middle of your cut-out, then crease everywhere you scored the paper. Fold gently and make sure you are creasing along the score lines.
- Important Note: If you’re folding it away from yourself, make sure that the little circles at the top of the box fall to your left-hand side. It’s very important because it will be a little more difficult to get the top of the box twisted closed if they’re going the other direction.
- Continue creasing along the top and the little diagonal lines. The top of box circles will be on your right-hand side for this step.
- Fold the little tabs on the open ends of the box.
- Fold all the little tabs on the edge of the octagon.
- Add a little glue to the middle section’s end tabs (the box sides.) Then align your other end and glue in place.
- Note: I prefer to use Tombow liquid glue. It dries clear and quickly.
- Hold ends closed for at least 30 seconds to a minute. Make sure your glue has grabbed and nothing’s sliding around on you before continuing.
- Add glue to the bottom, inside of the box.
- Press the bottom closed with the little tabs on the octagon. It’s easier to add the glue to the inside of the box than to the tabs because it will be less messy. Reach inside the box and press the tabs down. Make sure the bottom is even and aligned correctly. Also, make sure the glue has grabbed hold before going to the next part.
- Note: Before you fold the top down, make sure your box is filled with whatever treats or goodies you want, especially if you plan on adding the optional flower.
- Fold the top down. It will work like a spiral. If it’s not cooperating with you, just make sure you’re getting all of your pieces folded right at the creases.
- Make sure the tabs are all flowing in the same direction and then twist it until the box closes.
- Once you get that twist, use your finger to slide over each diagonal crease and gently push them in. This locks the top in place so it won’t keep popping open.
Congratulations, you’ve made a DIY paper flower box!
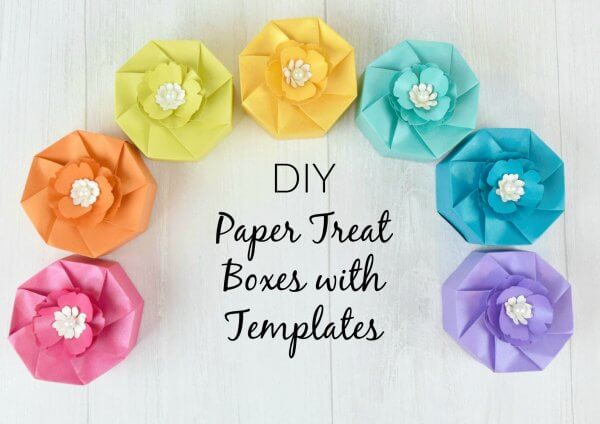
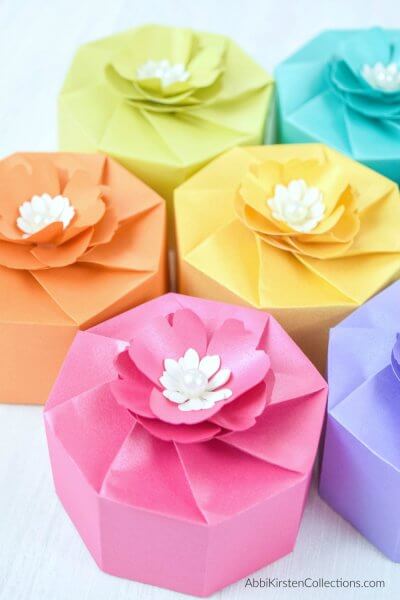
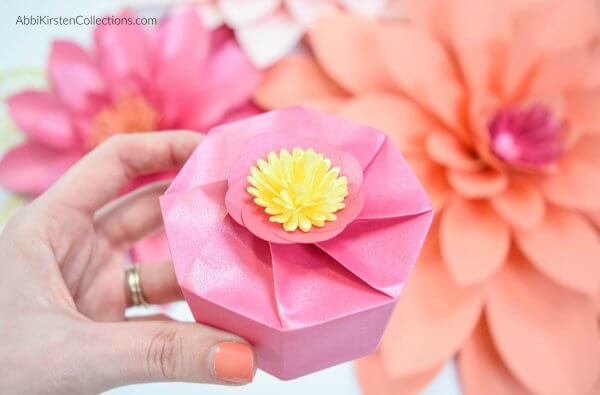
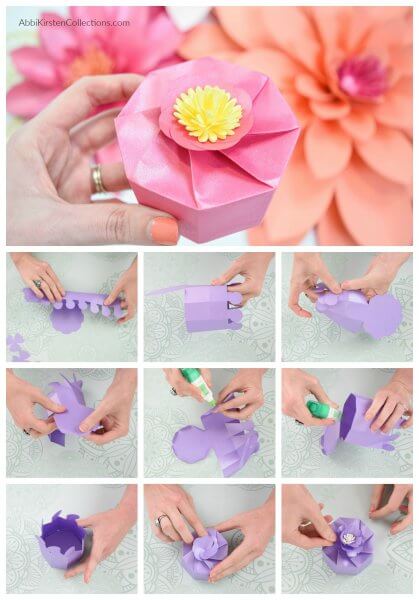
Step 4: Optional Flower Top
- Once you have placed your goodies in the paper box and twisted the top closed, you can add optional decorations like flowers.
- Use my simple Cricut template found with the paper box template. It only requires three cuts.
- Use the slender wood dowel to curl the petals to add dimension.
- Layer the three petals together with glue. Liquid glue or a hot glue gun will work here.
- Make sure you are alternating petals, so they aren’t directly stacked. This makes it look like the flowers are blooming and adds a lovely delicate touch to the paper flower box.
- Place the whole flower into the center of the larger flower box top with glue.
- NOTE: You can use the Cricut DIY paper flower box template I provide for the optional flower, but it is much faster to use a flower punch from a craft store.
You can make this optional flower top any size you want. You could also add fun touches like sparkles, glitter, a pearl, or rhinestones to the flower’s center or petals.
Note: Some crafters ask about opening the boxes with the optional flower on top. After some testing, foam tabs work well for holding the paper flower on the top and allowing the recipient to easily remove the flower when it’s time to open.
This cute paper treat box can be made in any color and size, and it is a beautiful favor or treat box for any occasion. Make sure you grab the free DIY paper box template on my blog below.
DIY Paper Box Template - Treat and Favor Gift Box Craft
These cute paper boxes are perfect for just about any occasion. Use this tutorial to create a paper gift box that can be filled with party favors, presents, candy, or more!
Materials
- Paper box and flower template
- Scissors or cutting machine
- Text weight metallic paper or any 50-pound weight paper
- A glue gun or Tombow liquid glue
- Small pearls or other decorations for the optional flower center on top of the gift box
- Scoring stylus or wheel
- Slender wood dowel for curling the petals of your flowers (optional.)
- Flower punch (optional.)
- Goodies, favors, or treats to fill the paper flower box (optional.)
Tools
- Cricut Machine
Instructions
Cutting Out the Paper Gift Box
Follow the instructions below based on your cutting method.
Scissor Instructions: If you are using scissors, use the free PDF file found in the freebies vault. Once your template is printed, cut around the outside of the design, and score the inside lines with your scoring stylus or scoring wheel if you have one. Then go to step 3.
Cricut Instructions: It is vital that the Cricut machine cuts the template correctly. The Cricut will cut every line it sees - and we don’t want that because your gift box will come out in pieces. We want to cut out the box as a whole and then score other areas for easier folding.
Upload the free SVG template to Design Space
- Select your image and click “UNGROUP” from the upper right-hand corner.
- There will be three options under the “UNGROUP” button. You need to change some of the inner box lines to scored lines. Select the inner box area with all the lines (the middle option.)
- Go to “LINE TYPE” in the menu across the top and select “SCORE.”
- Then select the option with the octagon shape.
- Go to “LINE TYPE” in the menu across the top and select “SCORE” again.
- Changing these first two options ensures your Cricut machine will only cut the outline of the paper box template and score the inner lines.
- The final Cricut step is to attach everything so it prints and cuts correctly. Select your whole image (you can use your mouse to highlight all the elements,) then click the “ATTACH’ button on the bottom right-hand side.
- Once all layers are attached, you can scale the paper box to any size you like. I scale mine to roughly 10.8” by 7.4”.
Assembling the Paper Gift Box
- Fold the center line found in the middle of your cut-out, then crease everywhere you scored the paper. Fold gently and make sure you are creasing along the score lines.
- Continue creasing along the top and the little diagonal lines. The top of box circles will be on your right-hand side for this step.
- Fold the little tabs on the open ends of the box.
- Fold all the little tabs on the edge of the octagon.
- Add a little bit of glue to the end tabs of the middle section (the box sides.) Then align your other end and glue in place.
- Hold ends closed for at least 30 seconds to a minute. Make sure your glue has grabbed and nothing's sliding around on you before continuing.
- Add glue to the bottom, inside of the box.
- Press the bottom closed with the little tabs on the octagon. It's easier to add the glue to the inside of the box than to the tabs because it will be less messy. Reach inside the box and press the tabs down. Make sure the bottom is even and aligned correctly. Also, make sure the glue has grabbed hold before going to the next part.
- Fold the top down. It will work like a spiral. If it's not cooperating with you, just make sure you're getting all of your pieces folded right at the creases.
- Make sure the tabs are all flowing in the same direction and then twist it until the box closes.
- Once you get that twist, use your finger to slide over each diagonal crease and gently push them in. This locks the top in place so it won’t keep popping open.
Optional Flower Top
- Once you have placed your goodies in the paper box and twisted the top closed, you can add optional decorations like flowers.
- Use my simple Cricut template found with the paper box template. It only requires three cuts.
- Use the slender wood dowel to curl the petals to add dimension.
Layer the three petals together with glue. Liquid glue or a hot glue gun will work here. - Make sure you are alternating petals so they aren't directly stacked. This makes it look like the flowers are blooming and adds a lovely delicate touch to the paper flower box.
- Place the whole flower into the center of the larger flower box top with glue.
- You can make this optional flower top any size you want. You could also add fun touches like sparkles, glitter, a pearl, or rhinestones to the flower’s center or petals.
Wanna be a Cricut Master and learn to create your own craft design files like me?
Do you own a Cricut machine or want to own a Cricut, but maybe you are overwhelmed when you look at the Design Space software and feel lost with all the functions?
Maybe you wish you could create your own design files rather than being forced to spend money on every design for each project you make.
Let me share with you the 3 biggest mistakes. Cricut crafters make and my proven steps to not only master your Cricut but also transform yourself into a craft designer!
If that sounds like it’s for you, be sure to join me here in my FREE masterclass!

About Abbi Kirsten
My mission is to inspire you to nurture the creative magic inside your soul – bringing you fun, easy-to-learn DIY projects and quality template designs. I share various projects, such as printables, SVG cut files, and craft tutorials, but I specifically love paper crafting and paper flowers. Interested in paper flowers?! I’ve created dozens of signature designs for you to enjoy – starting with my bestseller, The Art of Giant Paper Flowers, the Giant Flower Library, and my shop of endless paper designs and flower templates.
Want to join my Facebook community to share your crafts and learn from the best? Click here to request access to my group, Crafters and Cricut Lovers.
More Crafts to Love!