Glitter Faux Leather Christmas Tree Craft with Free Templates
This post may contain affiliate links that won’t change your price but will share some commission.

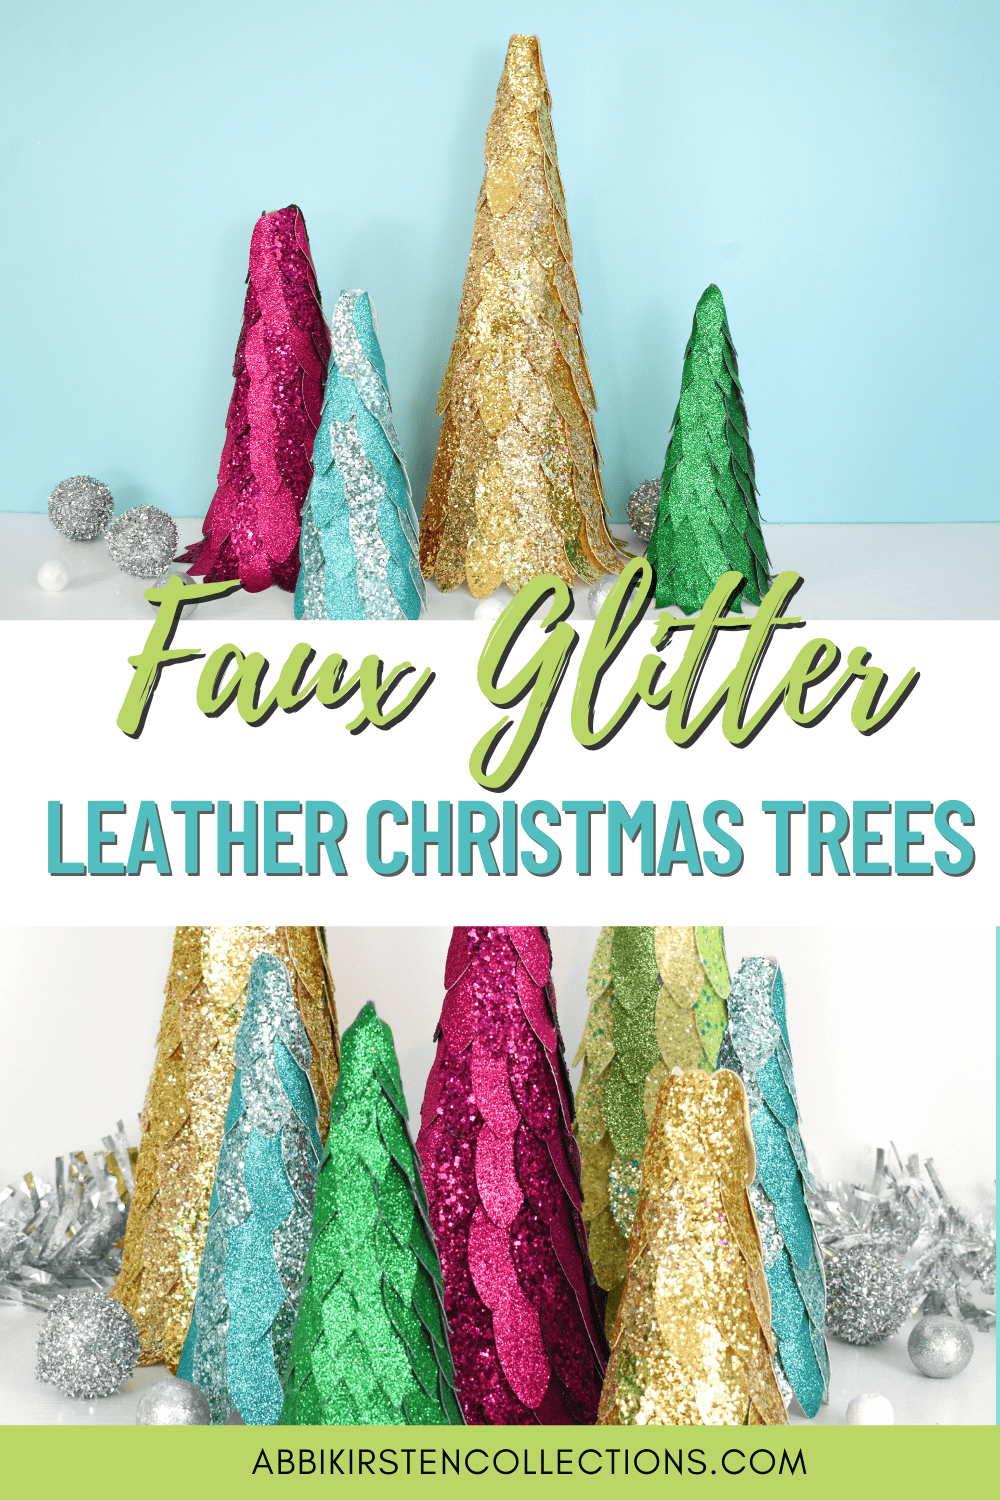
It’s become a tradition on my blog to create a new Christmas tree craft every year, like this Paper Star Christmas Tree Topper or DIY Paper Pine Trees. For my new craft, I wanted to challenge myself by using non-paper materials, so I went on a glitter and faux leather binge! Faux leather and glitter canvas have become very popular with crafters. These materials make wonderful bows, drawer pulls, and even earrings! Today we are bringing that shine to our holiday decorations with these gorgeous Glitter Faux Leather Christmas Trees!
These sparking, sturdy styrofoam cone Christmas trees resemble conifer trees and look great on fireplace mantles or on a table as centerpieces. You can use any color you want or just use gold and silver to give your decor that uptown feeling. These long-lasting glitter trees can be used year after year and make great New Year’s decorations, too!
Find last-minute Christmas gift ideas and free Christmas printables at Abbi Kirsten Collections!
How to Make Glittery Faux Leather Christmas Trees: Supplies & Step-by-Step Tutorial
What I love most about this DIY Christmas tree craft is its simplicity – you don’t need a cutting machine to make leather Christmas trees. Scissors (or rotary cutters) can cut through the leather strips or glitter sheets. It’s user-friendly for the whole family and an art project you can do with your older kids while watching your favorite Hallmark Christmas movie! You can use an adhesive other than hot glue if you want to make these faux leather trees with little children.

Supplies for Glitter Faux Leather Christmas Tree Craft
- Cricut Maker, Explore, or other cutting machine (optional)
- Scissors (if you don’t have a cutting machine)
- Christmas tree petal material of your choice: Faux leather or Glitter canvas sheets – I also love Craftyrific, Bumble Art and Craft on Etsy, and Jewel Box Supply, too!
- Styrofoam cones in various sizes – I used this tall Styrofoam cone in the video tutorial
- StrongGrip Cricut mat
- StrongGrip transfer tape (optional)
- Painter’s tape
- Glue gun with plenty of glue sticks
- Pencil if you plan to cut by hand for tracing the templates onto the back of the canvas sheets.
- Tree petal templates Design #104 (find them in the freebie vault below!)
How to Get the Christmas Tree Templates
Download these free templates by signing up via the form below. If you are already a member, log into your Member account. Need help entering the vault? Read this helpful Freebie Vault guide.
Once in the Freebie Vault, search for “Faux Leather Cone Christmas Tree” or “Design 104.”
Cut Out Your Christmas Tree Petals
You will need to create your own Design Space cut file settings for chunky glitter canvas with a Cricut cutting machine. But don’t worry! I will walk you through all the steps below.
For a 14-inch cone, I used 18 large petals on the bottom row, 16 on the second row, 14 on the third row, and so on, reducing the petal count of each layer by two (even after switching to the smaller petals as the cone narrows). Altogether, my petal count was 105.
Cutting by Hand
If you plan to cut by hand, print the free templates on cardstock and trace them onto the back of your faux glitter leather/canvas. Then use a sharp pair of scissors to cut your tree petals. This is no small task, so leave yourself extra time to complete this part.

Cutting with a Machine
Cutting with a Cricut helps the process and the hands so much! There are SVG cut files included in the free template designs that you can upload to Cricut Design Space – learn how to upload an SVG here.
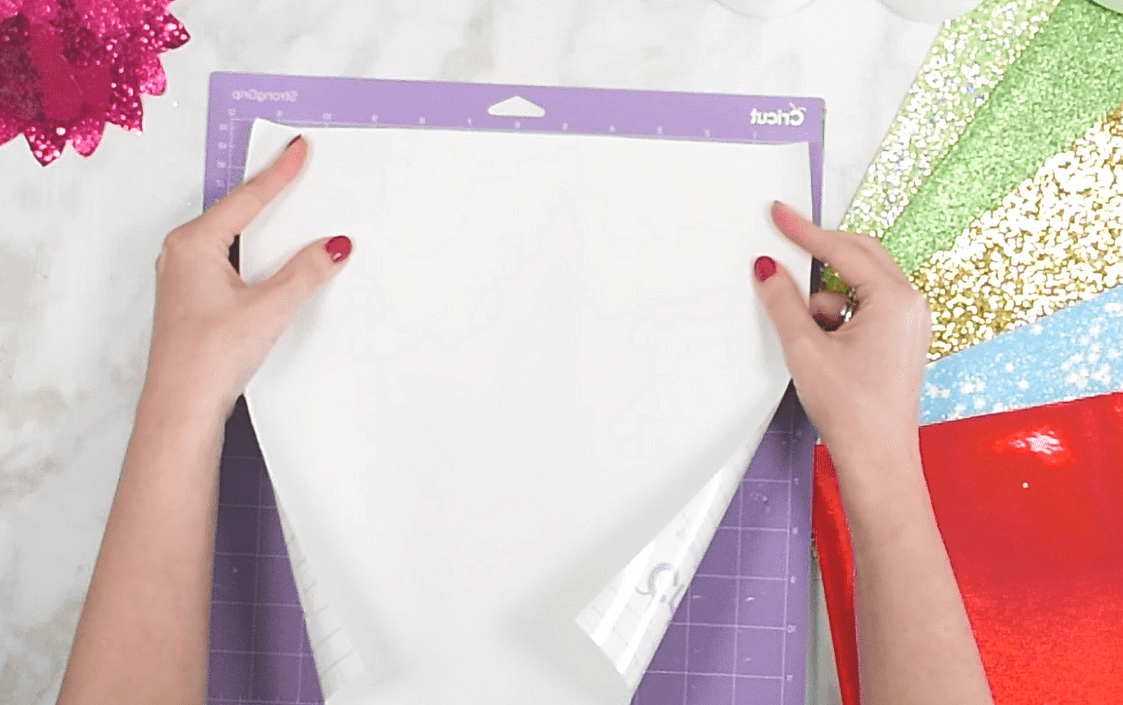
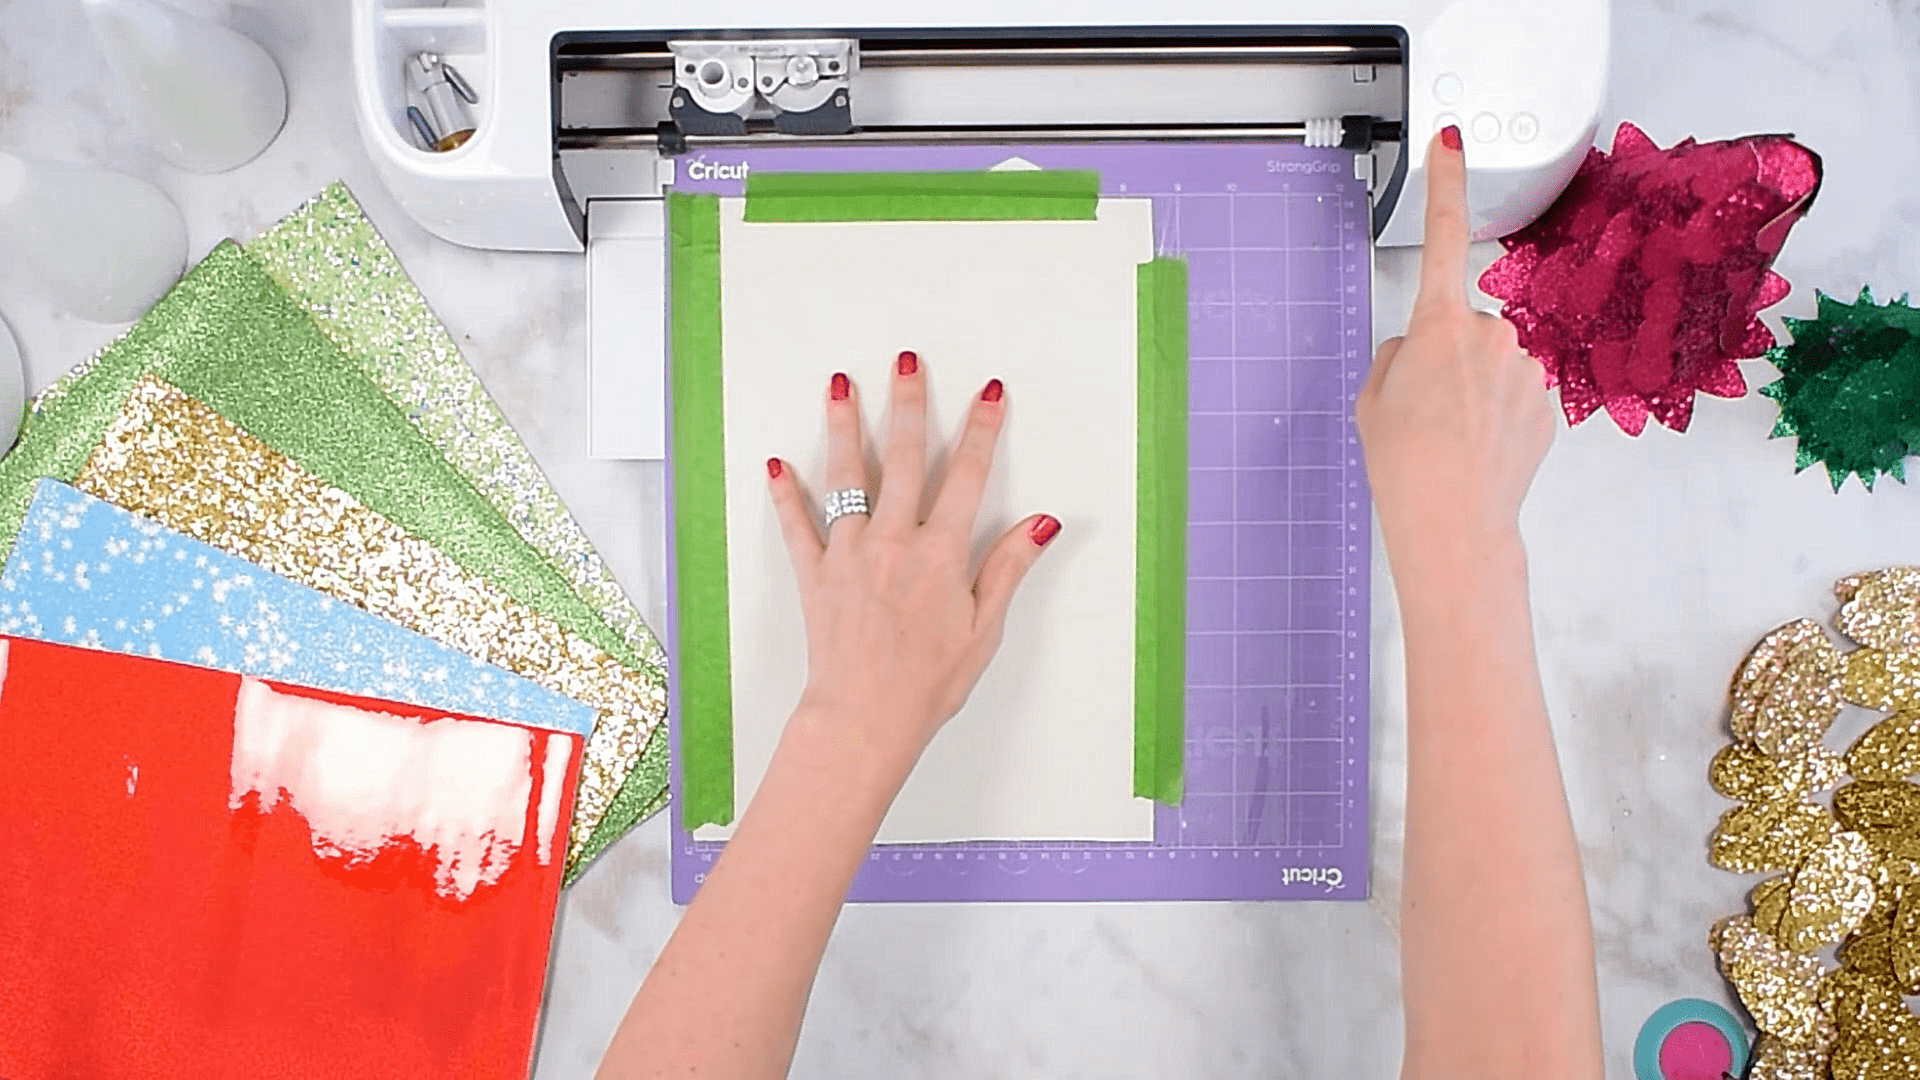
To save your cutting mat from getting glitter stuck all over it, use the transfer tape liner hack! I cut a piece of 12 x 12 strong grip transfer tape and placed it white liner side up onto my strong grip mat. Once placed, remove the white liner, and the sticky side of your transfer tape should be up for you to place the glitter sheet on it, glitter side down. Secure the edges of the glitter canvas with painter’s tape. This method allows you to cut without getting chunky glitter all over your mat!
Looking for more Design Space and Cricut Hacks? Check out my 16 Questions & Answers Ever Beginner Asks Post
YOU MIGHT ALSO LOVE

Create Your Own Setting in Design Space for Cutting Chunky Glitter Leather/Canvas Sheets
For thin faux leather sheets, you can use the faux leather setting in Design Space. If you are using a thin glitter canvas, the canvas setting under “Custom Options” will work well. However, if you plan to use a chunky glitter canvas sheet, you will need to create your own setting for the best results. Here’s how:
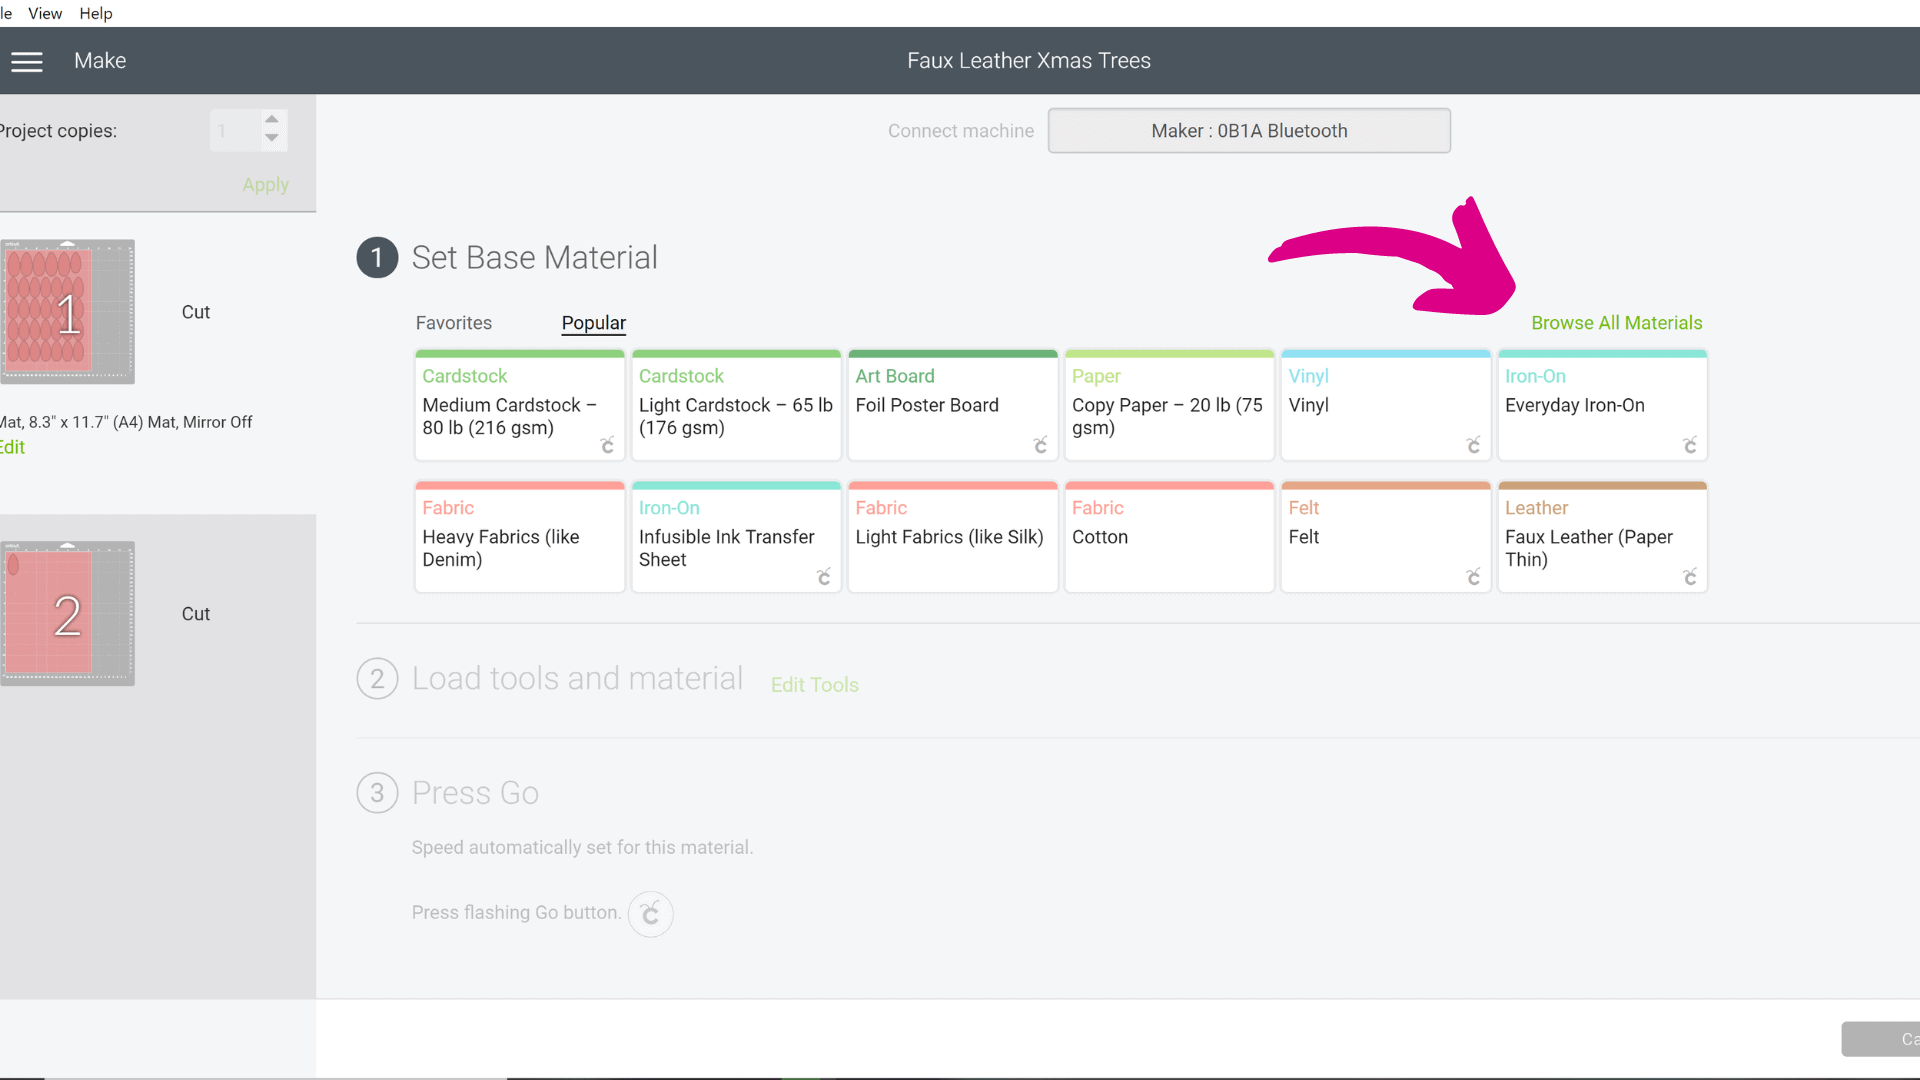
- Load your templates and click “Make It.” Once on the cut screen where you select your settings, choose “Browse All Materials.”
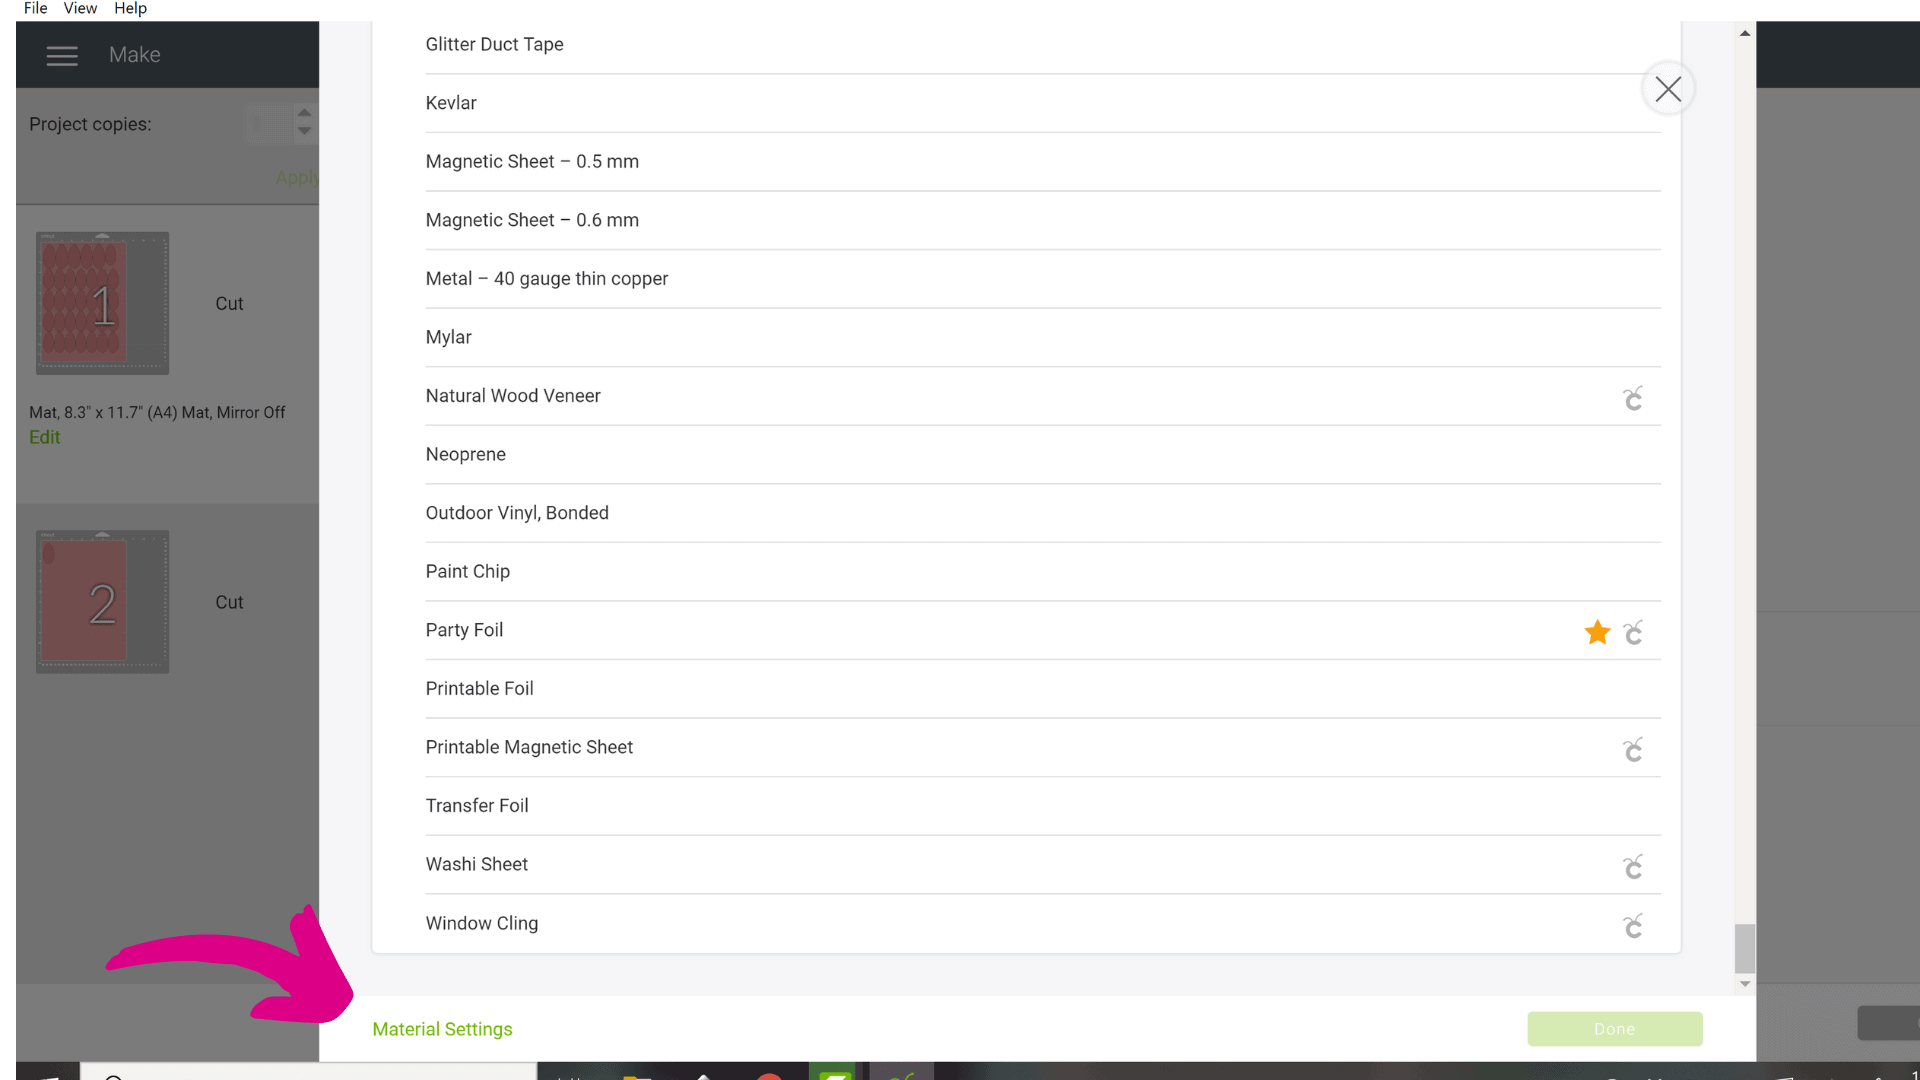
- Scroll to the very bottom and select “Material Settings.”
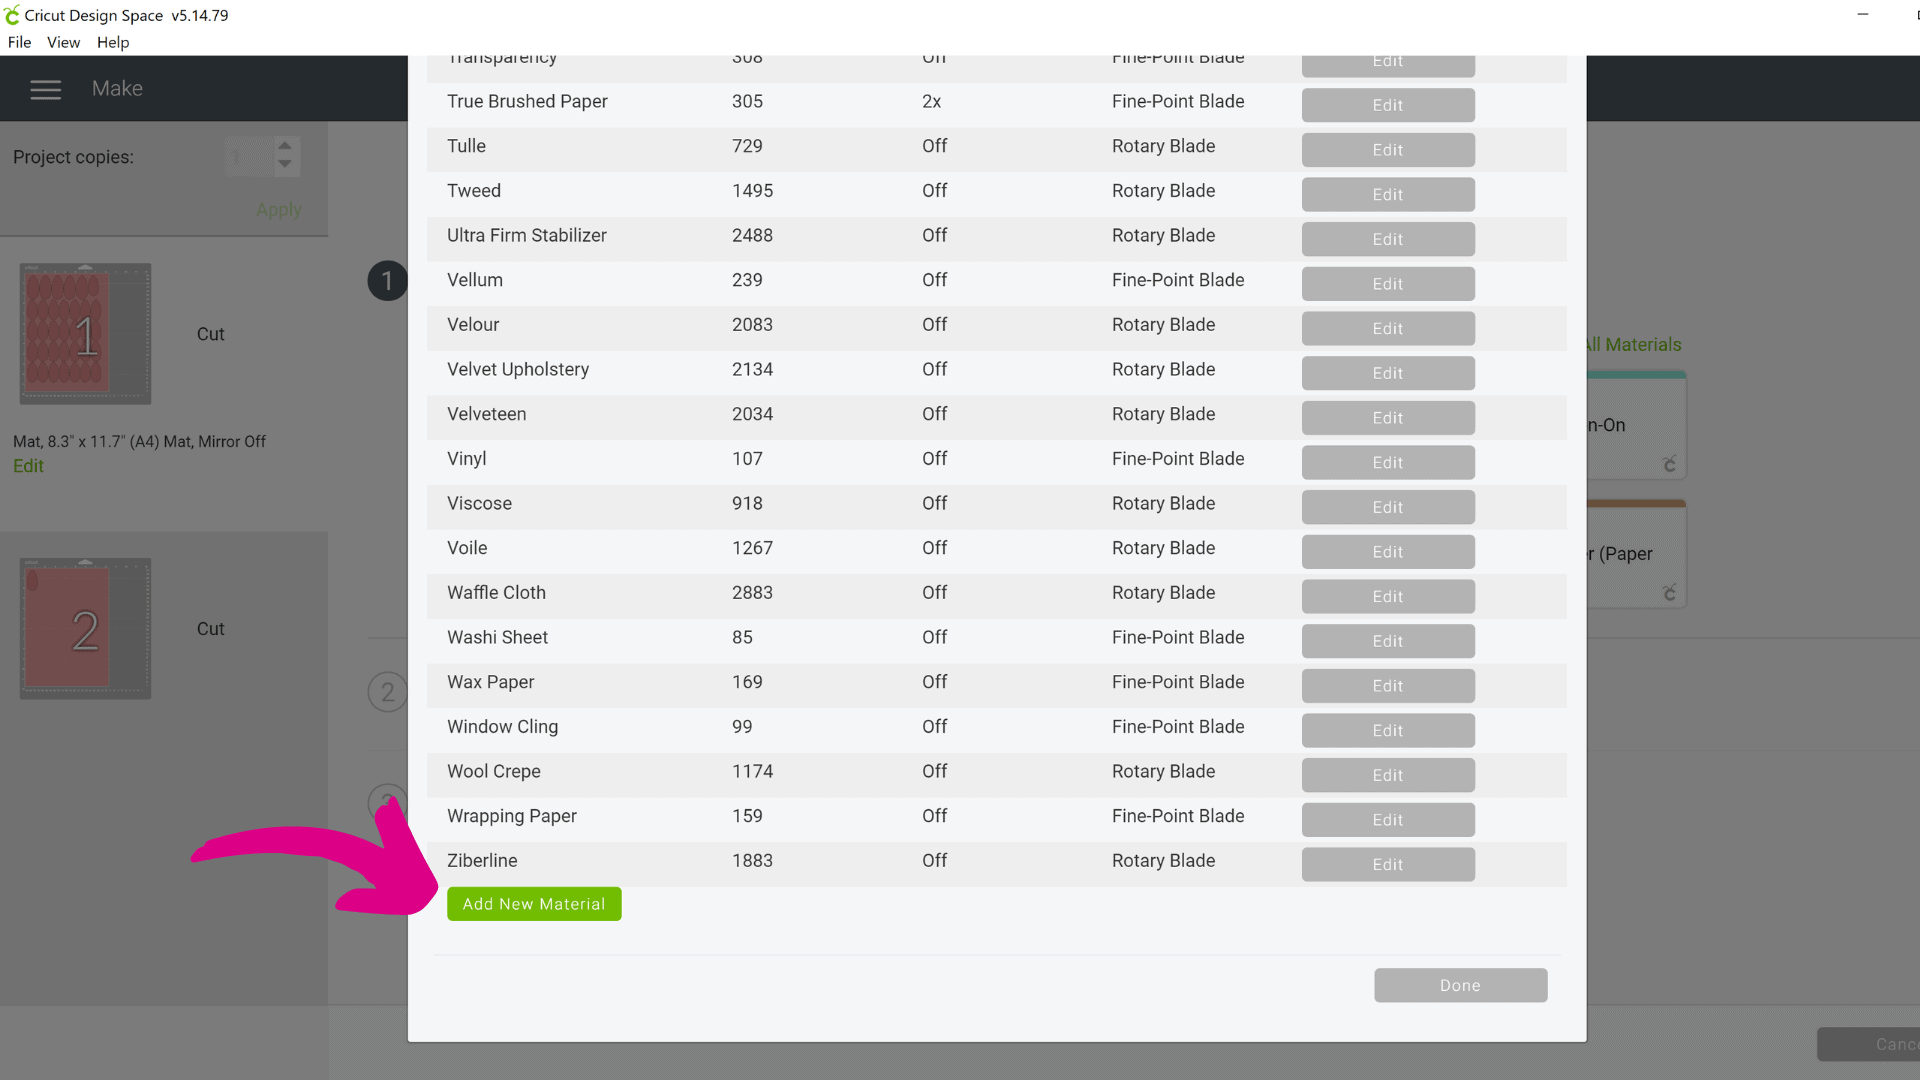
- Click “Add New Material” to create your own setting.
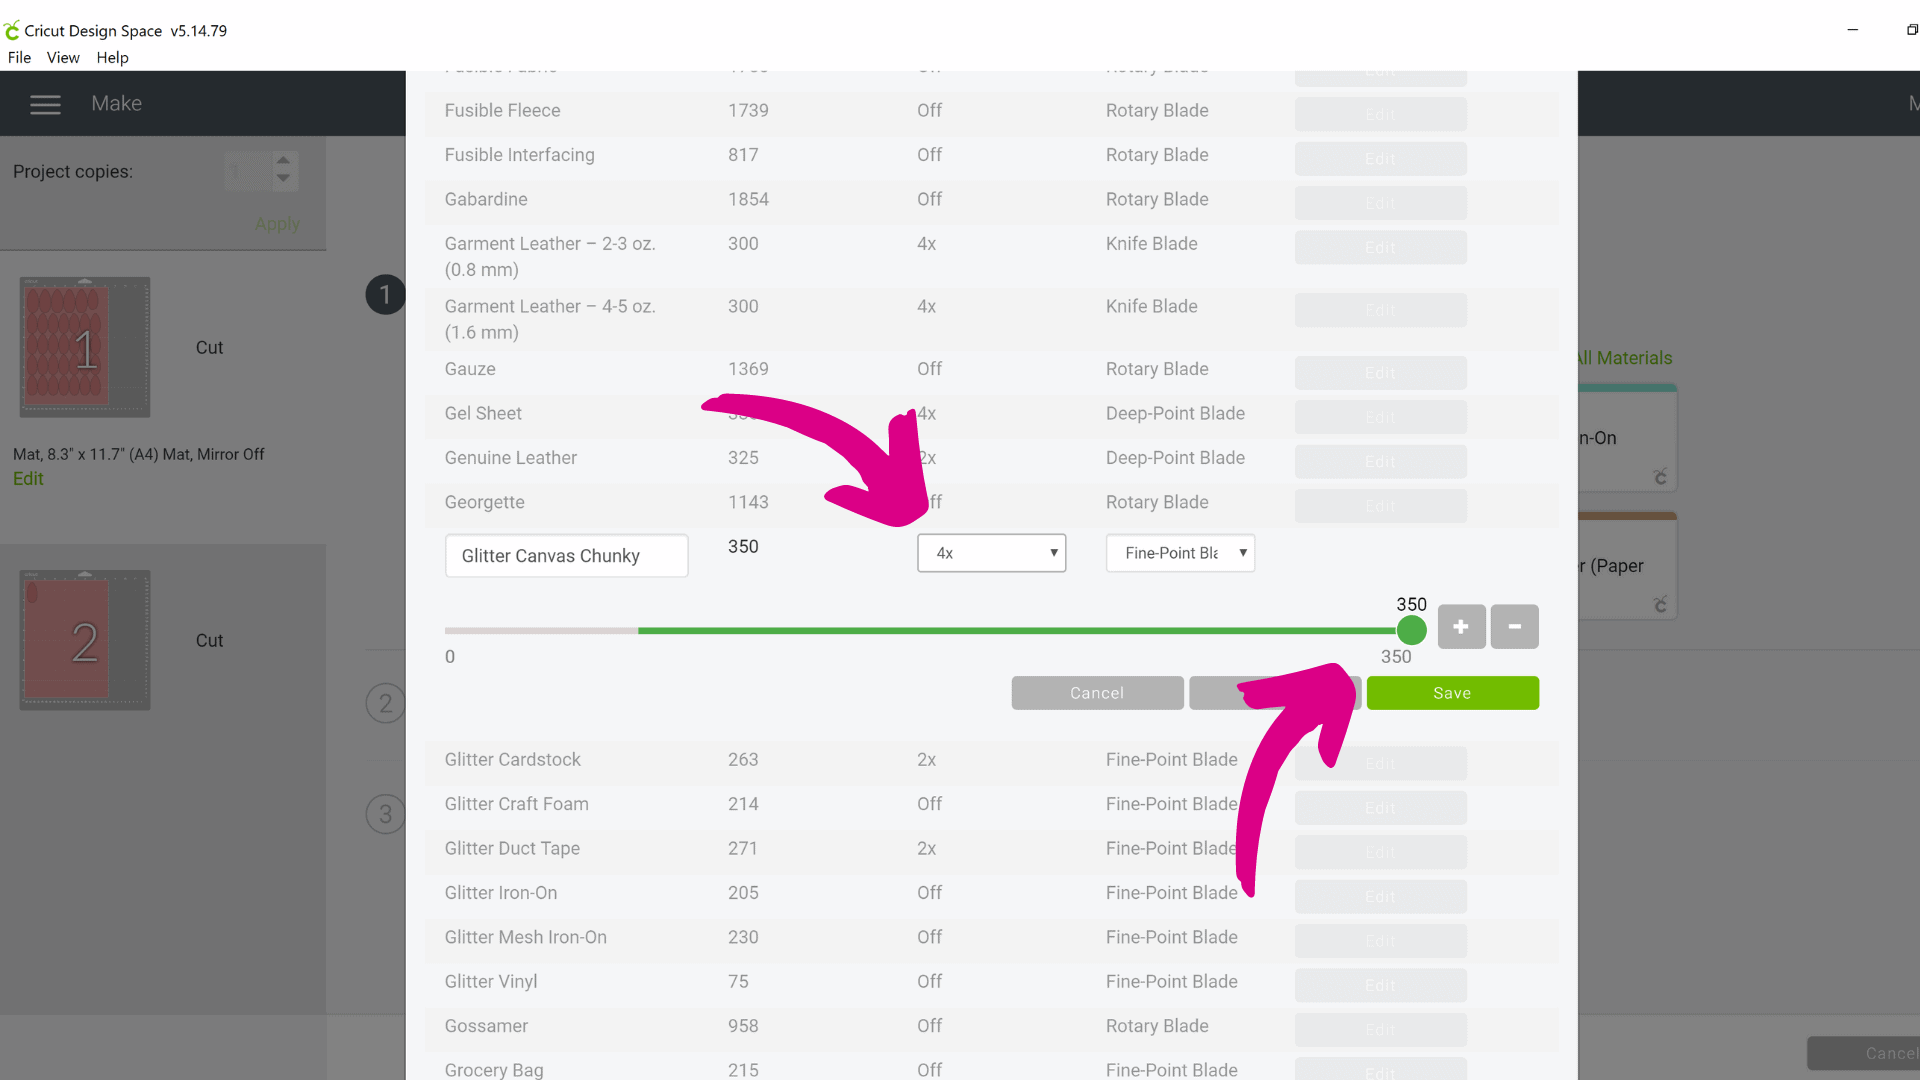
- Name your material. I named my setting Glitter Canvas.
- Select the pressure, blade, and number of passes. Mine are as follows: maximum pressure (350), fine-point blade, and 4 passes. Then click Save. (you do not need a deep point blade for this project).
- Now that you have created a custom setting, return to your setting sections and select the Glitter Canvas you just created.
- Use the dropdown menu to change the pressure to “MORE.” Then load your material and begin the cut!
- Next, place your glitter leather or canvas and tape down the edges with painter’s tape. Load the mat and proceed with the cut.
- When you finish cutting your material, unload and remove it from the mat. It’s common for pieces to stick together, so you may need to gently pull the tree petals out to get the final release from the chunky glitter.
Assemble the Glitter Faux Leather Christmas Tree
Faux Leather Christmas Tree Craft Video Tutorial
Now it’s time to assemble our cone Christmas tree craft! Watch the Christmas Cone tree video tutorial or use the written and picture instructions, and see how easy this festive project is!
Step-by-Step Faux Leather Christmas Tree Instructions
- Step 1: Gather all your materials and Christmas tree petals. Make sure you have a clean surface with enough space. You will need a lot of hot glue, so make sure you have plenty of glue sticks ready to go.
- Step 2: Add hot glue to the top of the larger tree petal on the back.
- Step 3: Place the petal on the cone’s lowest layer, leaving about ½ inch of the tree petal overhanging the bottom of the cone. Make sure none of the white of the cone is showing.
- Step 4: Place the next larger tree petal on the right side of the first petal at the same height and slightly overlapping the edge of the first petal. Repeat until you have completed the bottom layer. On a 14-inch high cone, this takes about 18 of the larger tree petals.
- Step 5: For the last petal of each layer, slightly lift up the edge of the next petal so you can tuck the edge of the last petal underneath. This creates a seamless layer.
- Step 6: Continue creating layer after layer. When the cone begins to get more narrow, switch to the smaller petals. Each layer takes about two less petals than the previous layer.
- Step 7: For the last layer, put glue on the back of the petals in the middle and bottom so the petals stick above the top of the cone. You can pinch or glue the top petals to create a pointed tree top.
This Faux Glitter Leather Cone Christmas Tree Craft project is perfect to display year after year! Capture a great Christmas vibe using glitter and your favorite colors!
Be sure to share your project in my Facebook group!


Glitter Faux Leather Christmas Tree Craft with Free Templates
Are you ready for a holiday season full of glitz and glamour? This simple glitter and faux leather Christmas tree craft makes your home merry and bright. It’s easy, quick, and comes with free templates! You can use scissors or a cutting machine with our PDF and SVG cut files. This is a great craft to do while watching Hallmark Christmas movies or when the weather gets bad enough to stay inside. Bring on the holiday bling and bring some shine into the winter season!
Materials
- Scissors (if you don’t have a cutting machine)
- Pencil (if cutting by hand)
- Cricut or other cutting machine (optional but recommended)
- StrongGrip Cricut mat (if using a Cricut)
- StrongGrip transfer tape (optional)
- Faux leather (or other material of your choice)
- Glitter canvas sheets (or other material of your choice)
- Styrofoam cones 13.5” x 5.5” (or in your size choice)
- Painter’s tape
- Glue gun
- Tree petal templates Design #104
Instructions
- Cut out your petals by hand or with a cutting machine.
- Gather all your materials and cut Christmas tree petals.
- Apply hot glue to the top of a petal and adhere it to the bottom of the cone, leaving the bottom of the petal partially off the cone. Continue around the cone’s bottom until you have completed the first layer.
- Apply alternating petals in layers around the cone.
- Tuck the last petal in each layer behind the first petal in that layer.
- Use smaller petals when the cone narrows.
- Place hot glue on the bottom of the petal for the last layer so that the petal is slightly over the top of the cone. Pinch these petals together to make a point at the top of the cone.
Now you have an eye-catching Christmas decoration that will last for years! Experiment with cone size and glitter or faux leather colors to create a forest of glittering wonder!


More Crafts to Love
- Christmas Poinsettia Flower Mandala Tutorial – Christmas Card Craft
- DIY Pumpkin Pie Boxes – Thanksgiving Favor Treat Box Templates
- Giant Paper Sunflower Tutorial – Paper Flower SVG and PDF Printable Templates
- 3D Layered Paper Mandala Craft Tutorial – Sunflower Layered Mandala SVG File
- Cardboard Tube Crafts – 6 Clever Ways to Reuse Vinyl Cardboard Tubes
About Abbi Kirsten
Welcome to my colorful corner of the internet, where we play with vibrant crafts and unlock your creative magic! Hang out with me and get lost in a fun array of projects, tutorials, and products, from stunning papercraft ideas to flower templates, Cricut help for beginners, and endless crafter’s hacks.
Join the Member Vault and participate in my monthly Craft-Alongs in my Facebook group to access all the magic!