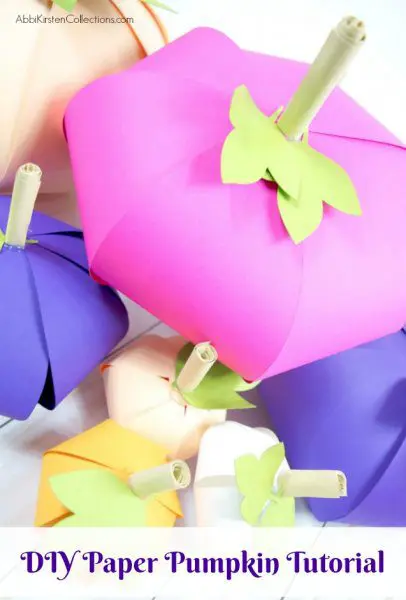
DIY Paper Pumpkin Craft With Cricut: Free Templates
This post may contain affiliate links that won’t change your price but will share some commission.
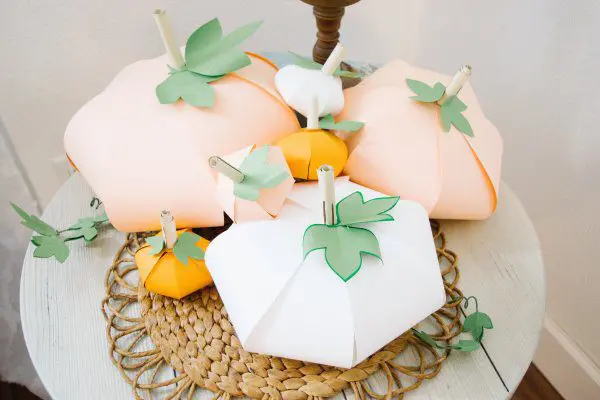
Happy (almost) fall y’all! Although, in my world, when Starbucks releases the beloved Pumpkin Spice Latte, it’s officially Fall. So, to celebrate one of the best times of the year we are going to do a few DIY Fall Decorations. Specifically, a Paper Pumpkin Step-By-Step DIY Tutorial. This is a super cute, fun craft for the fall that is simple, basic, and even something that little kids can manage to do.
In today’s tutorial, we have TWO sizes of pumpkins to choose from.
I am going to show you how to make a Mini Pumpkin first and then a Larger Paper Pumpkin design. If you are using a cutting machine, you can conveniently make these in a lot of different sizes, and the templates I provide come with (2) pdf files if you are cutting these by hand.
Paper Pumpkin Step-By-Step DIY Tutorial
Supplies
- 65-pound card stock
- Glue gun
- Scissors or cutting machine
- Wire (optional)
- 3D pumpkin SVG templates (download for free below)
Download the Free Paper Pumpkin Templates for Cricut
Download these free 3D paper pumpkin templates by signing up via the form below. I’ll send you an email to set your password and account up. If you already have an account, then log in and find it by searching the keyword “pumpkin” in the top search bar in the Vault.
DIY Paper Pumpkins Video Tutorial
If you prefer, watch the video for this Paper Pumpkin Step-By-Step DIY Tutorial. Turn your volume up for instructions! Or keep reading for a written tutorial.
Mini Paper Pumpkins With Cricut
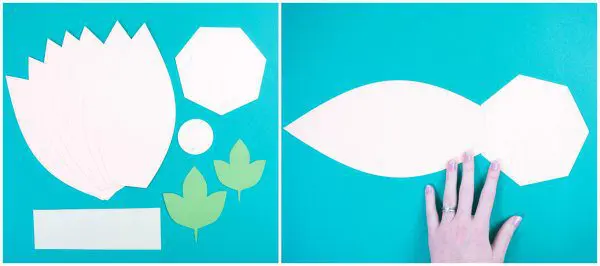
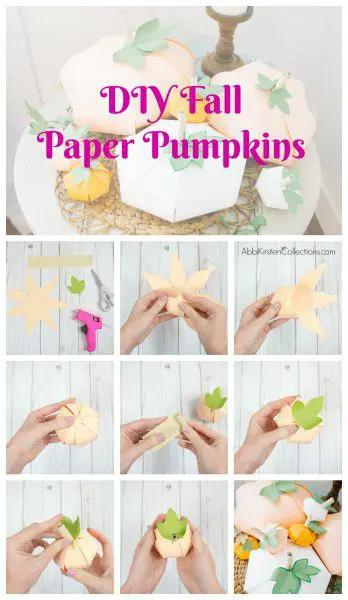
Cut out your templates. You will have the leaves, stem, and pumpkin.
Step 1

To get started making the pumpkin, you are going to choose one of the points and add glue. Overlap the point with one next to it and repeat the process with all seven sides of the pumpkin. For the last piece, it may not come together perfectly (don’t worry, pumpkins aren’t perfect anyway). Give it a little squeeze to make contact in the center, and it will pop back up. Set aside to make room for the stem.
Step 2
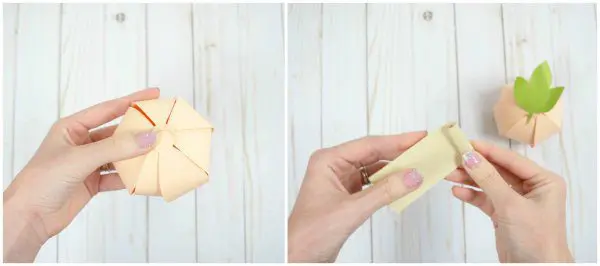
Your stem piece should be about 6 inches long and 1 ½ inch wide. Use your fingers to roll the paper all the way up until you achieve the desired thickness for your stem. You can add glue while rolling the paper to make sure it stays tight and won’t unroll. I like to make the top a little uneven so as to look more like a stem rather than a piece of paper, but that is optional.
Step 3

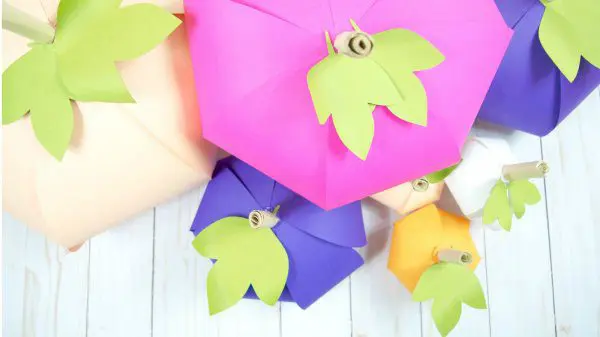
Next, take the two leaves (or three if you prefer) and glue each leaf on one side of the stem at the base. Fold each leaf out so that you create a base to add glue to in order to adhere it to the top of the pumpkin.
Step 4
Add glue to each leaf and the stem area and press it onto the top center of the pumpkin. Press your leaves down because that’s going to stabilize the stem. Give it a little push down, and it will pop back up. This will help the glue make good contact.
The mini pumpkin is all finished! Enjoy!
Extra Large Paper Pumpkin Craft
Cut out your templates:
- 7 pumpkin pieces
- 1-7 sided base
- 1-2 inch circle
- Your preferred number of leaves (at least 2)
Step 1
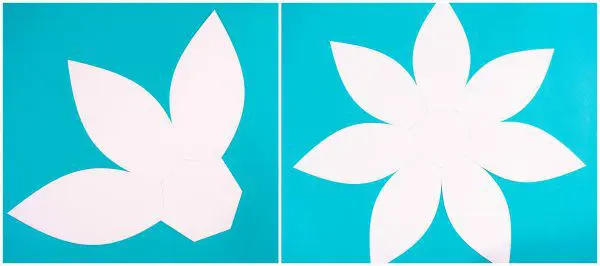
Glue each pumpkin piece onto each side of the 7-sided base. This will help keep it even so that when you fold and assemble, the pieces are as even as possible.
Each of the 7 sides represents a place where to glue each one of the pumpkin pieces onto. Pumpkins aren’t perfect by nature, so this does not have to be 100% perfect! I am a perfectionist, so I get it, but I try not to get too hung up on it.
Step 2
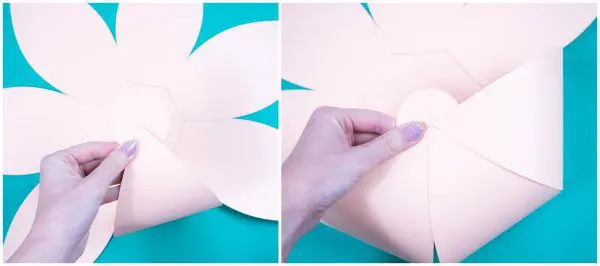
Take your circle template and fold each pumpkin piece up. Then add glue to place it onto the circle. Think of it like you are adding a slice of pie to the circle! You may notice when you get to the last couple of pieces, you may have to glue it slightly uneven, and that is fine! Make sure to hold the last piece for a second so that it doesn’t pop open. This is going to make the pumpkin authentic looking! Pumpkins are oval, squashed, and sometimes lop-sided, so it will be realistic.
Step 3

For the stem, you will need a six by 2 inches piece of paper. Simply repeat the process from the mini pumpkin.
Step 4
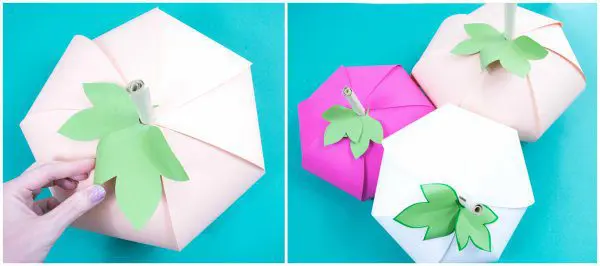
Repeat the process with the leaves, gluing 2 or 3 around the base of the stem. This will provide a solid foundation to add glue and stick to the top of the pumpkin. Remember to fold down the leaves!
Step 5 (optional)
Take a few pieces of wire (18/20/22 gauge) about 6-7 inches long. Twist a few of them together, even at different lengths, if you prefer. Fan them out a little bit and glue any extra leaves with the wire sandwiched in between the 2 of them. You can also wrap the wire around your finger to create a corkscrew vine coming off the branch of the leaves.
Once you are happy with the vine, loop it around the stem of the pumpkin, and you are done!
I hope this project makes it easy and exciting to go pumpkin crafting crazy! I can’t wait to see your creations!

DIY Paper Pumpkins
Let the DIY fall festivities begin! Create your own paper pumpkins with this easy step-by-step tutorial.
Materials
- 65-pound card stock
- Glue gun
- Scissors or cutting machine
- Wire (optional)
- 3D pumpkin SVG templates (download for free below)
Tools
Instructions
Mini Paper Pumpkins With Cricut
- Cut out your templates. You will have the leaves, stem, and pumpkin.
- Choose one of the points and add glue. Overlap the point with one next to it and repeat the process with all seven sides of the pumpkin. Set aside to make room for the stem.
- Your stem piece should be about 6 inches long and 1 ½ inch wide. Use your fingers to roll the paper all the way up until you achieve the desired thickness for your stem. You can add glue while rolling the paper to make sure it stays tight and won’t unroll.
- Take the two leaves (or three if you prefer) and glue each leaf on one side of the stem at the base. Fold each leaf out so that you create a base to add glue to in order to adhere it to the top of the pumpkin.
- Add glue to each leaf and the stem area and press it onto the top center of the pumpkin. Press your leaves down because that’s going to stabilize the stem. Give it a little push down, and it will pop back up. This will help the glue make good contact.
The mini pumpkin is all finished! Enjoy!
Extra Large Paper Pumpkin Craft
- Cut out your templates:
•7 pumpkin pieces
•1-7 sided base
•1-2 inch circle
•Your preferred number of leaves (at least 2) - Glue each pumpkin piece onto each side of the 7-sided base. This will help keep it even so that when you fold and assemble, the pieces are as even as possible.
Each of the 7 sides represents a place where to glue each one of the pumpkin pieces onto. - Take your circle template and fold each pumpkin piece up. Then add glue to place it onto the circle. Make sure to hold the last piece for a second so that it doesn’t pop open.
- For the stem, you will need a six by 2 inches piece of paper. Simply repeat the process from the mini pumpkin.
- Repeat the process with the leaves, gluing 2 or 3 around the base of the stem. This will provide a solid foundation to add glue and stick to the top of the pumpkin. Remember to fold down the leaves!
- (optional) Take a few pieces of wire (18/20/22 gauge) about 6-7 inches long. Twist a few of them together, even at different lengths, if you prefer. Fan them out a little bit and glue any extra leaves with the wire sandwiched in between the 2 of them. You can also wrap the wire around your finger to create a corkscrew vine coming off the branch of the leaves.
About Abbi Kirsten
Welcome to my colorful corner of the internet, where we play with vibrant crafts and unlock your creative magic! Hang out with me and get lost in a fun array of projects, tutorials, and products, from stunning papercraft ideas to flower templates, Cricut help for beginners, and endless crafter’s hacks.
Join A-Star Crafters and participate in monthly Craft-Alongs in our community Facebook group!


Where is the PDF template for the leaves & stem for the free mini pumpkin tutorial?? Clicking on the link in the blogpost only brings up the pumpkin template.
Please check the url again for the leaf. The stem is a simple rectangle, which you can cut by following the measurement provided in the post.