3D Paper Star Template: Paper Star Instructions and Free Template
This post may contain affiliate links that won’t change your price but will share some commission.
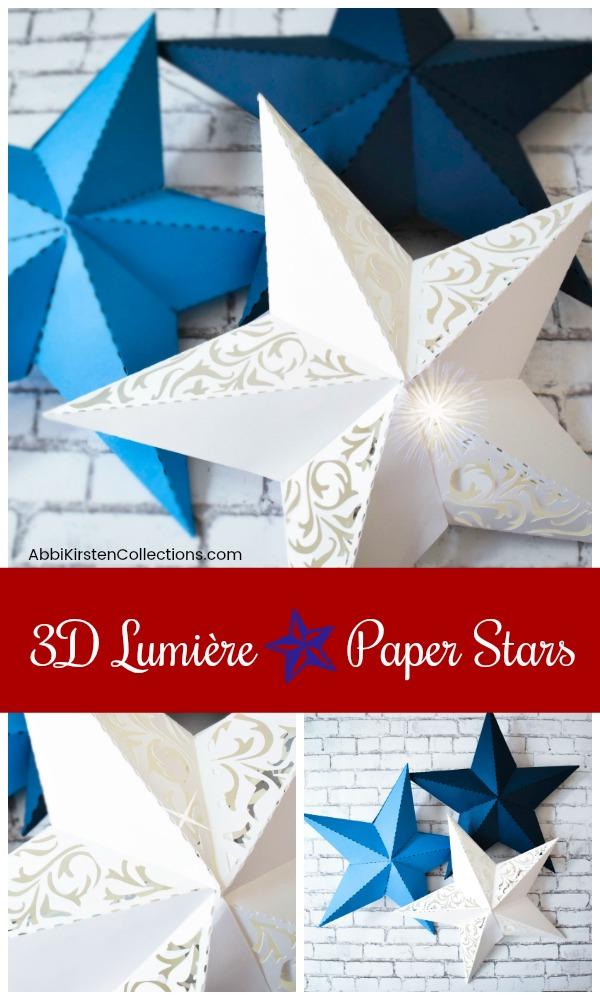
I recently spent a few days designing some 3D Paper Star Templates! These are totally cool. First, they are great for holidays like July 4th, Memorial Day, Christmas, and even parties, plus they make great nursery or home decor. Secondly, they are easy for anyone to make.
If you know me, you know that I am a paper flower fanatic. But lately I’ve had the desire to branch into new areas of paper design, so came about the 3D paper star templates.
While you cannot cut out the ornate detailed ones by hand, I have designed a printable PDF that will work for those who do not have a cutting machine. And that template is free to you today at the bottom of the post. 🙂

I’m going to show you step by step how easy it is to make these stars and provide you with a free printable and .svg file for those who have cutting machines. Plus I have a full video below to show you how to assemble them. Yay!
Related Posts
Easy Beginner’s Method When Making a Large Paper Flower
37 Inspiring Paper Flower Tutorials
How to Stem a Giant Paper Flower
3D Paper Star Template: Paper Star Instructions
Supplies/Materials
- Scissors and/or cutting machine (Cricut Explore Air 2 Machine)
- Glue Gun
- 65-pound cardstock ( I found my gold paper at Michael’s craft store!)
- LED lights (optional)
- Baker’s twine or yarn
- Hole punch
- Star templates
Download The Free Paper Star Craft Templates
Get the 3D paper star SVG templates for free inside the Abbi Kirsten Craft Vault! There are hundreds of other freebies waiting for you, too. If you do not yet have a free account, you can create one via the form below. Once logged in, use the keyword “stars” at the top search bar to find and download the templates.

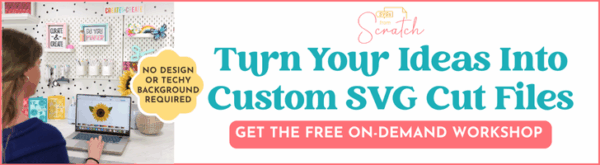
Step 1
Cut out 5 templates (no matter what design you are using). These will be the 5 points of the star.

Step 2
Fold along the dotted line. If you are using a cutting machine your dotted line will actually be cut out (creates a great light effect!).

Step 3
Glue the thin lip together with the other side of the star so it closes.


Step 4
Fold the 2 other lips down and out. Do this 4 more times so you have 5 points folded and ready to go.
 .
.
Step 5
You will now want to glue all 5 points together by adding glue or double side tape to the outside of the 2 lips we folded down and out. Then tuck them inside another star point.
 .
.
Step 6
Getting the last point to go in can be tricky. Try and be patience and work with it.
Update: One trick I found to make this easier is to actually glue in the last star point unfolded, then finish folding the point together like we did in steps 1-5 once you have it connected to the other 4 points. This approach gives more room for you hand to fit in and connect the star points.
 .
.
To hang your star you can punch a hole at the top of one of the points and string baker’s twine, ribbon or yarn through it.
I personally like to keep one of the lips open and slip in a LED tealight. That way I can reach in and out to turn it on and off! Or you could string these on some white lights and hang them up – they have many possibilities!
How you would use theses stars? Parties, weddings, July 4th? Share with me below in the comments!
Free 3D Paper Star Templates
Find your free star template in my craft template library! Download it in the holiday section.


Hi Abbi,
I love your creations!! Is it
possible to purchase the blue and white stars? I have downloaded the freebie and Thank You for that!!
Arlene
Hi, I currently am not selling any physical shipments but if you are looking for our other star designs to download you can find those here 🙂
https://www.etsy.com/listing/539067045/wedding-paper-lanterns-hanging-lanterns?ref=shop_home_active_4
https://www.etsy.com/listing/525254732/paper-star-lantern-svg-cut-files-diy-3d?ref=shop_home_active_16
Hello. Thank you for the instructions of making a star!
This is so creative! Thank you for the free template! I love your resource library. 🙂
Thank you so very much for the star instructions. I made them for my daughter’s “twinkle twinkle little star baby shower”. I made 7 large stars and will place them on the windows surrounding the room using suction cups. I purchased a small star punch at Michael’s and punched holes into each panel. I then took your template and scanned it into my computer. I then reduced in by 50 percent, which gave me a star that is about 6 inches in size. I glued a wooden skewer into the base of the star and I will insert into my centerpieces. I used Michael’s 65 lb. gold card stock. These stars have been so much fun to make – I love the look – thank you again!!!
Hi Rose! I am so happy to hear you are enjoying them! Your project sounds wonderful! 🙂
Hi, I love these! How big can you make them with a cutting machine? I want to hang them up on some string lights so maybe 18-24″ big.
Hi! If you use 12 x 12 cardstock for each star point cut out, they can measure up to 24 inches. 🙂
If you added a tea light, would this have to be a table top decoration, or is there a way to hang it with a light in it?
Yes, you could add a tealight! I have placed one on the inside before I add the last star point on and use double-sided tape to hold it on the inside center.
Thank you! They’re adorable!