DIY Sublimation Mugs: Free Stackable Mug Templates
This post may contain affiliate links that won’t change your price but will share some commission.

Sublimation is a printing process that starts with printing from a sublimation printer onto a special sheet of paper (sublimation paper) before transferring that image onto another material. In today’s tutorial, you will learn the complete process of sublimation on mugs. If you are new to sublimation, read my beginner’s supply and resource guide first! As a bonus, I will be featuring the Cricut Mug Press and how you can use Cricut Design Space to help you scale and cut sublimation projects.
Additionally, I am giving away 8 free Spring flower mug templates for you to enjoy!
Sublimation Mugs: How To Easily Sublimate On Cups and Mugs
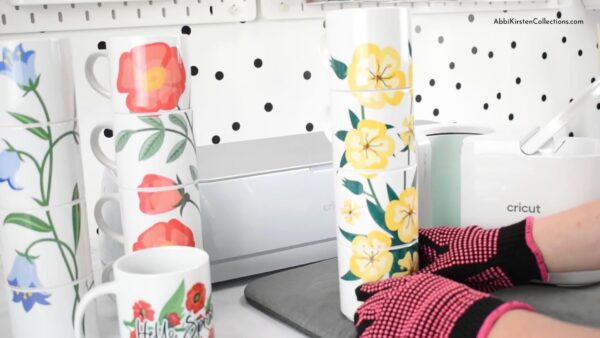
This sublimation tutorial will showcase two options. First, a traditional sublimation coffee mug, and second, my fun stackable mug design that creates a picturesque design when the mugs are stacked together. If you don’t want to go the stackable mug route, you can simply skip the parts of the tutorial that require repeating the same process over again for the other mugs.

Free Sublimation Mug Templates
I have a total of 8 FREE floral mug sublimation designs: 4 stackable designs and 4 traditional designs. If you want all eight of my designs, join the community and get them for free in the Craft Vault!
Enter your name and email below to set up a free account in the AKC Craft Vault and download these designs by searching design #512 or the keyword “sublimation!” Already joined? Log in and download the mug designs here!
You may also enjoy these other sublimation image options!
Included in the templates are both pre-sized PDF printables and PNG images. If you need to make size adjustments, you can alter the PNG images, which I will be doing in Cricut Design Space.
Quick note: While you’re not required to use Cricut Design Space, I’ve found that it’s an easier method. There are many benefits of using Cricut Design Space for sublimation crafts: you can upload PNG images, scale easily and accurately, and mirror them with one click. In the mug sublimation video, I will show you how to use Print Then Cut for sublimation and also how I cut these sublimation mug templates with just a straight cutter.

What Mugs Should I Use For Sublimation?
Let’s start with the supplies.
Are you wondering where to find blank mugs for sublimation? There are lots of websites online that offer many choices, including wholesale items. But the first thing to understand is that not all mugs can be used for sublimation. If the ceramic mugs were not created to receive the sublimation dye ink, then the process won’t work. Let’s review some of the best brands to buy for sublimating on mugs.
Where To Buy Sublimation Mugs?
- Cricut sublimation mug blanks
- Heat Transfer Warehouse (wholesale option)
- Amazon sublimation mug blanks
Note: You may have heard you can use sublimation on dollar tree mugs. In general, I do not recommend sublimating with dollar tree mugs because their transfer is either very light or won’t last.

Supplies To Make Sublimation Mugs
- Mugs (Make sure you have sublimation-ready mugs. I use the Cricut mugs; they have a stackable mug set)
- Sublimation paper
- Cricut Mug Press (you can use another mug press if you’d like)
- Heat-safe surface (something to set your mugs on while they’re cooling because they will be very hot)
- Uncoated butcher paper (protects the inside of the mug press)
- Heat-safe tape (keeps the design on the mug while you press it)
- Heat-safe gloves
- Alcohol cleaning pads (or rubbing alcohol and a cleaning cloth)
- Scissors, straight cutter, or cutting machine (If printing stackable mugs, you’ll need to trim along the inside of the light gray line after printing. The non-stackable mug designs are already mirrored for you; you’ll just need to trim inside of the black lines bordering the image.)
- Mug sublimation designs (free)
How To Sublimate On Mugs: Video Tutorial
Step 1: Printing and Cutting The Mug Templates
Cut out your design(s) with whichever cutting method works best for you, whether you choose to use the Cricut Print Then Cut process or just a straight cutter.
Using Cricut For Sublimation
I like to use Cricut for cutting my sublimation designs because the Print Then Cut allows for accuracy when cutting along the sublimation image. Plus, Design Space lets you scale in detail and mirror your design in one click.

To start, upload the PNG images to Cricut Design Space. Select Complex and then Continue two times.

Add the four designs to the Canvas. I like to stack all four designs on top of each other with the Align>Center tool and then resize them all at once. If you are using the stackable mugs by Cricut, the scale should be 8.75 inches wide by 2.89 inches high.
Repeat this process with the regular mug designs as well if you are not going with the stackable mugs. You may need to measure the size of your mugs.

Save your project and move to the cut screen by clicking on Make It. Use the Mirror toggle on the left-hand side to mirror any sublimation design that has text so it appears in the correct direction once transferred. The easy mirror function in Design Space is one of the reasons I love printing my sublimation designs through Cricut!

Send the images to your sublimation printer. Choose the material setting. I have found using the 24 lb copy paper setting works well for most sublimation papers.

Place your printed design onto a Cricut mat, press the double arrow button to load the mat, and press Go to proceed with the cut. Repeat for any remaining designs.
Cutting the Mug Templates With A Straight Cutter or Scissors
If you opted to use the PDF printables to cut these designs, I recommend leaving the scale set to “actual size” in your printer settings. Once the design has been cut, use a straight cutter or a pair of scissors to trim just inside the light grey line.

To make my stackable mug design, you’ll need to cut out all four pieces of the design. Place them in order on the surface in front of you, making sure the designs align.
Step 2: Prep Your Mugs With Rubbing Alcohol
Cleaning your surface before sublimating is super important so that nothing prevents your design from transferring beautifully on your mug(s). Prep each mug by wiping it down with rubbing alcohol, so the surface is ready to receive the sublimation ink. Let your mug(s) air dry for a few minutes before beginning.

Stack your four mugs on top of each other to keep them organized. Take the mug at the top and set it aside and begin placing the designs on working from the top down.
Step 3: Adding Heat Safe Tape To The Mugs
With the design facing the mug, wrap the paper around the mug. Pay attention to the placement of the handle and edges (you want the handle to be in the center of the design and the paper to come close to the edge without lining up right against it). Place your tape down to hold the paper in place; add tape wherever you feel it is necessary to keep a tight grip.

We’re working from the top down, so grab the next mug and piece of paper. You can line the paper up similarly to how you did with the top mug.
After lining up the paper on the second mug, grab the first mug again. Hold it on top of your second mug, and make sure the design is lined up! You should be able to see through the sublimation paper to ensure everything looks good!
If it’s not lined up, go ahead and adjust things. You want the mugs to look like continuous flowers. I’d recommend checking twice before taping down (don’t forget to look at your edges to ensure everything fits seamlessly before you tape).

Repeat the process with the rest of the mugs. The last step is to double-check your alignment. Restack the mugs to make sure everything is lined up correctly.
Step 4: Using The Cricut Mug Press For Sublimation
Power on your Cricut Mug Press which will take 4-5 minutes to heat up. Make sure the lever is up, and the mug press is sitting on your heat-safe surface.
Take your first mug and wrap some uncoated butcher paper around it before you slide it into the mug press (this step is generally good practice to ensure your mug press doesn’t get ruined by any sublimation ink bleeding).

Put on a heat-safe glove and slide your mug into the mug press at an angle. Push down your lever. The Cricut Mug Press will take a few minutes to press the mug and transfer our sublimation design onto the cup.
After the first mug in the stackable set is done, carefully take off the paper with a heat-safe glove. Set it aside on a heat-safe surface as it’s very hot. Repeat this process with the other three mugs until you have the stackable design completed!

Still wearing your heat-safe gloves, you can now finally stack your completed stackable mugs and admire your work!
There you have it! A complete beginner’s tutorial for sublimation on mugs. If you are brand new to sublimation, check out my in-depth list of the best sublimation supplies, blanks, printers, and more! Which of these floral designs is your favorite? Tell me below in the comments.