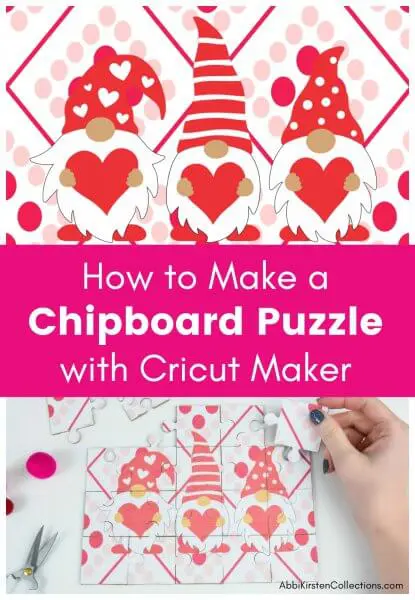
How to Make a Puzzle with Cricut – Free DIY Puzzle Template SVG for Cricut
This post may contain affiliate links that won’t change your price but will share some commission.
I’ve wanted to make a puzzle with my Cricut for a while now but honestly was worried about dealing with torn edges. I also wondered whether I could make a puzzle with my Cricut Explore as easily as with my Maker machine.
But my mission here is to always test and share my results, even if they’re a total fail! I also thought it would be fun to design and share a free Cricut puzzle template for you to enjoy – which you can grab below.
Torn Edges On Cricut Made Puzzles
When I started making my puzzle with Cricut, I tried chipboard first with my Maker machine and became very frustrated. No matter what I did, my image ended up torn, and ultimately, my puzzle was not pretty enough for keeping. 🙁
I also heard the frustrations of others who owned the Explore machine and wished they could make puzzles. However, the heavy chipboard doesn’t work with Explore, because the knife blade isn’t compatible. Explore users felt stuck.
Today I’m giving you a free Cricut puzzle template in both rectangle and heart shapes. Plus, I’ll show you how to make your own puzzle, whether you have an Explore machine or the Cricut Maker machine.
I’ll be using Kraft board with my Explore machine and chipboard with my Maker machine for my puzzles. If you want to discover all the materials Cricut can cut for you, read my post here.

For Explore Users
I will be teaching you how to cut your puzzle with Kraft board – a material still sturdy enough for puzzle-making, but that can be easily cut with the fine-point blade.
For Maker Users
You can use the Kraft board method mentioned above or heavy chipboard. I’ll also show you the two extra steps I take to make the puzzle turn out with SMOOTH TEAR-FREE edges!
How to Make Puzzles with Cricut Explore (Scroll Down for the Maker)
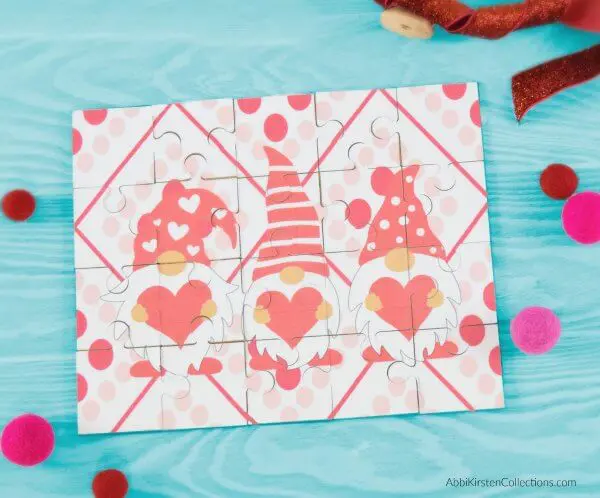
Let’s start with the Explore puzzle tutorial. Here are the supplies I used to create my gnome heart puzzles with my Cricut.

Supplies for Making a Puzzle With Kraft Board
- Kraft board
- Printable vinyl
- Explore (or Maker)
- Fine-point blade (comes with both Cricut machines)
- Cricut puzzle template, which is FREE when you sign up via the form below or log into your account here and search ‘puzzle.’
- Printer
- Image of your choice (gnomes files are included in my freebies)
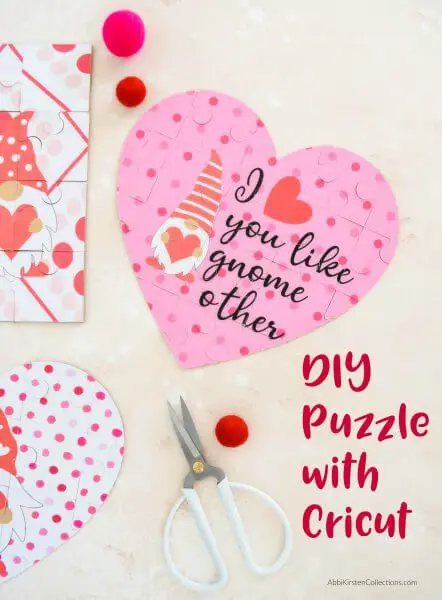
Cricut Puzzle Template Freebie
Download these free templates by signing up via the form below. If you are already a member, log in right here and find it by searching ‘puzzle’ or Design #52 at the top of the vault. Need help entering the vault? Read this helpful post here.
Once you have your supplies in hand, go ahead and watch the video below where I will show you exactly how to set up your template in Design Space and cut out the puzzle on Kraft board.
How to Make A Custom Puzzle with Cricut – Part 1
How to Make a Custom Puzzle with Chipboard Using the Cricut Maker
Okay, so obviously using the method above with Kraft board is quick and easy and can be done with the Explore or Maker. But what about using heavier chipboard for those who own a Maker?
You can make a puzzle with your Cricut Maker with the knife blade and use the Damask chipboard setting for the 1.5mm chipboard. Sounds easy, right?
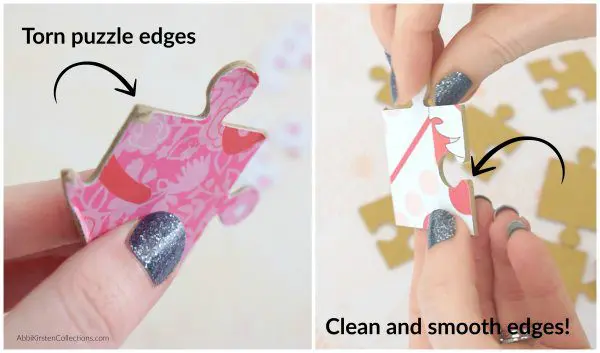
I tested this again and again only to find out that my image would tear because Cricut has to make 12-20 passes (depending on the thickness) to cut through the chipboard.
The result? A torn, tattered image and A LOT of wasted time. My printable vinyl just couldn’t withstand the stress.
So I thought, why not slice the image and cut the chipboard and printable vinyl separately? Then I could layer the vinyl on the chipboard puzzle pieces, just like we layer vinyl in so many other projects.
The result? An extra hour of work for a flawless puzzle cut from thick chipboard! I’m talking clean, crisp edges. Take a look at my picture below to see the difference (and the bad piece on the left was the best of the worst!).
Keep reading to find out what supplies I used to make the heavy chipboard puzzle and watch part 2 of my puzzle video to see how it’s done!
Supplies for Making a Puzzle with Chipboard
- Chipboard (I use the 1.5 mm by Cricut. I personally recommend you only use Cricut chipboard. I tested over half a dozen different brands and Cricut’s was the best simply because they designed it to work with their machines.)
- Printable Vinyl
- Cricut Maker
- Knife blade
- Printer
- Cricut puzzle template, which is FREE when you sign up via the form below or log into your account here and search ‘puzzle.’
- Image of your choice (gnomes files are included in my freebies)
Get these puzzle templates and my gnome images when you sign up below!
How to Make a Custom Puzzle With Cricut – Part 2 (Maker Only)
FAQs about Cutting the Chipboard Puzzle
Q: How do I make sure my chipboard pieces are being matched to the right vinyl piece?
A: First, if you use my puzzle templates, they should match up pretty effortlessly without keeping serious track piece by piece. However, if you are using another puzzle template or worry about this, you can still arrange the pieces as I suggest in the video, but if you want to keep track then arrange them in the order you slice the pieces from the puzzle and use your “ATTACH” tool to make sure they remain the same on the cut screen as they show on the canvas. Once cut out, just follow your canvas as a guide, piece by piece.
Q: Why can’t I cut the puzzle from the chipboard assembled together? Why do you want us to arrange the pieces undone?
A: The reason this is so important is that Cricut will have to make many passes around each piece. If the puzzle is together, that means where the puzzle pieces touch, they will receive double the amount of needed passes; therefore, you will still end up with ripped, torn edges. Watch the video above for more explanation.
Q: How much extra time did this take over the Kraft board method above?
A: All in all, the time it took to slice my image into the puzzle pieces and layer my vinyl on top of each piece was about an hour more. To me, one extra hour of work is well worth a clean, neat puzzle!
Have another question? Kindly leave a comment below and I will be happy to help!

More Crafty Goodness!
- How to Make A Paper Cactus: Prickly Pear, Aloe Vera, and Ferocactus
- DIY Cali Poppy Paper Flowers
- Make Fruit Pop-Up Cards With Cricut
- Butterfly and Bug Shadow Boxes
- Make A Spring House Explosion Treat Box
Wanna be a Cricut Master and learn to create your own craft design files like me?
Do you own a Cricut machine or want to own a Cricut but maybe you’re overwhelmed when you look at the Design Space software and feel lost with all the functions?
Maybe you wish you could create your own design files rather than being forced to spend money on every design for each project you make?
Let me share with you the 3 biggest mistakes Cricut crafters make and my proven steps to not only master your Cricut but also transform yourself into a craft designer!
If that sounds like it’s for you, be sure to join me here in my FREE masterclass!


Can the vinyl image be kept together instead of slicing them in the maker? Because the material is vinyl, it should only do one pass and you kept them together in the explore video
You can keep the image together if you like but I have found that even the kraft board can require a heavier pass which could cause tearing on the image. 🙂
I am new to the Cricut Maker world, but concerning “How to Make a Custom Puzzle – Part 2 (Maker Only)” Why can’t you just cut the puzzle without cutting the picture and then once the puzzle is cut WITH OUT Unloading apply your picture and press cut, canceling after the first pass?
That’s worth a try! There is a chance it could still tear since the sticker will not be as smooth with all the cuts underneath it could catch in a weird way. Let me know if you try it! 🙂
Hi I need help!! So I am trying to do something similar, but with 1000 piece puzzle divided across 8 sections to make it fit. I’ve already done the logistics of how many pieces per sheet and how to splice the image and everything. But every time I’ve tried to cut the puzzle out, the Cricut cuts around the line Instead of cutting along the line itself. I’ve tried making the line super thin and it didn’t help. It still just preserves the line instead of cutting along it. Any tips??
That sounds like whatever puzzle template you are using is not formatted correctly. You may want to try using a different puzzle template and do a test cut on some pieces before moving to the project in full. 🙂
i am a newbie so pardon the dumb question but am i supposed to print it out before cutting with cricut?
Hi! Yes, for this project you would print through Cricut design space on your printer and then cut. 🙂
I need to make a puzzle in the shape of the state of nevada. How do I make a custom shaped puzzle? Please help! Haha
Hi! To make a custom shape template I would download the rectangle puzzle and then choose an image of your state. Once both have been imported to Design Space you can use the Slice tool to cut out the state shape from the puzzle.
Would it be possible to mod podge an image onto the chipboard before cutting? Instead of using vinyl?
You could give it a try! I am not sure how that would work since I haven’t personally tried it. 🙂