How To Use Cricut Design Space: Get Started With This Simple Cake Topper Craft
This post may contain affiliate links that won’t change your price but will share some commission.
How to Use Cricut Design Space: Start With An Easy Craft
If you’re brand new to Cricut or thinking of buying one, you may have some questions, like how to use Cricut Design Space, the software that operates a Cricut machine. Cricut Design Space works with all the current models of Cricut, including the Explore series, the Makers, and the Joy models. And while the process can initially feel overwhelming, I promise using a Cricut machine is not complicated. It just takes practice as you work through a few simple and straightforward tutorials. And as you begin with several easy crafts.
Not only has Cricut been the best investment for my creative journey, but I’ve learned how to enhance my craft skills in new ways. Check out all my Cricut tutorials to see even more possibilities owning a Cricut can bring you.
How Much Does Cricut Design Space Cost?
I get asked weekly in my community from new Cricut owners if you can use Cricut Design Space for free. The answer is yes! Cricut Design Space is completely free. There’s no cost to play around and use all the basic tools inside of Design Space. Cricut even offers several free shapes that you can use to design. Additionally, Cricut offers limited free images each week in its ever-growing image library.
The Benefits of Cricut Design Space & Cricut Access
Design Space is totally worth learning because you will master all the possibilities of your Cricut machine. But what about Cricut Access: Cricut’s image library subscription of over 250,000+ designs? Ultimately, this is a personal decision, but some of the benefits to consider as a Cricut Access subscriber are:
- Access to all Cricut images (over 250,000 and counting)
- Design with the Monogram Maker
- Access to over 700+ premium fonts
- Create unlimited collections which are used for organizing your saved projects
- Discounts on Cricut materials or exclusive offers
- You can join annually or try it out for a monthly fee and cancel anytime

How To Use Cricut Design Space To Make a Cake Topper Craft Tutorial
The best way to learn how to use Cricut Design Space is by practicing the tools and functions. Let’s walk through a very easy beginner-friendly paper craft, a cake topper, to demonstrate how you can easily get started in Cricut Design Space.
First, let’s cover supplies and the setup in Cricut Design Space.
Easy Cake Topper with Cricut Supply List
- Cricut machine
- Foil poster board
- Glitter cardstock or regular cardstock
- Bearly Art glue
- Scissors
- Brayer
- Cutting mat
- Hot glue gun
- Floral picks or bamboo skewers
- Acetate sheet
How to Make Cake Toppers With Your Cricut: Video Tutorial
Step 1: Install Cricut Design Space
Before we can make our cake topper with Cricut, we need to install Cricut Design Space. If you haven’t yet, download Cricut Design Space on your desktop computer. Set up an account by creating a Cricut ID (name, email, and password). You can also download Design Space for iOS and Android devices.

Step 2: Log in To Cricut Design Space
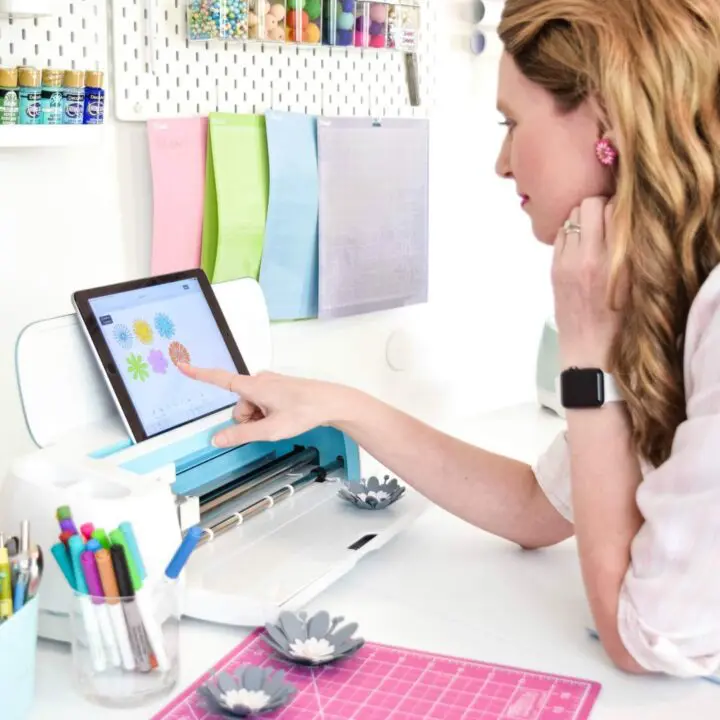
Once logged in, you will land on the home screen of Cricut Design Space. Click on New Project at the top right to create a new Canvas.

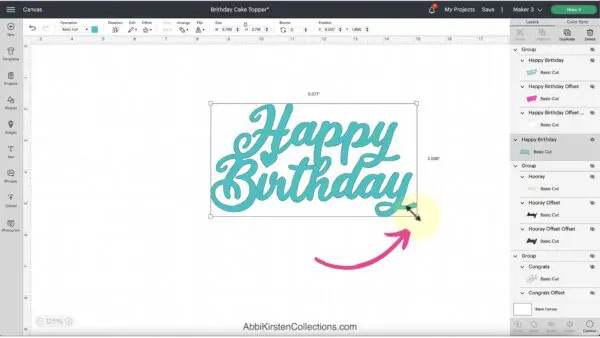
Step 3: Find An Image
Let’s get started with our easy happy birthday cake-topper with Cricut. You will need to find an image from Cricut. Cricut has several free options, and if you subscribe to Cricut Access, you will be able to choose anything from the Cricut image library.
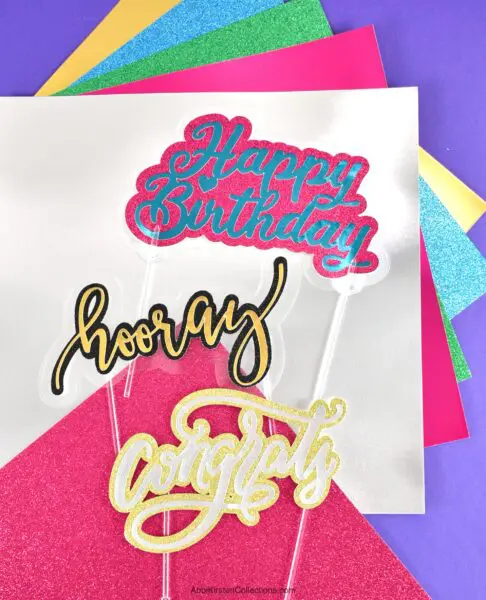
Click on the image’s tab and type in a keyword such as cake topper, birthday, congrats, or any occasion-specific phrase. The images I used for this project are listed below. You can search them under the Images tab on the left side of the canvas.
- Happy birthday design: #MB157B09
- Hooray design: #M9A31DE
- Congrats design: #MC1FB3C0
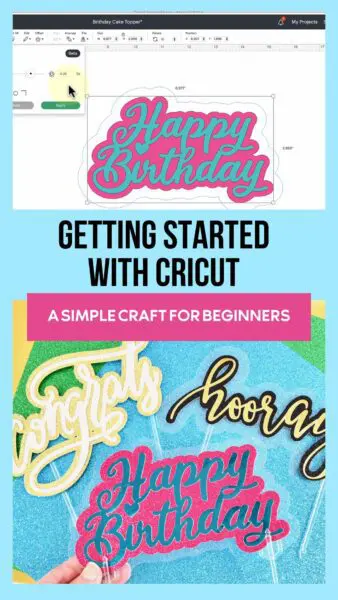
Step 4: Scale your Design

The first step is to scale the image to your preferred size. I will be adding an offset here, so I plan to have my happy birthday start at about 6.5 inches wide. To scale, hover and pull at the corner of any selected object on the canvas to increase or decrease the size.
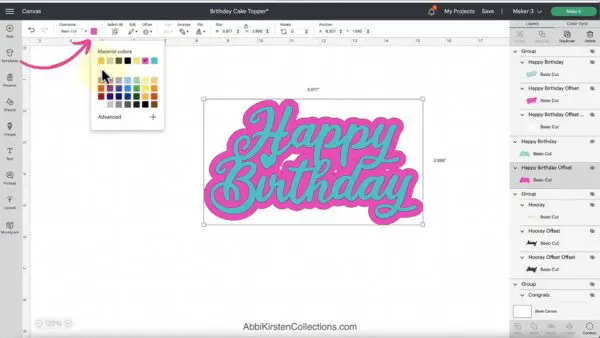
Step 5: Add an Offset
Click on your image and then select the Offset tool in the top main edit bar (slightly to the left). I like to set my offsets to about 0.20. Click on Apply, and the offset will be added to your design. Select the new black offset layer and change it to another represented color if you wish. Mine will be pink.
I’m going to repeat once more, adding an offset to the existing offset. This time I chose 0.35 of an inch for my offset size.
Step 6: Remove Contours From the Offset
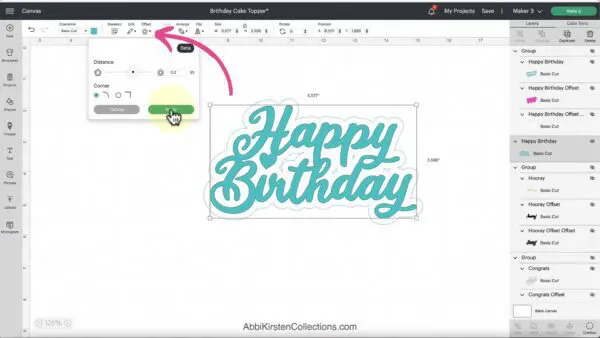
If your offset results in any strange remaining cutouts, you can eliminate them by clicking the Contour button at the bottom right of the Layers Panel. Select Hide All Contours, and it will eliminate those extra pieces. Close the box, and the result is now present on the canvas.
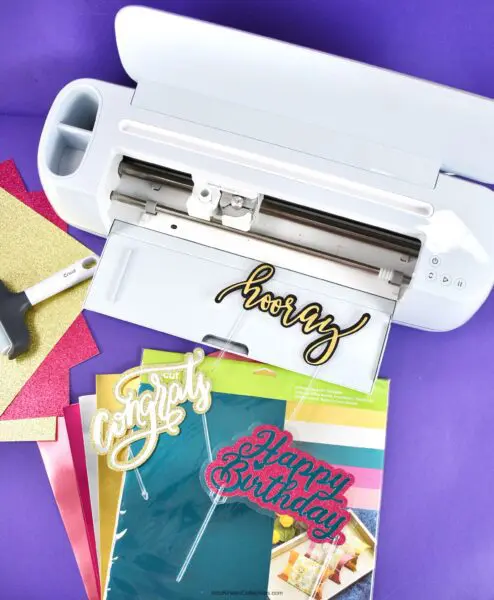
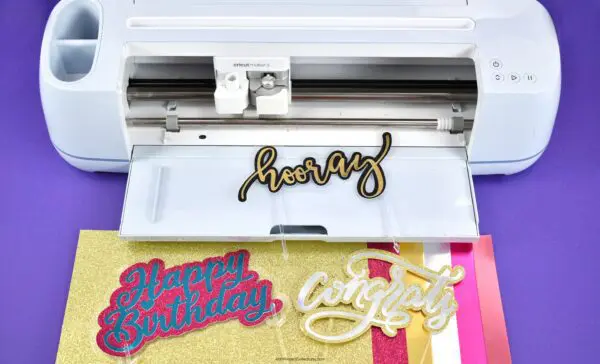
Step 7: Cut The DIY Cake Topper
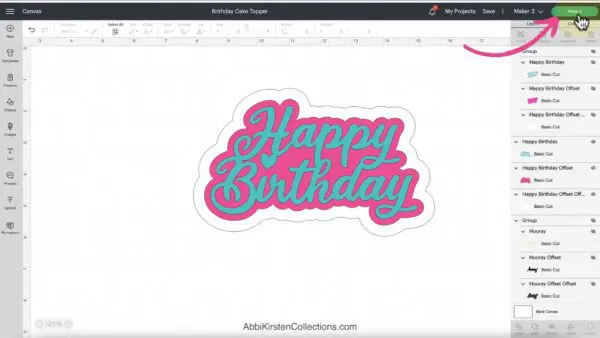
To send the images to the cut screen, click the green Make It button at the top right of the canvas to move to the cut screen. Select Continue at the bottom; make sure your Cricut machine is powered on. You can connect via Bluetooth or use the USB cable to plug your machine into your computer.
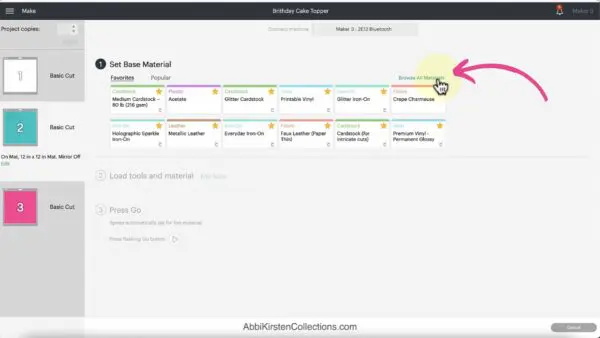
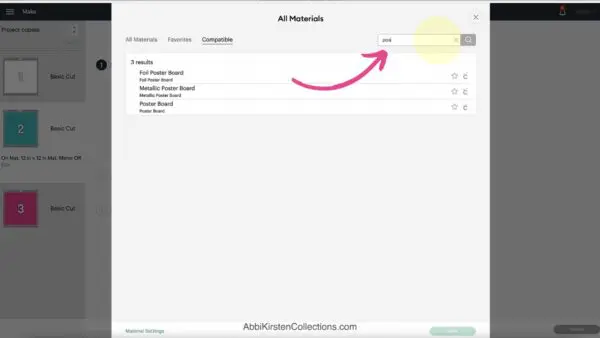
Once your Cricut is connected, the material settings become available. Select the corresponding material. Browse All Materials and choose the type of paper you are using. For me, I search the Cricut Foil Poster Board for one mat, Cricut Glitter Cardstock for the other, and Acetate for my last mat.
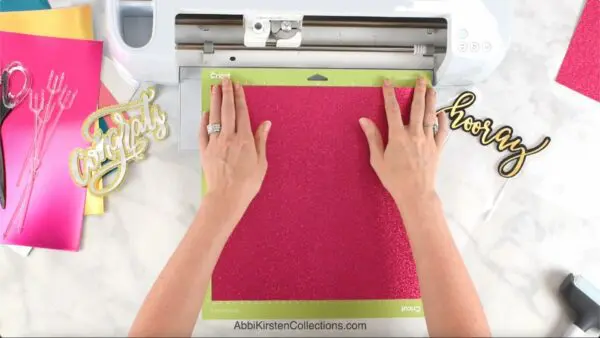
Place your material onto your cutting mat. I am using the standard green mat, but the light blue can work too.
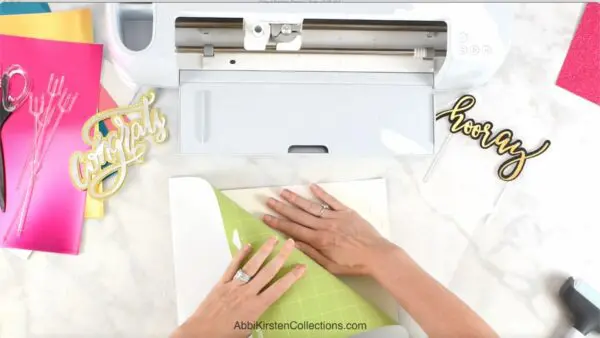
Push the flashing arrow button to load the cutting mat while pressing it against the rollers. Cricut will scan your mat to ensure it is long enough and there is proper space behind the machine. Once complete, the play or Cricut C icon will begin to flash. Press this to proceed with the cut.
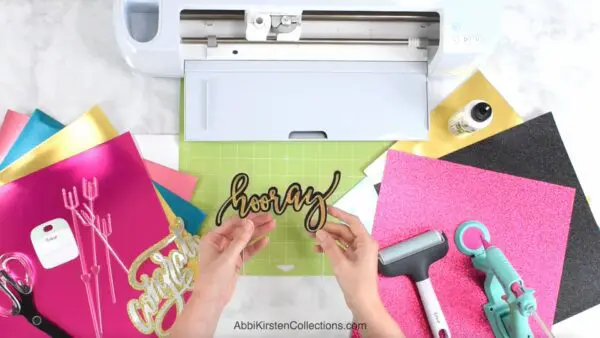
When the cut is complete, unload and flip your mat face down. Peel the mat away from the material to eliminate excessive curling.
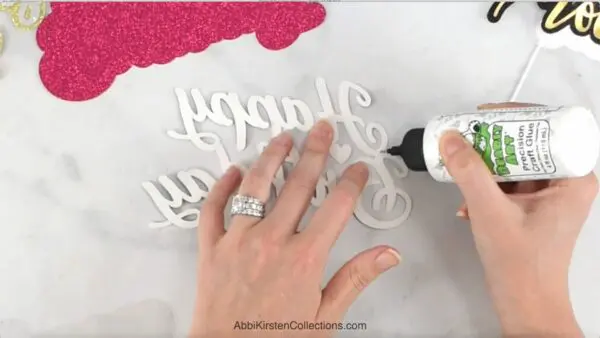
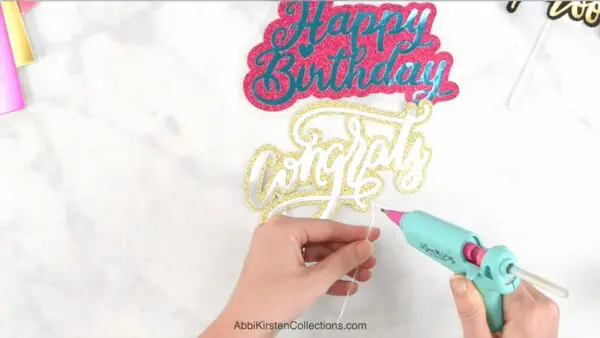
Step 8: Assemble Your Cake Topper
To assemble your easy cake topper, flip the top design over and apply a little glue. I use Bearly Art glue, but other brands or scrapbooking tape can also be used. Line up the design and press the layers together.
Repeat the last step if you added a third layer, as I did.
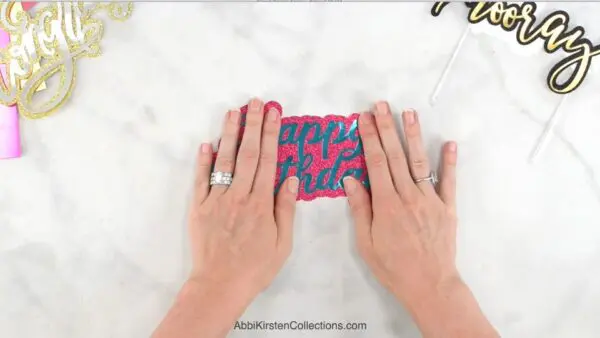
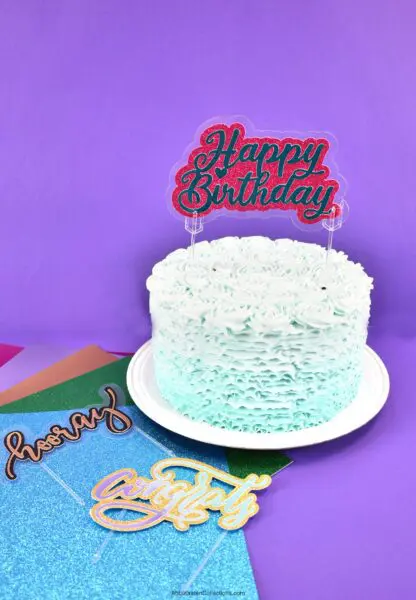
The last step is to add either your bamboo skewers or clear floral picks to the base of the cake topper. I use hot glue or liquid glue to connect the floral picks to the backside. If you wish to go glue-free, then just thread the topper onto the floral pick like a card, and you have now made a personalized cake topper for your next party.

Your easy Cricut cake topper is complete! This is just one of the hundreds of creative ideas you can make with your Cricut machine. What questions do you have about using your Cricut? What help do you need in Cricut Design Space? Tell me in the comments, and I’ll be happy to help you.
How to Use Cricut Design Space to Make a Cake Topper
Create a simple cake topper while learning how to use Cricut Design Space!
Instructions
- Download Cricut Design Space on your computer. Set up an account by creating a Cricut ID (name, email, and password). You can also download Design Space for iOSand Android devices. Install Cricut Design Space.
- Once logged in, you will land on the home screen of Cricut Design Space. Click on New Project at the top right to create a new Canvas.
- Find an image from Cricut. Cricut has several free options, and if you subscribe to Cricut Access, you will be able to choose anything from the Cricut image library. Click on the image’s tab and type in a keyword such as cake topper, birthday, congrats, or any occasion-specific phrase.
- The first step is to scale the image to your preferred size. I will be adding an offset here, so I plan to have my happy birthday start at about 6.5 inches wide. To scale, hover and pull at the corner of any selected object on the canvas, you can increase or decrease the size.
- Click on your image and then select the Offset tool in the top main edit bar (slightly to the left). I like to set my offsets to about 0.20. Click on Apply, and the offset will be added to your design. Select the new black offset layer and change it to another represented color if you wish.
- I’m going to repeat once more, adding an offset to the existing offset. This time I chose 0.35 of an inch for my offset size.
- If your offset results in any strange remaining cutouts, you can eliminate them by clicking the Contour button at the bottom right of the Layer’s Panel. Select Hide All Contours, and it will eliminate those extra pieces. Close the box, and the result is now present on the canvas.
- To send the images to the cut screen, click the green Make It button at the top right of the canvas to move to the cut screen. Select continue at the bottom and make sure your Cricut machine is powered on. You can connect via Bluetooth or use the USB cable to plug your machine into your computer.
- Once your Cricut is connected, the material settings become available. Select the corresponding material. Browse All Materials and choose the type of paper you are using. For me, I search the Cricut Foil Poster Board for one mat, Cricut Glitter Cardstock for the other, and Acetate for my last mat.
- Place your material onto your cutting mat. I am using the standard green mat, but the light blue can work too.
- Push the flashing arrow button to load the cutting mat while pressing it against the rollers. Cricut will scan your mat to ensure it is long enough and there is proper space behind the machine. Once complete, the play or Cricut C icon will begin to flash – press this to proceed with the cut.
- When the cut is complete, unload and flip your mat face down. Peel the mat away from the material to eliminate excessive curling.
- To assemble your easy cake topper, flip the top design over and apply a little glue. Line up the design and press the layers together. Repeat the last step if you added a third layer, as I do.
- The last step is to add either your bamboo skewers or clear floral picks to the base of the cake topper. I use hot glue or liquid glue to connect the floral picks to the backside. If you wish to go glue-free, then just thread the topper onto the floral pick like a card.


What thickness of acetate sheets do you use?
Thank you!
4 ml 🙂
when applying the acetate, can you see the glue through it?
Good question! The glue dries clear so that is not a problem. 🙂