Cricut Design Space Software Updates: What You Need To Know
This post may contain affiliate links that won’t change your price but will share some commission.
To make it easier and more fun to create with Design Space, Cricut makes changes and upgrades to its features. Today, I’m sharing the most recent Design Space updates and how to use them.
We’ll only cover the big bites here. If you want the full scoop on all the changes (like small enhancements and bug fixes), you can click Release Notes here on Cricut’s help site to find all the details.
Be sure to bookmark this page so you can check back for any new Design Space updates.
So you may be thinking…How do I find the version of the Design Space software I have?
Let’s start there…
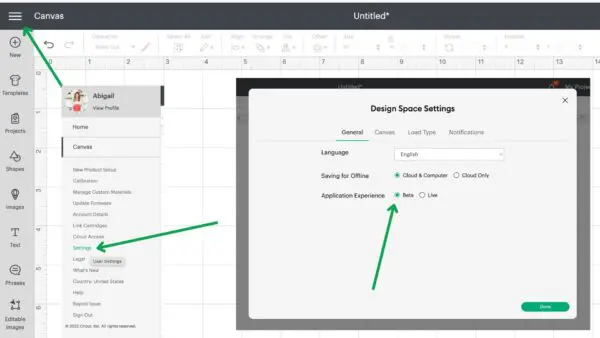
To find out what version you have, open Cricut Design Space and then look at the top middle of the screen for the version number.
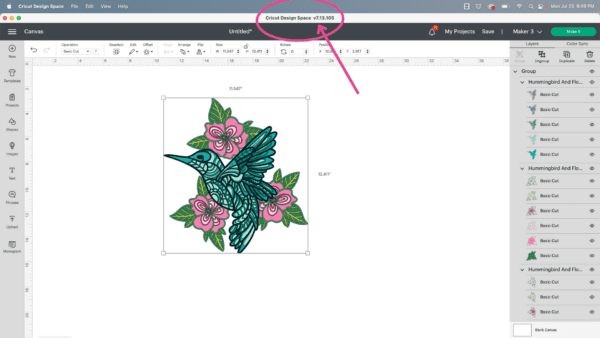
Don’t worry if your version is not the most current shown here; it takes a bit of time for everyone to receive the latest version. If you go to the three lines at the top left of the Design Space canvas, then click settings, make sure you have Beta selected, and you will be in line to receive the newest updates first!
For more help, Cricut has an amazing team at help.cricut.com that will help with any software issues.
Design Space Updates
- October 2022 Cricut Design Space Updates (V7.20 and V7.21)
- July 2022 Cricut Design Space Updates (V7.13)
- July 2022 Cricut Design Space Update (V7.12)
- June 2022 Cricut Design Space Update (V7.110
October 2022 Cricut Design Space Updates (V7.20 and V7.21)
Editable Images
Cricut has added a new library of images that can now be customized with personal details.
To find these new images open a new Canvas in Design Space, and to the left, in the Design Panel, you will see a new button option called Editable Images.
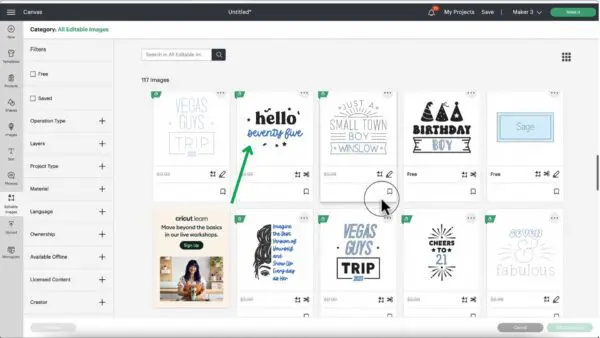
Click on the new Editable Images button and select one of the options. I am choosing the Hello Seventy-Five SVG.
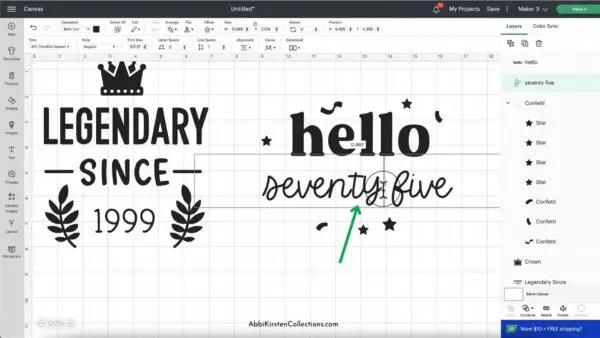
In this example, I was to be able to change the age from seventy-five to twenty-five. First, Detach the images using the Detach option a the bottom of the Layer’s Panel to the right. Then Ungroup the image using the Ungroup Icon at the top right (you can also right-click and select Ungroup).
Hover over the words, double-click seventy-five inside the text box, and replace the words by typing out what you wish to have.
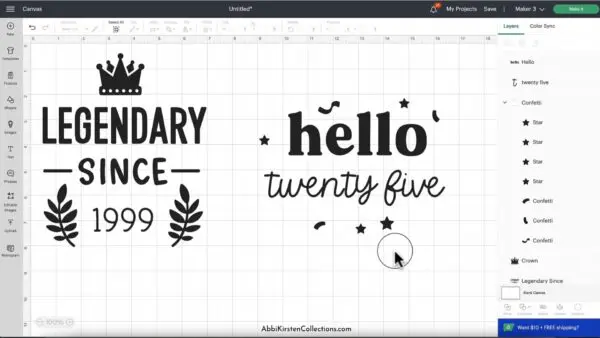
One thing to note is Editable Images only lets you edit the personalized information that needs to be customized in the design. Meaning the word Hello cannot be edited.
All in all, this is a great new addition to Cricut Design Space, and I am sure Cricut will continue to add more editable images!
Combine Tools and New Layer’s Panel Update
Another exciting update from Cricut! These new Design Space updates include a new selection of functions called the Combine Tools! The combine tools are present where the weld function was. Don’t worry the weld is still there. Now you just have to click on the little drop-down arrow now to reveal the weld and all the combine tool options.
What makes this update so exciting is that these tools, unite, subtract, intersect, and exclude, follow a more traditional graphic design model. This means Cricut is taking steps to make Design Space an independent graphic software option for creators. If you have ever used Inkscape to make your own SVG files, you will recognize these functions!
Unite Tool
Have you ever wished for the option to change a welded design after you have closed out your Design Space? Now you can with the unite function! It works exactly the same as weld, but it’s reversible at any time!
You can select two or more objects, click the combine button at the bottom of the layers panel, then choose unite. Unite will remove the overlapping cut line to make one object.
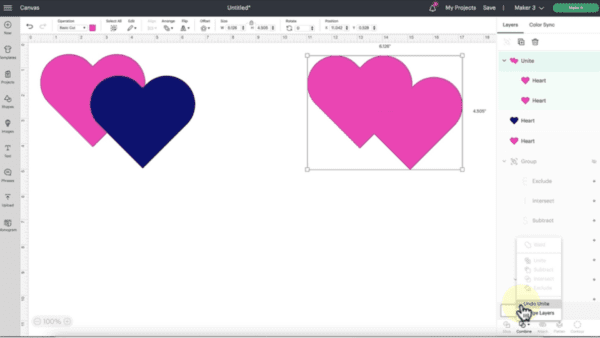
Now, in the layers panel, you can see the word unite present for these two hearts that are sitting underneath the united result. That means that the two hearts have been united to create the united result above it. What that also means is you can undo this function. So when you click on the combined result, you can still select the combine tool and then select the undo unite option from the drop-down menu to go back to your original separate hearts.

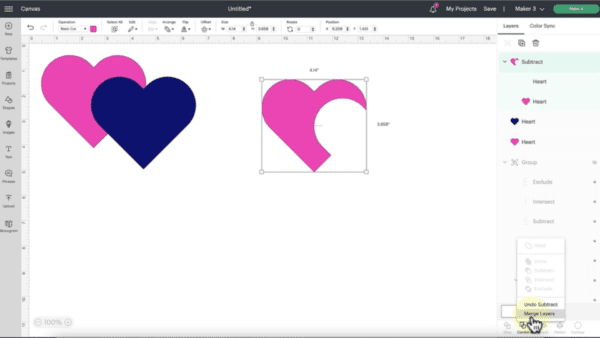
Subtract Tool
Next, in the new combine tools, you will see the subtract function. The subract tool works with two or more overlapping items selected. Using subtract cuts out the overlapping shape. Whatever shape is sitting on top, in this example, the navy heart is going to be sliced out of the bottom shape.
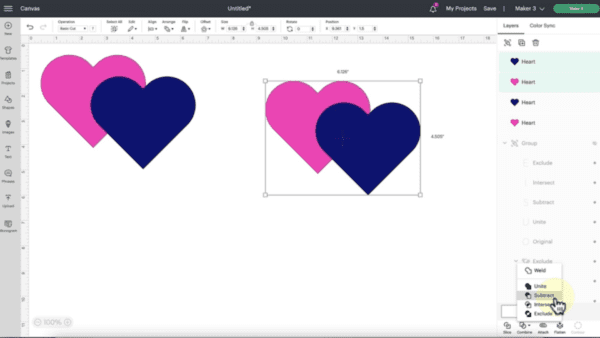
So here, for our example, we see that the navy heart has been subtracted from the pink heart. In the layer’s panel, we can see that we have a subtracted result. Then we have the original the navy heart that was on top now hidden.

Undo subtract at any time by clicking on the combine button and then selecting undo subtract from the drop-down menu.
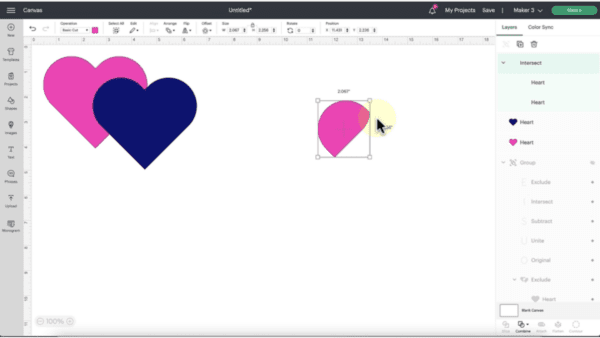
Intersect Tool
If we select both hearts and click on intersect, that’s going to produce whatever result is the overlap. Only the common space where these two hearts overlap will result from our intersect tool in this example.
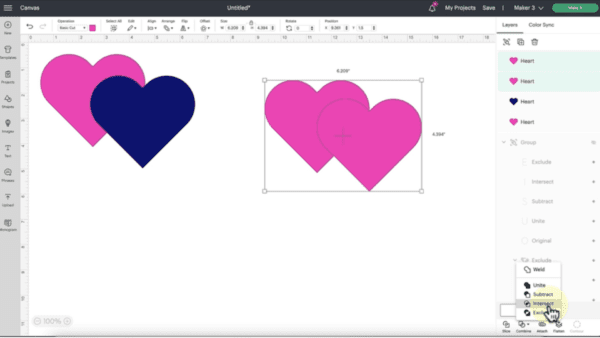
In this example, we have a remaining awkward piece of the heart left because that’s the intersecting and overlapping piece. Again, in the layers panel, we can see that we have that intersecting result and the two original hearts. You can go back to that combine and undo the intersect at any time.
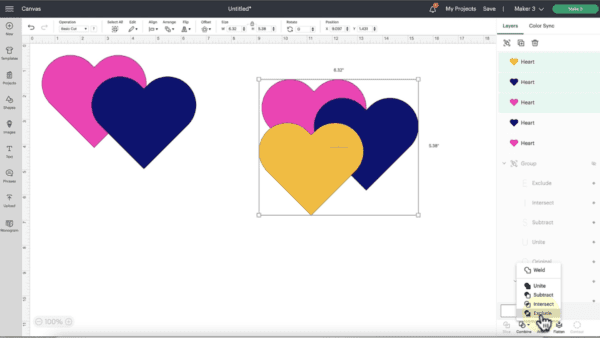
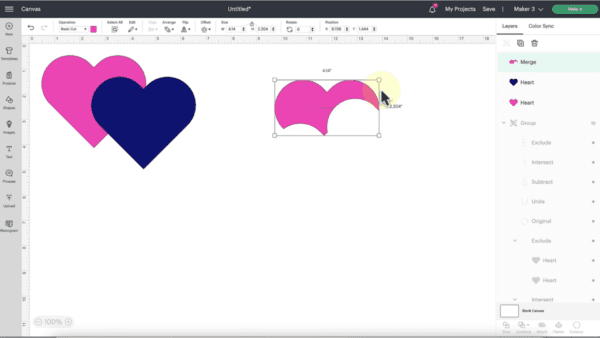
Exclude Tool
To exclude, select two or more objects and then click the combine button. Choose the exclude option from the drop-down menu, Design Space is going to slice out the overlapping area and exclude that piece from the overlapping design.

Likewise, the layers panel will show the excluded result and then the layers underneath from which that result was produced.
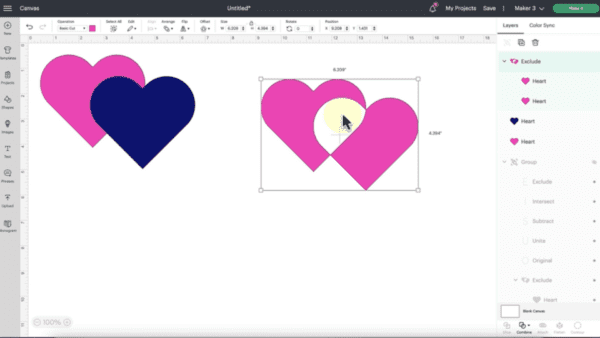
You can undo the exclude tool at any time by clicking on the combine button and then selecting undo extract from the drop-down menu.
How Are these tools different from the Slice Tool?
Some of you might be wondering how these new tools stand apart from the slice tool when a couple of them produce similar results. Unlike slice, all of these combine functions can be used with more than two objects selected! The combine tools also allow for a more specific control, and I have noticed they work faster than the slice tool.
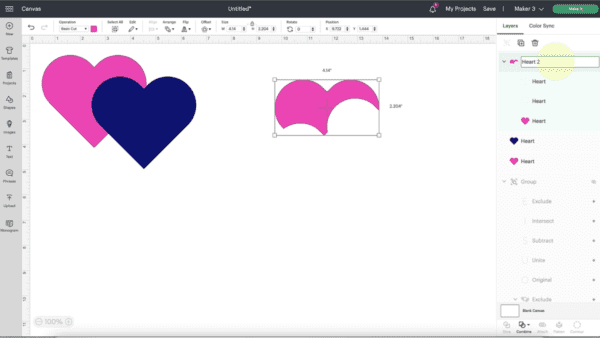
Merging Layers
These new Design Space updates include the ability to condense the additional sub-layers in the layers panel by merging layers together. First, select the object you want to merge, click on the combine button, and select merge layers from the drop-down menu to condense the layers.
If you click on any of these sub-layers before merging, you’ll see an outline guide of the original layers before you use one of the combine tools. This feature is helpful for adjustments.
Once you merge layers, that essentially makes it more permanent on your canvas. If you’re not sure you want this to be the end result, then don’t merge your layers yet. Even if you close out the saved project and reopen it later, you can still undo the combine tools so long as you have not merged. However, if you are ready to tidy up your layer’s panel and eliminate some of these extra sub-layers, merge is the best option.
Notice when you have the merged result selected, the combine function is no longer clickable, which means you can’t go and undo the combine tool action now that the layers are merged.

The most important thing with merge is don’t use it unless you’re sure that you are happy with the final results.
Naming Layers
You can also name the layers and sublayers to customize them more. Double-click with your mouse and type in whatever name we want to give that layer. If you later choose to combine the layers for that object, you will need to rename the merged layer again.
July 2022 Cricut Design Space Updates (V7.13)
Bookmarking Fonts
One of the recent updates I’m most excited about is the ability to bookmark my favorite fonts! No more searching through page after page of fonts for your favorites or trying to remember the names of the fonts you like to use; just bookmark your favorites, and you’ll be all set!
To bookmark a font, click the Bookmark icon, and the bookmark icon will change color to show that the font is bookmarked.
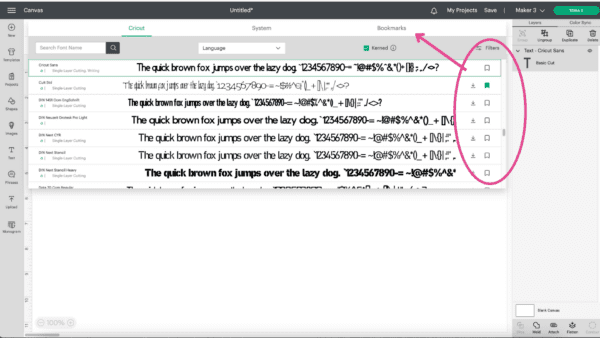
To find your bookmarked fonts from the Canvas screen, click on Text, then click the Font selector, and then click on the Bookmarks tab on the far right.
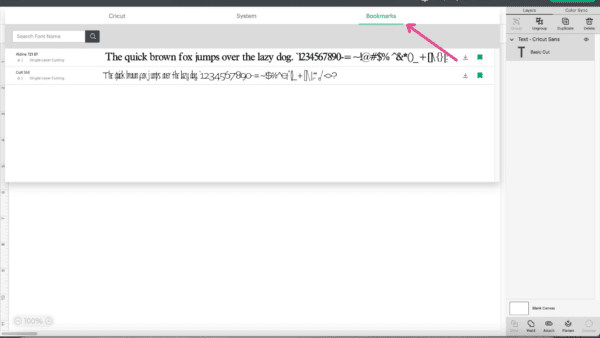
Remember: The system fonts you bookmark will only be saved on that device.
July 2022 Cricut Design Space Updates (V7.12)
Keyboard Shortcuts
These shortcuts will help you create faster by simplifying tasks to a few simple keystrokes. Download a printable cheat sheet of the keyboard shortcuts. So you can learn them easier, the keyboard shortcuts are also listed after the menu items.
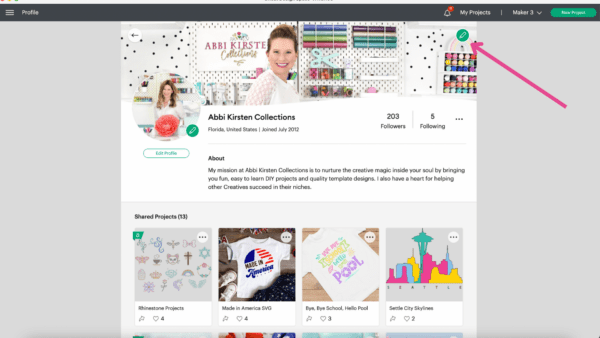
Profile Banner
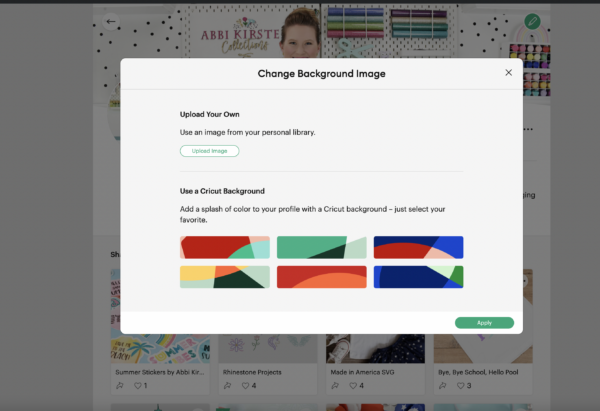
Show off a little with the new background image on your profile! Choose from one of the pre-designed banners, or upload your own image that reflects your personality and style.
From the Home screen, click View Profile, and then click the edit icon on the profile banner.
Choose a pre-designed Cricut banner or upload your own image using the upload image button.
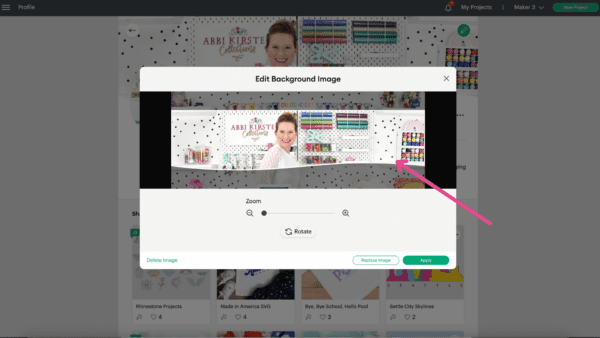
Time to play! Have fun expressing your own style by zooming in and rotating the image. When it’s just the way you want, click Replace Image and then click Apply to set your changes.
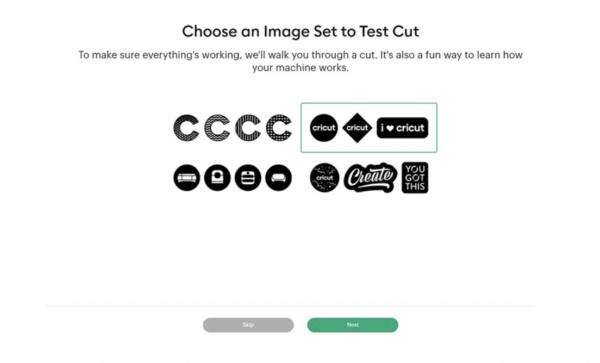
Test Cut Image Groups
Cricut Explore 3 and Cricut Maker 3 users will be excited to know they now have the option to perform a test cut. This new feature ensures that the material settings and pressure selected will be right for the project.
June 2022 Cricut Design Space Updates (V7.11)
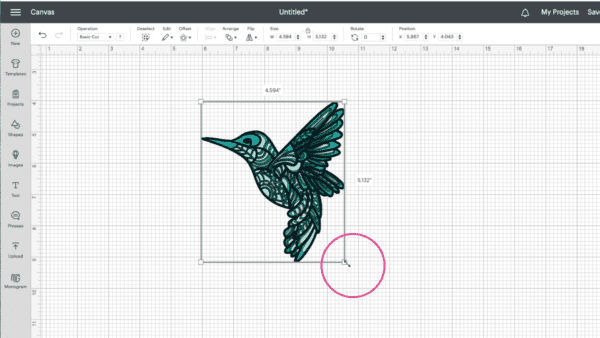
Bounding Box Updates
Gone are the days of the delete, lock icon, rotation arrow, and scaling arrow around each selected image. I know some crafters found this update quite annoying, but once you adjust, you will find it is actually useful and works much like other graphic software out there.
How to Scale, Unlock, and Rotate Images in Design Space
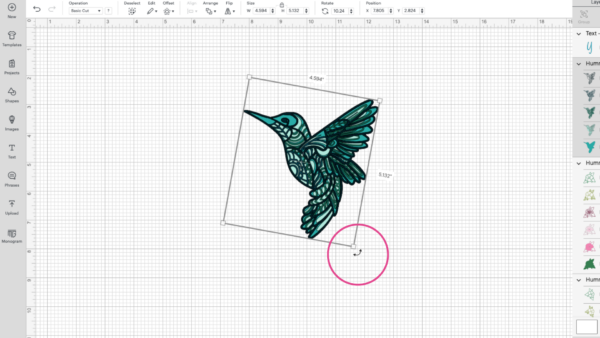
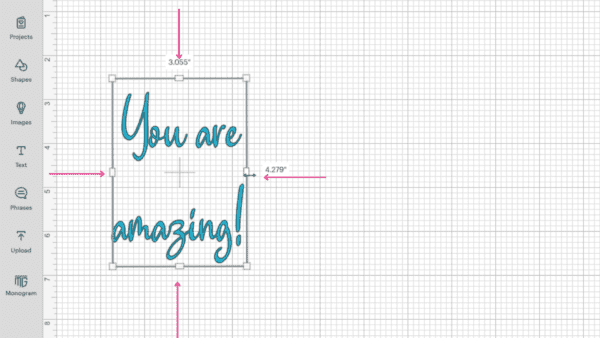
To resize and rotate the image from any corner, bounding boxes (the box around the image or text) have new corner handles.
If you hover over the corner of a bounding box, you’ll now see a double-sided arrow instead of the previous icons for resizing, rotating, and locking.
Rotate the image by hovering your cursor just outside of a corner handle until a curved arrow appears, and then click and hold to rotate the image. For a specific angle, enter the value in the Rotate field in the Edit toolbar at the top of the canvas.
To delete your image, right-click on the image and select Delete. Likewise, you can select Delete in the Layers Panel or use the Delete key on your keyboard.
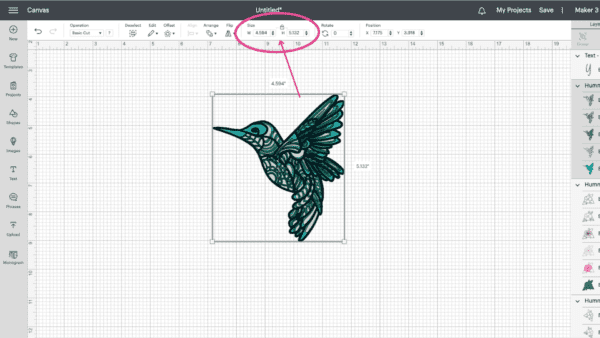
To stretch the image, click the lock icon in between the size boxes in the Edit toolbar at the top of the canvas to unlock image proportions.
Updates to Text Handling
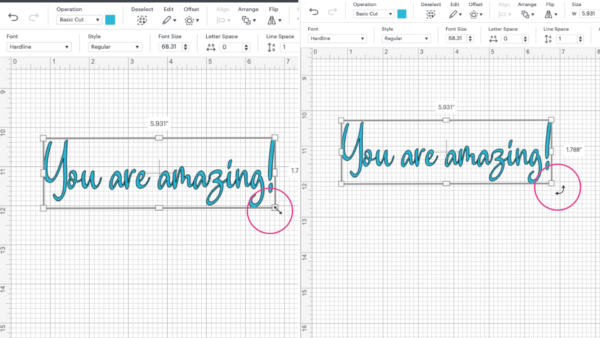
The bounding box updates also apply to the text boxes, but with a few more options.
Handles on the text bounding box on the top and bottom corners, letting you change the size or rotate.
Text Wrapping
Use side handles to make the text box narrower. Cricut Design Space will automatically wrap your text and place it on the next line.
Adjust Text Within Text Box
Switch to single-line text or wrapped text through the Alignment menu by clicking on Wrap off or Wrap on.
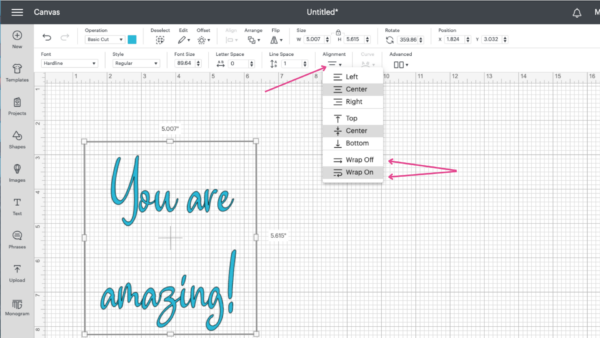
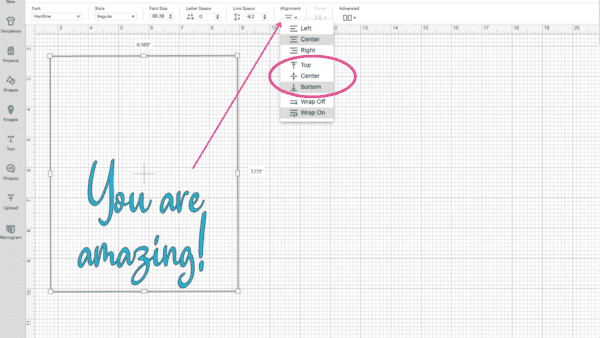
Add space above and below your text by clicking on the Top, Center, or Bottom options in the Alignment menu. Or align the text Left, Right, or Center. By turning wrap off, you will get your bounding box to go back to its default.
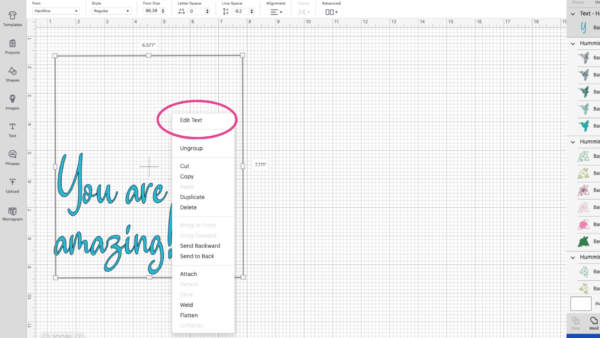
Update To Right-Click Menu
Along with functions such as Group, Ungroup, Delete, Attach, and Flatten, you can now right-click and choose Edit Text from the menu.
You are completely up to date on the newest Design Space updates! What other questions do you have? Ask me in the comments.
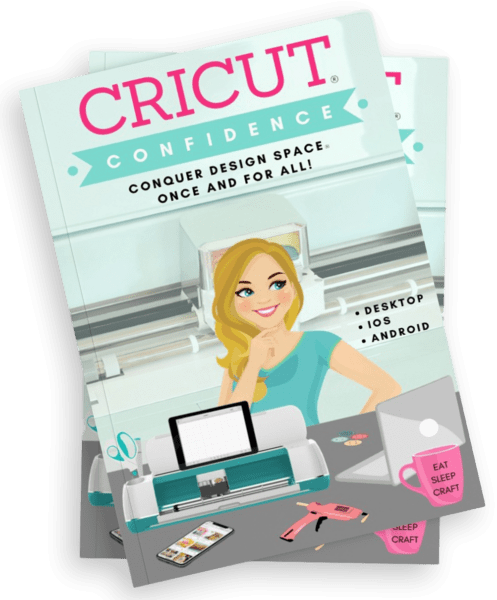
Cut Cricut Confusion. Craft With Confidence™️
Does Design Space tech have you overwhelmed and lost? Master the software in just a few days with a copy of my ebook, Cricut Confidence, where I will walk you through all the Design Space tools, functions, and pro tips for confident crafting!
Hey, Crafty bestie! I’m Abbi!
I’m thrilled you are here! I have spent the last 10+ years making messes and magic in my home studio to make the world a more colorful place, one craft at a time! I’m on a mission to nurture the creative magic inside your soul and bring that bursting imagination inside you to life with easy-to-learn tutorials. If you haven’t yet, be sure to join the subscriber community to gain access to all my freebies or visit my signature design shop, Catching Colorflies!