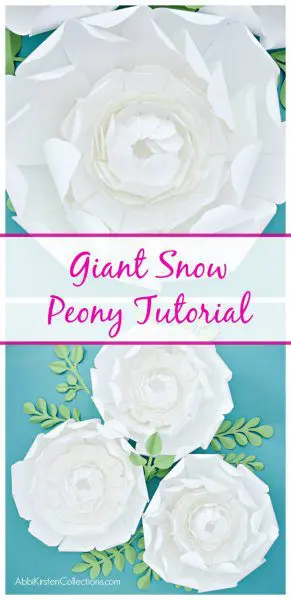
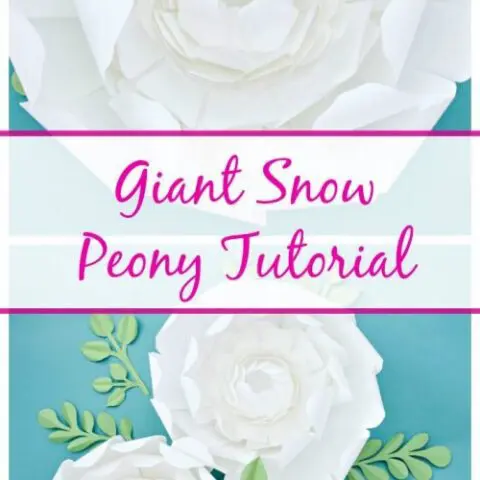
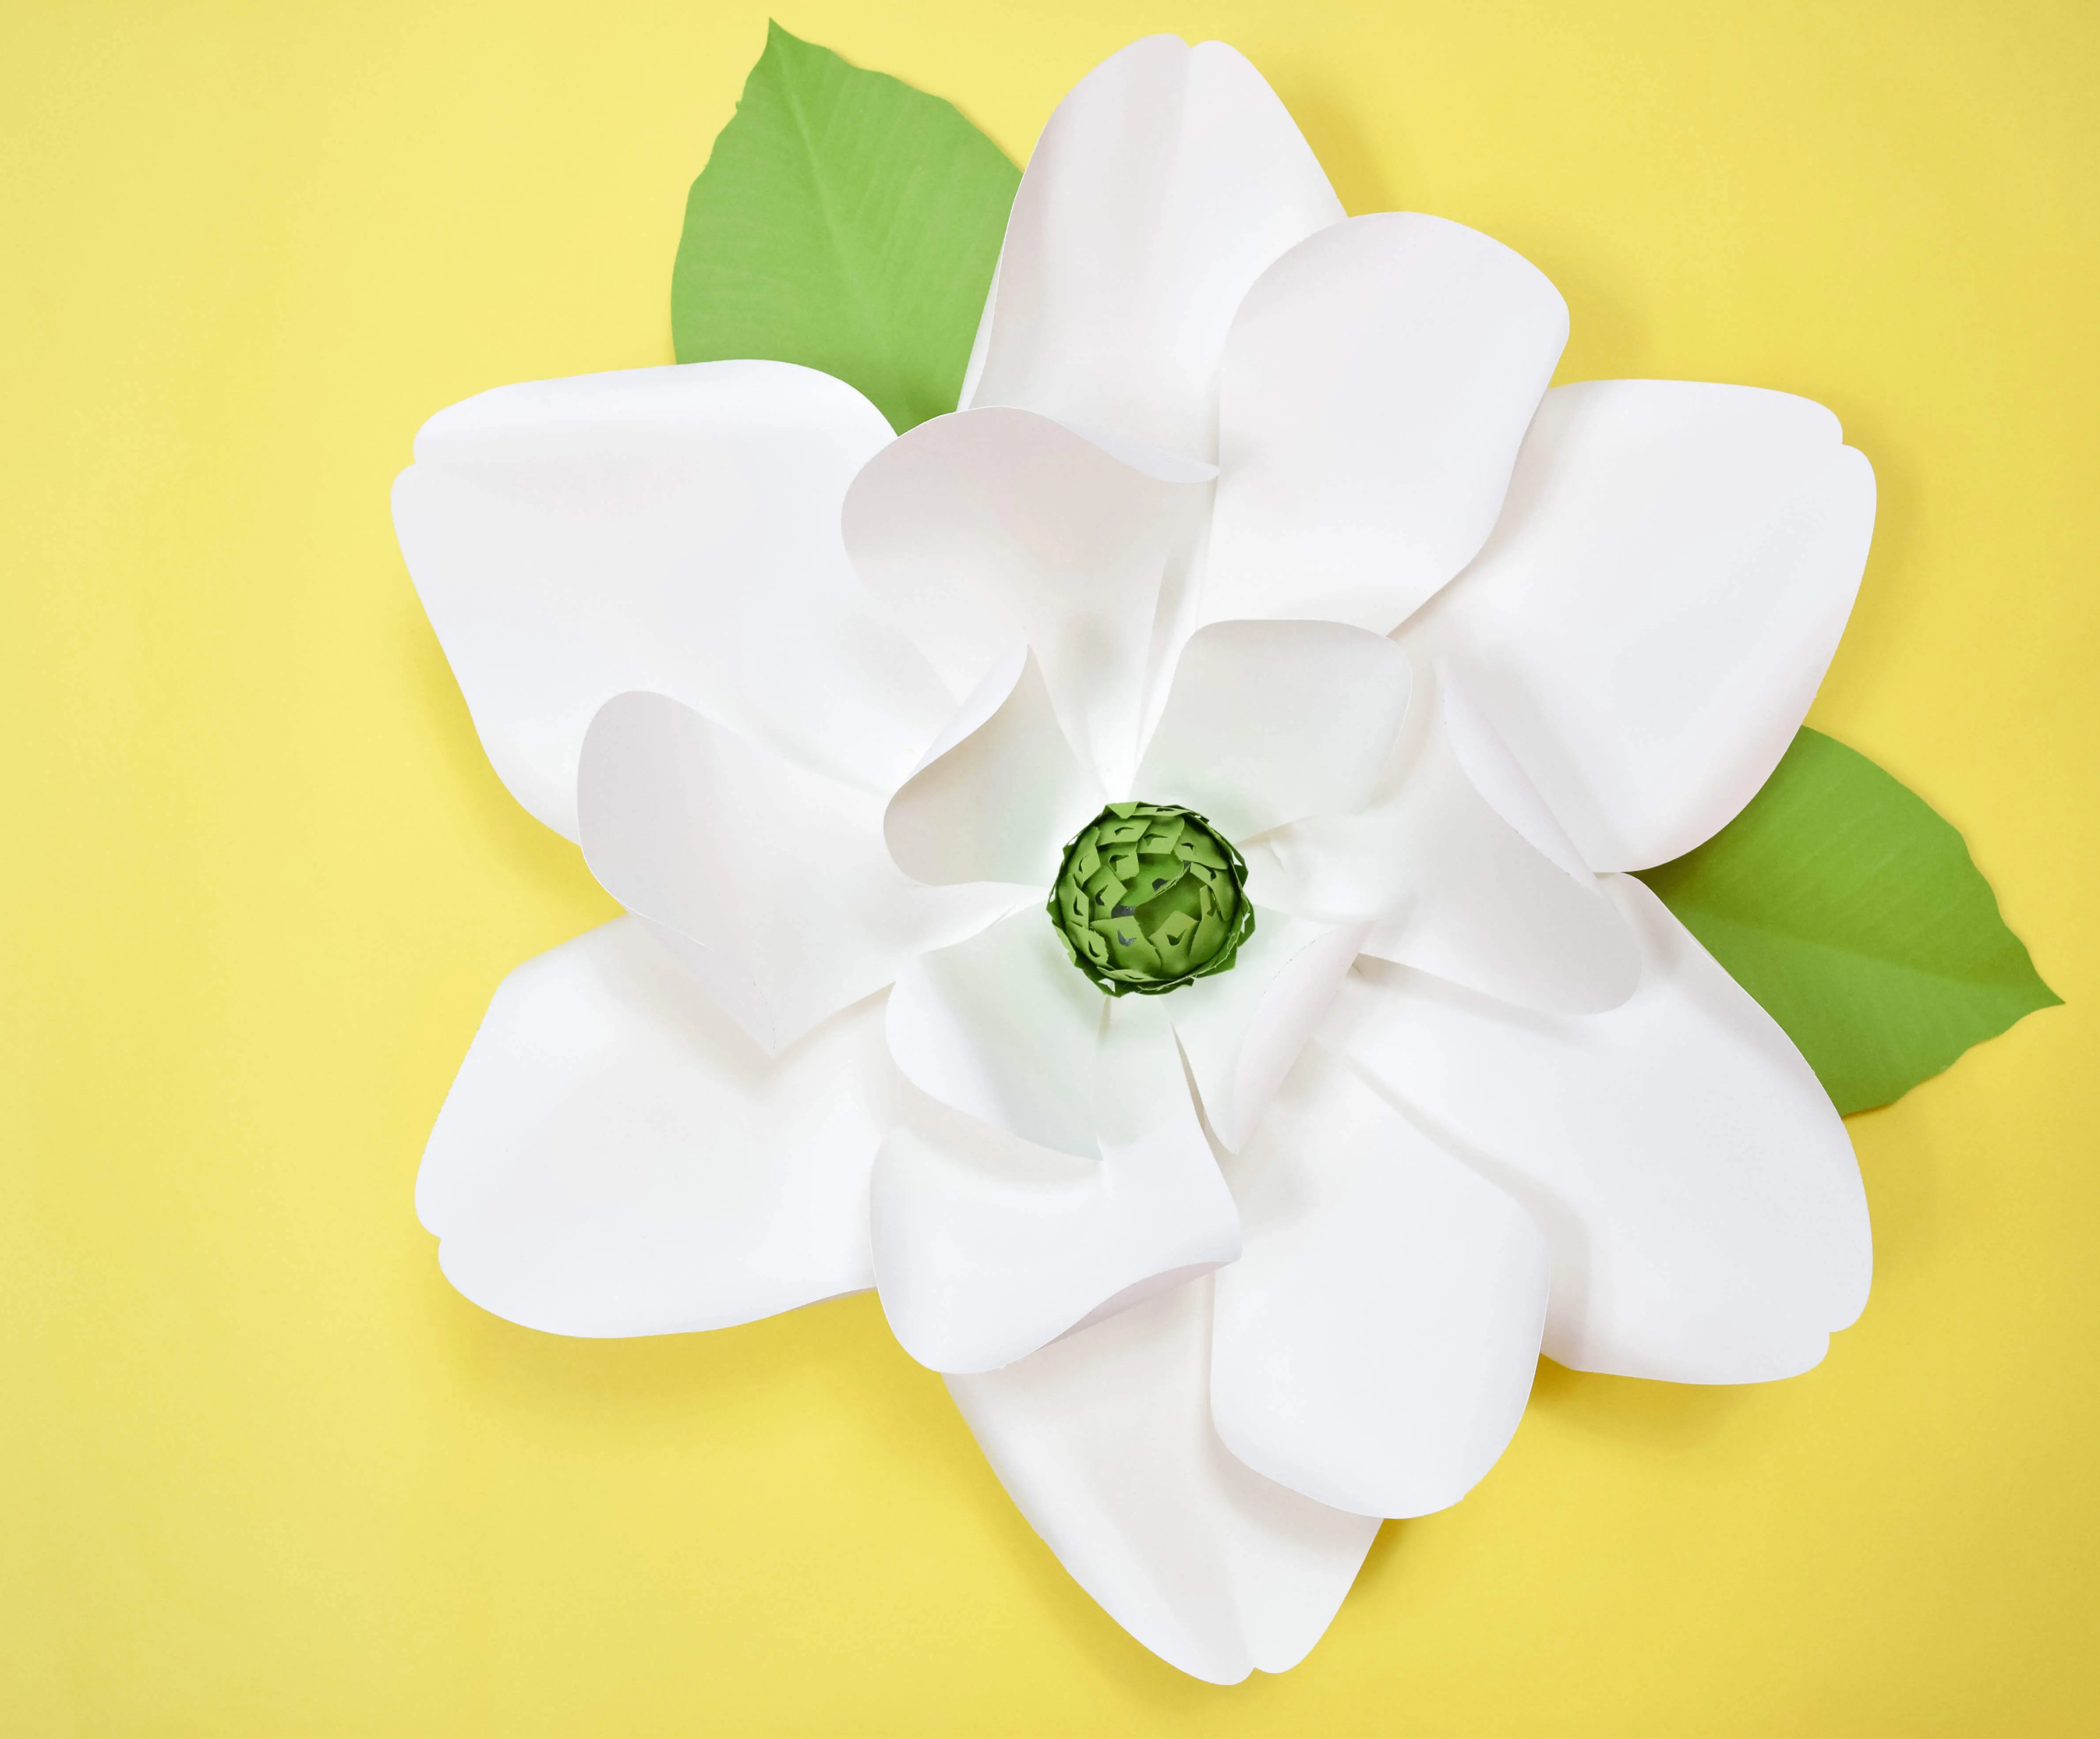
DIY Giant Snow Peony Paper Flower Tutorial
This post may contain affiliate links that won’t change your price but will share some commission.
Today I am sharing this beautiful peony paper flower tutorial with you. Every so often I like to take a peek into the history of the flowers I’m creating. Finding out the messaging I’m sending to my guests as they admire one of my creations makes the labor of love so much more meaningful.
Today, we are going to do a DIY Giant Snow Peony Paper Flower Tutorial. My hope is that the romance and prosperity that this beautiful flower represents blossoms in your own life today!
Supplies For DIY Giant Snow Peony Paper Flower
- Glue Gun
- 65-pound cardstock
- Cricut cutting machine
- Scissors (if you don’t want to use a cutting machine)
- Wooden dowel
- Paper Blooms shaping mat (optional)
- Templates
- Foam circle disk 2-3 inches high and 2-3 inches wide
- A lot of patience
- You can always view my full tried and true supply list here!

Step-By-Step Giant Snow Peony Instructions
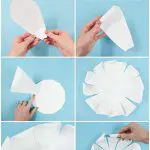
Cut out your petals
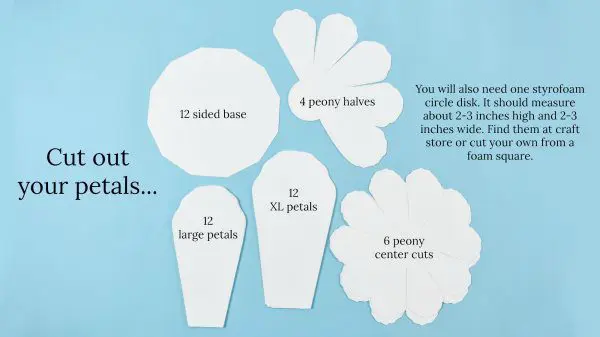
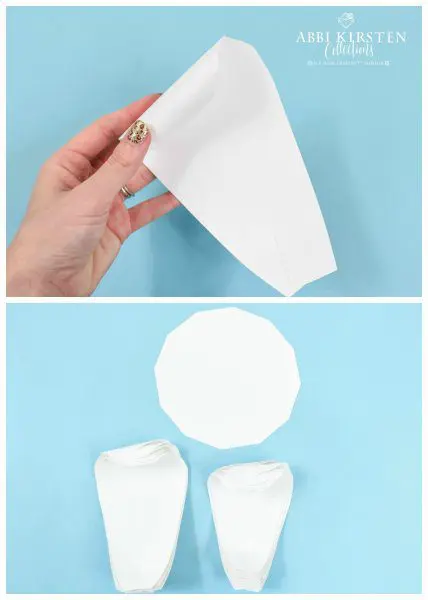
You will have 5 different shaped pieces to cut out. To get started on your paper peony flower tutorial, cut the following number of petals/fringe pieces out. You will also need one Styrofoam circle disk. It should measure about 2-3 inches high and 2-3 inches wide. This will help elevate the center of the peony. Find them at a craft store or cut your own from a foam square.
- 12 Sided Base, measuring 7 x 7 inches
- 4 peony halves, measuring 9.7 H x 6.2 W inches
- 6 peony center cuts, measuring 7 x 7 inches
- 12 large petals, measuring 6.3 H x 4 W inches
- 12 XL petals, measuring 7.6 H x 4.6 W in inches
Step 1
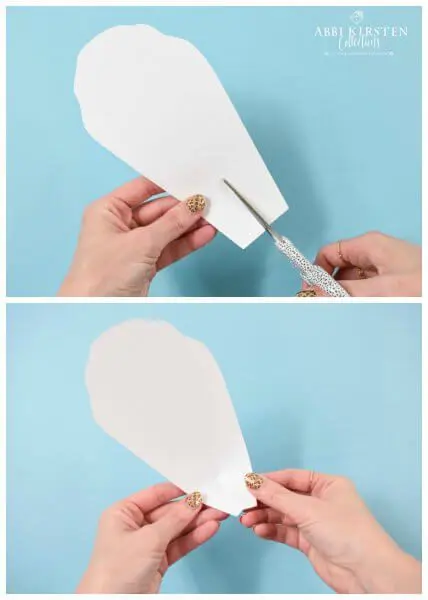
Once you have cut out all your petals, start with the bottom-most part of the peony. Grab your large and XL petals. Then, cut an inch to 1 ½ inch vertically on the bottom of the petal towards the top. Do this for the large and XL petals. For each petal add a dot of hot glue where the cut is and slightly overlap the two pieces. This helps the petals stand up when we add them to the flower.
Then gently roll the petal inwards towards the bottom. You can use a wooden dowel, marker, or anything that is handy to curl with.
Step 2
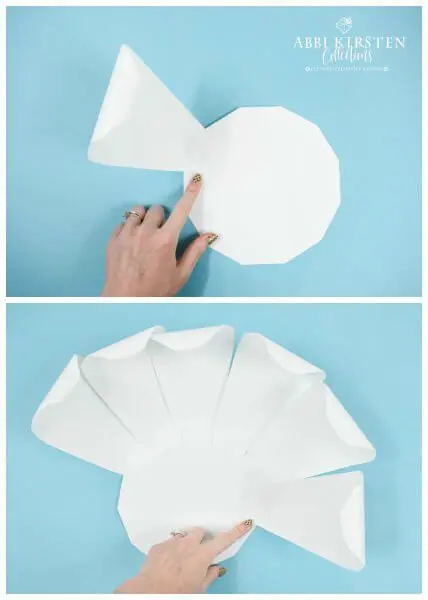
After curling your petals, grab the 12-sided base you cut out earlier. Each side represents where an XL petal will go. Add glue to the back of the petal so that it sticks properly to the base. Place the petal about 2 inches towards the middle of the base. Keep going until you have added all 12 XL petals.
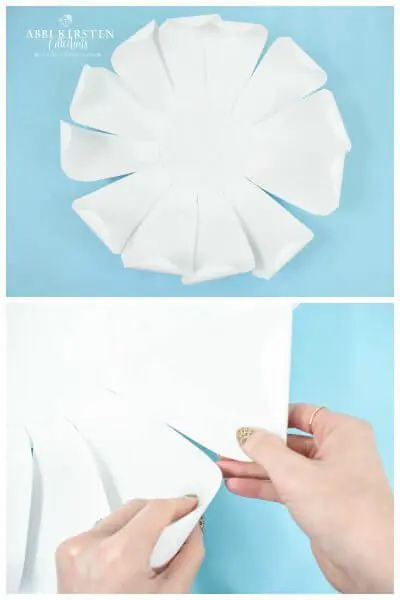
One problem I had to solve with this peony paper flower tutorial is the weight. You’ll notice that this flower is a bit floppy. See that each petal slightly overlaps one another. What you want to do is add a bit of glue on the edge to each petal about 2-3 inches from the base. This makes your flower a bit more stable.
Related Posts
DIY Rainbow Ombre Floral Leaf Table Runner
Free Large Paper Rose Template
Step 3
Moving on to our large petals. Add a small dab of glue to the back of each petal and place them in between the XL petals about ½ an inch inward. Do this with all 12 large petals until you have gone around the whole flower. Try to tuck the last petal underneath the starting petal to make for a more flowery look. Again, you can curl the petals more if you would like. Set this aside.
Step 4

Now, we are going to start the centerpiece. This does not include what we just made, yet.
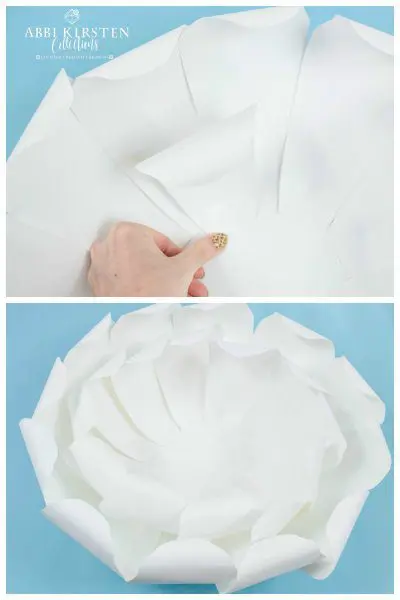
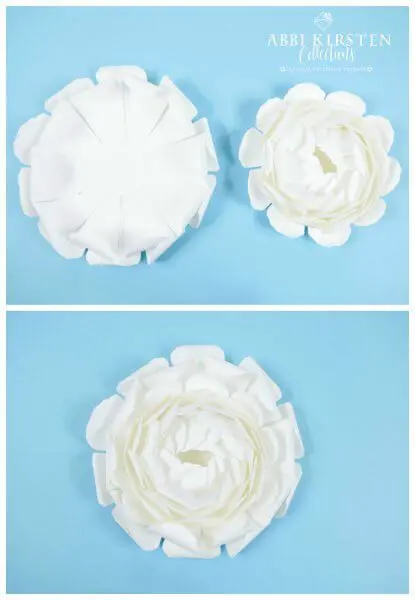
To start the center, grab the four peony halves that you cut out. Take two halves and glue them together at the center circle point by overlapping them. Repeat this same process with the other two halves. Once you have done this, curl each petal point inwards.
After curling each petal on both pieces, place one piece on top of the other by gluing the center. Try to get the petals to alternate in between one another so that they are not directly stacked.
Step 5
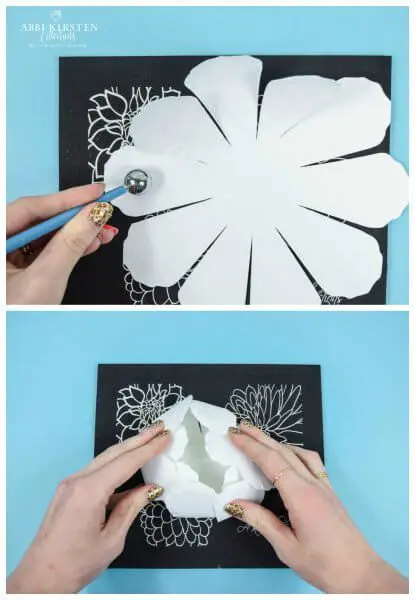
For the final petal, you are going to be cupping the petals. I used my Paper Blooms shaping mat and tool set to roll over each petal. This helps each petal to stand up on their own. If you do not have this tool, you can purchase it in my shop, Catching Colorflies, or you can use your fingers.
Tuck the petals the same direction so they overlap one another so that they are flowing the same direction. Twist them tightly together. Repeat this process with the other peony center cuts.
Step 6
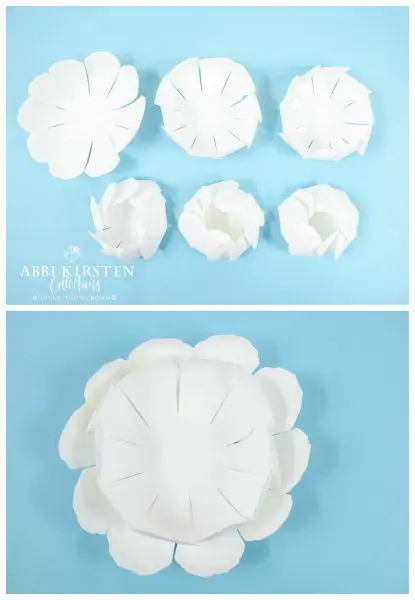
Now you have 6 cupped peony center cuts. You are going to do exactly what you did with the Peony halves and place each center cut within one another working with the petals to fan them out and then back in again.
As you place more and more within each other it will become thicker. The last piece you place in there will need to be as close and closed it can be.
Step 7
Next, you are going to piece everything together. Take what you just made with the six cupped petals and place inside the four peony halves.
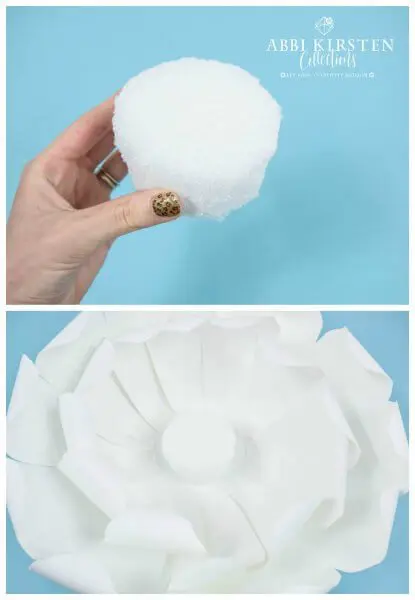
Take your round foam circle disk and glue this down into the inside center base of your peony flower. Test to make sure the center will look good. If you think it looks good, glue the center piece down onto the foam disk. Roll edges more if you feel the need to.
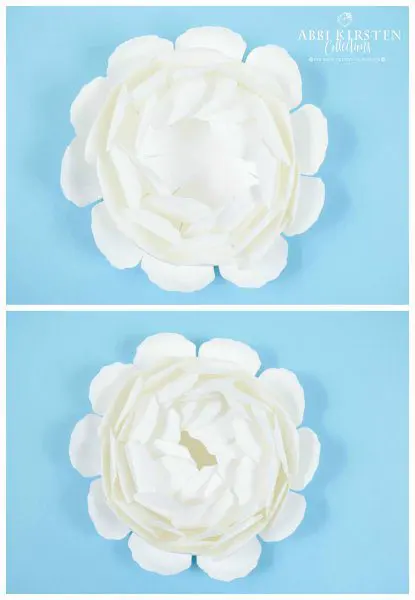
And your flower is now complete!
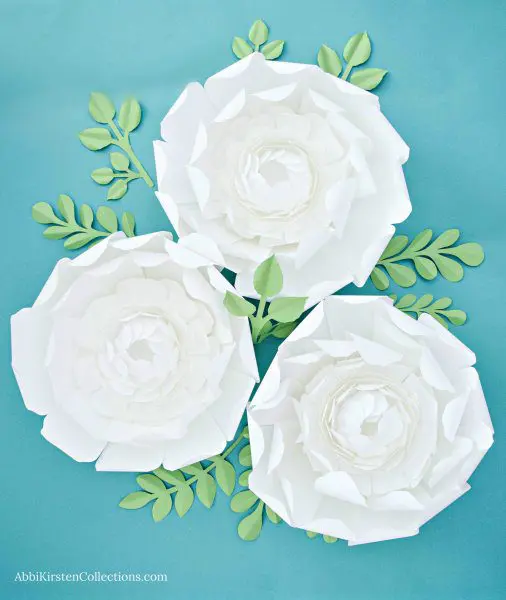
Enjoy your giant Snow Peony!
I loved creating this Peony Paper Flower Tutorial because of their realistic look! Whatcha think? How would you use this paper Snow Peony tutorial? Tell me below! And if you enjoyed this please be a pal and share.

Step-By-Step Video Tutorial
If you prefer watch the video for this peony paper flower tutorial. Turn your volume up for instructions!
DIY Giant Snow Peony Paper Flower Tutorial
You can make this delicate and elegant giant snow peony paper flower with this step-by-step tutorial with video instructions! Spruce up event decorations or outdoor gatherings with this beautiful white paper flower.
Materials
Instructions
Step 1: Cut Out Your Petals
There are 5 shapes to cut out, plus you may need to trim down your foam disc so it measures 2-3 inches by 2-3 inches.
- 12 Sided Base, measuring 7 x 7 inches
- 4 peony halves, measuring 9.7 H x 6.2 W inches
- 6 peony center cuts, measuring 7 x 7 inches
- 12 large petals, measuring 6.3 H x 4 W inches
- 12 XL petals, measuring 7.6 H x 4.6 W in inches
Step 2: The Bottom of the Peony
For all the large and XL petals:
- Cut an inch to 1 ½ inch vertically from the bottom of the petal toward the middle.
- Add a drop of glue on one side of the slit and adhere it to the other side of the slit to form a “bowl” or curve.
- Gently roll the petal inwards towards the bottom using the wooden dowel.
Step 3: Attach the Large and XL Petals to the Base
- Each of the 12 sides of the base matches an XL petal.
- Add a drop of glue to the base and attach the XL petals about 2 inches inward. Add all 12 XL petals.
- Add a drop of glue to the back of each of the large petals and adhere them to the base about a ½ inch inward.
- Alternate the large petal’s second layer with the XL petal's bottom layer so a large petal lays above and over the gap between the two XL petals.
Step 4: The Centerpiece
- Glue two peony halves together in the center but alternate petals so that the top layer of peony petals lays over the gaps between the bottom layer.
- Repeat with the other two peony halves.
- Curl the peony halves tops in towards the center.
- Glue one set of the peony halves to the other in the center.
- After curling each petal on both pieces, place one piece on top of the other by gluing the center. Try to get the petals to alternate between one another so that they are not directly stacked.
Step 5: The Final Petals
- Begin cupping the petals. You can use the Paper Blooms Shaping Mat and Tool Set or your finger.
- Tuck the petals in the same direction so they overlap.
- Twist the together gently.
- Repeat with all peony centers.
Step 6: Assembling the Centerpiece
- Place and glue each of the 6 cupped peony centers into each other. Make sure to adjust and fan the petals.
- The last cupped petal will need to be tightly closed.
Step 7: Assembling the Giant Snow Paper Peony Flower
- Place the assembled 6 cupped peony centers and glue them into the assembled peony halves.
- Glue the round foam circle into the center of the peony base.
- Glue the center (cupped petals and petal halves) onto the foam base.
- Fluff or roll center petals to cover the foam and make the flower look like it is blooming.
You did it! Enjoy your giant snow peony!
Discover More
Share what you’ve been up to by using #DIYwithAbbi. I would love to see your creativity in the works so flaunt your flower power magic! You are a huge source of my inspiration!
My mission is to inspire you to nurture the creative magic inside your soul – bringing you fun, easy-to-learn DIY projects and quality template designs. I share a variety of projects but specifically love paper crafting and paper flowers. Interested in more flower tutorials?! I’ve created dozens of signature designs for you to enjoy – starting with my best seller, The Art of Giant Paper Flowers, the Giant Flower Library, and Catching Colorflies, my shop of endless paper designs and flower templates.
Feeling overwhelmed? Start here with my tried and true Resource List!
Thanks for letting me pop into your day!


Gorgeous! This is a great idea for wedding decorations
Absolutely fabulous instructions. Where were these in 2011 when I made hundreds of paper flowers for my wedding?! It was so HARD to find thorough instructions. These are real beauts too 🙂
These are so adorable! I love crafts like this for dinner table placeholders!
This looks beautiful and you break it down into such manageable steps that I feel like I will actually be able to make this and make it look good. Thank you!
Wow those are so pretty, perfect for a bridal shower or birthday party. I need to pin this DIY for later I can see me doing the project at some point 🙂
This gorgeous giant paper peony looks so real. I am going to try it for my daughter’s room.
These are beautiful! And will be perfect for the next party I plan. Thanks for sharing!
This is really pretty. Going to try this out ?