DIY Paper Christmas Tree Craft – Free Templates
This post may contain affiliate links that won’t change your price but will share some commission.
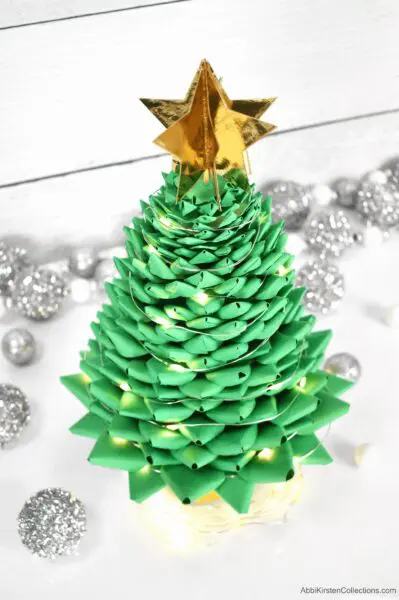
Since Christmas is a great time to create something new, I decided to go for a new approach to a small decorative Christmas tree using paper in this DIY paper Christmas tree craft. I love Christmas, my whole family really does, especially my big brother. He always laughs and tells me instead of a man cave, he would love to have a Christmas room year-round. I think that sounds like a good idea to me. Especially if there was a built-in cookie and cocoa dispenser!
My brother takes an interest in my work from time to time and keeps mentioning a Christmas tree made from paper. While I haven’t figured out how to make a life-size one yet, I decided to give a small one a go. I think it came out fairly well. Maybe good enough for a Christmas room?! I won’t sugarcoat the fact that it takes a little time to make, but it is extremely easy to build.
Update: I also made a new version of this paper Christmas tree craft as a natural pine tree!
Supplies for Paper Christmas Tree Craft
First, let’s review our supply list.
- Green 65-pound weighted cardstock (you can use 8.5 x 11 size for all except the bottom 5 layers, for which I used 12 x 12 cardstock)
- Gold foil cardstock for the top star
- Gold glitter cardstock for the bottom stand piece
- Glue gun
- Bamboo skewer
- You may also want some liquid craft glue
- Tiny LED lights (optional)
- Christmas tree SVG cut files or PDF printable templates (free below)

Download the Free 3D Paper Christmas Tree Templates
Download these free 3D Christmas tree templates in the Craft Vault or by signing up via the form below. Once you set your password, enter the Vault and search at the top with the keyword “Christmas Tree” or design #64.
If you already have an account, just sign in and download the free Christmas tree template instantly.
3D Paper Christmas Tree Video Tutorial
After creating this craft many years ago, I finally made a video tutorial for my 3D paper Christmas tree craft. Watch the 3D Paper Christmas tree instructional video or keep reading for a picture overview.
Paper Christmas Tree Template Measurements
While this paper Christmas tree craft would take an insane amount of time to cut by hand with scissors, I still included printable PDF files if you wish to go that route – maybe make it a class group project?! When using your cutting machine, follow these measurements. I have 38 layers in total. This may vary for everyone a little according to preference, but that is how mine turned out.
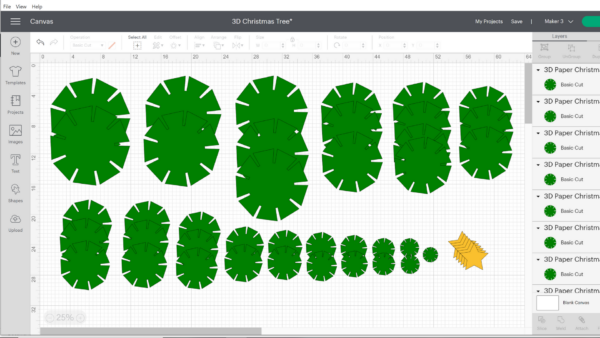
Below I have written all the layers and dimensions of each layer I used. Feel free to adjust this, though, I have made a few versions with less and been successful as well.
- 10.5 by 10.5 inches – 2 layers
- 10 x 10 inches – 3 layers
- 9.5 x 9.5 inches – 3 layers
- 9 x 9 inches – 3 layers
- 8.5 by 8.5 inches – 3 layers
- 8 x 8 inches – 3 layers
- 7.5 x 7.5 inches – 3 layers
- 7 x 7 inches – 3 layers
- 6.5 by 6.5 inches – 3 layers
- 6 x 6 inches – 3 layers
- 5.5 x 5.5 inches – 3 layers
- 5 x 5 inches – 2 layers
- 4.5 x 4.5 inches – 2 layers
- 4 x 4 inches – 2 layers
- 3.5 x 3.5 inches – 2 layers
- 3 x 3 inches – 2 layers
- 2.5 x 2.5 inches – 2 layers
- 2 x 2 inches – 2 layers
- 6 star cutouts as shown in the video, or you can do just one like the picture tutorial.
- 1 tree base – shown in the video
NOTE: In the SVG files, you will also see an X in the center of each tree layer. This X can be changed to an Operation scoreline in Design Space to score where you will punch the bamboo skewer through. Once changed to a scoreline, make sure to use your Attach tool at the bottom of the Layers Panel to keep the tree template and score X together.
Gluing your paper Christmas tree
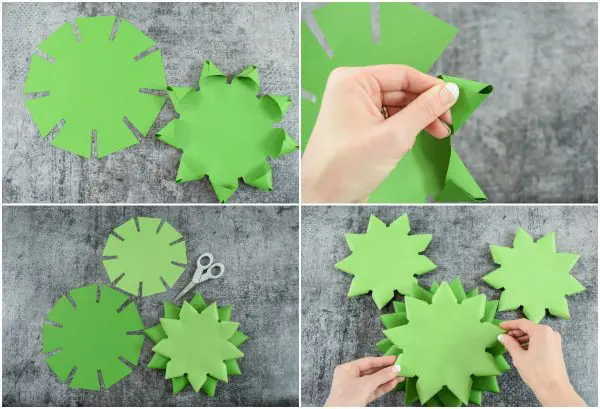
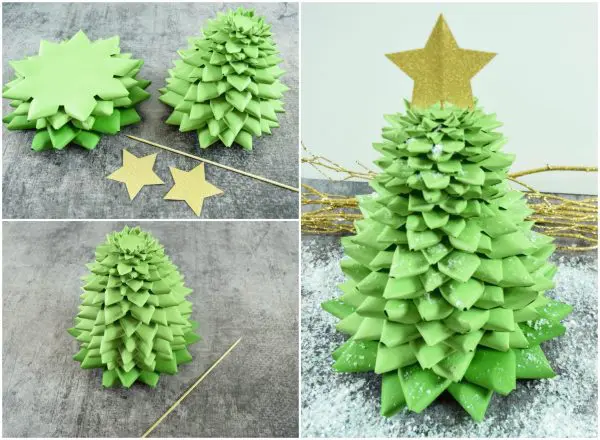
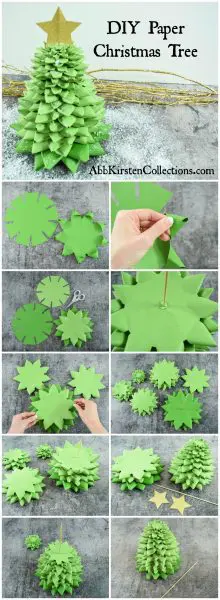
You will want to start by cutting out all your layers for the tree. As I said before, I used 38 layers for mine. It may vary a little for everyone.
Each of the square-like edges is going to get folded around like a cone and secured with hot glue. This is, unfortunately, the slightly tedious part but as you can see, it creates a great layered look once we start to assemble.
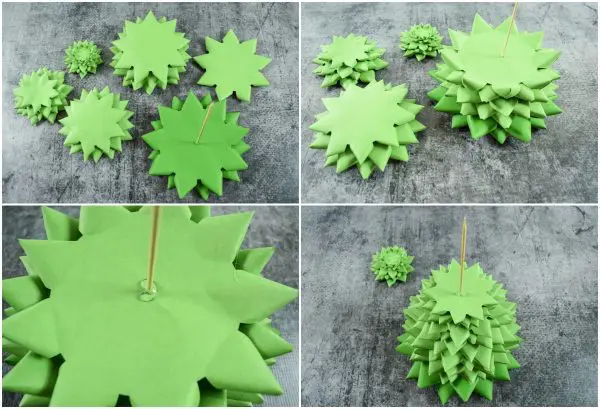
Building the Paper Christmas tree
Once you have finished gluing all the points of the tree into cones, you will then want to start stacking them in order of largest size to smallest size.
I am using a basic bamboo skewer to accomplish this. As you stack them, be sure to alternate each layer so that it looks more natural as a full tree. It can be helpful to add a bit of glue in between each layer around the skewer so that the layers don’t move or spin out of place.
Keep adding all the layers until you reach the top. The last couple may prove to be a little hard to roll your tips into cones. If that is the case for you, then just curl the edges downwards for a similar look.
Adding the Star to the Paper Christmas Tree
I’ve added a small star to the top of my tree as well. In my picture tutorial, I used just two-star cutouts back to back, but in my video, I opted for 6-star templates, folded in half and glued together for a 3D effect.
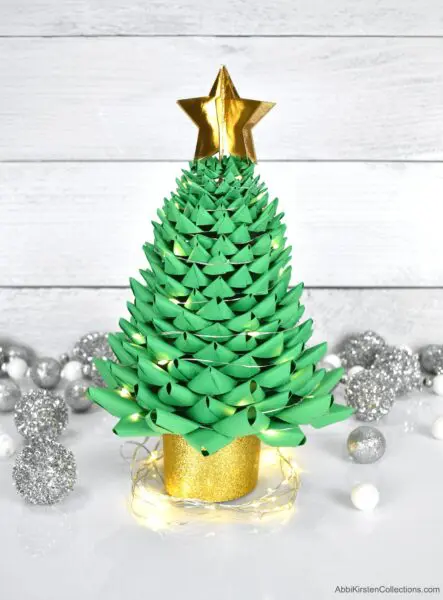
There you have it! Find a spot to display your pretty paper Christmas tree! An optional idea is to add some small LED twinkle lights around the paper Christmas tree. I have also added a tree base in the video tutorial.
About Abbi Kirsten
Welcome to my colorful corner of the internet, where we play with vibrant crafts and unlock your creative magic! Hang out with me and get lost in a fun array of projects, tutorials, and products, from stunning papercraft ideas to flower templates, Cricut help for beginners, and endless crafter’s hacks.
To access all the magic, join the Member Vault and participate in my monthly Craft-Alongs in my Facebook group!


Nice Christmas tree, can you share the template for the 9 petals circles. Thank you for this pretty tree.
Thank you. The templates are available in the post. In the supply section.
Thank you! Love this so much! I plan to use them on my dining table decor.
Thank you Abbi for the link! I didn´t see more than #13 in the library, but now I can see all. Now going to make a tree!
The link does not take you to the free template. It takes you to your Christmas bundle that you have on sale for $37. I have gone to your free library and have not found it there either! Help?
Hi Mary
When you log into the freebie vault please take a moment to read all the info at the top of the page, which will explain exactly how to find the freebie you are looking for. 🙂
I lucked out when i scrolled to your site, this is something my granddaughter and i can do together. Thanks for the patterns. Happy Holidays