How To Use Patterned Vinyl: Step by Step Layering Iron-On Tutorial
This post may contain affiliate links that won’t change your price but will share some commission.
Do you love to try fun projects with your Cricut machine? What about craft vinyl projects? Crafting with permanent adhesive vinyl and removable vinyl is one of my favorite materials to work with as a cutting machine owner because there are so many ways to use these unique patterns. But sometimes, I have a hard time deciding how to best use my favorite pattern, especially when it comes to cute patterned vinyl or new designs in solid colors.
From custom items like drinkware, tumblers, and mugs to wood signs, keychains, decals, t-shirts, totes, and more, both heat transfer vinyl (HTV) and adhesive craft vinyl offer a great way to personalize items.
If you are like me, you might be wondering how to choose a design that highlights the pretty pattern while still creating a legible and cohesive final result for the project.
Below are several ways you can showcase your favorite patterned vinyl, plus a tutorial on how to apply heat transfer patterned vinyl to a t-shirt to get you started!
But first, where can you find the best vinyl?
Where To Find The Best Patterned Vinyl And Iron On Vinyl?
Expressions Vinyl is my top go-to resource online for vinyl. Here are a few of my favorites!
- Siser Easyweed heat transfer vinyl
- Siser solid vinyl and holographic glitter vinyl
- Oracal 651 permanent vinyl
- Limited edition partner collaboration vinyl packs
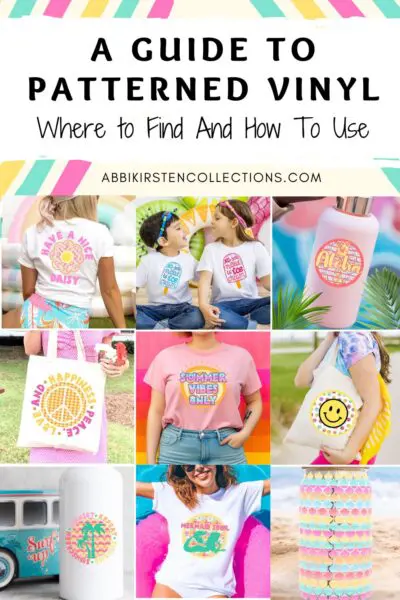
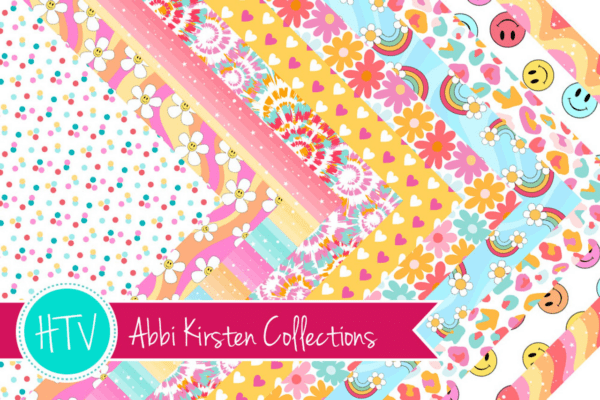
10 Limited Edition Vinyl Patterns by Abbi Kirsten Collections
This month I have partnered up with Expressions Vinyl to bring ten original pattern designs for both adhesive vinyl and heat transfer vinyl! These designs are all bright, colorful, and full of summer vibes!
In this tutorial, I am featuring limited edition patterns created by Abbi Kirsten collections, but you can also find loads of other patterned vinyl designs too.
Tips For Choosing SVG Designs That Work Well With Patterned Vinyl
So how can we showcase pretty patterns in our craft projects? There are a few key things to look for when picking an SVG design to cut the pattern vinyl from.
- Pick a design that has a large solid element to it. For example, the design above has a background layer that, even when cut out, will capture the pattern of the vinyl without much disruption to the rhythm we want to see with our eyes.
- Choose fonts carefully. If you are using pattern vinyl in a design that has text elements, aim to do with thicker, chunkier fonts or thick monogram designs like these circle monograms.
- Only use one pattern vinyl per craft project. As pretty as pattern vinyl can be, you don’t want to mix and match within a single project. Choose a single pattern vinyl for one project so the eye is captured by it rather than sharing a spotlight with another pattern mixed in. If you want or need to add more vinyl, use a complementary solid vinyl color for that project.
- Keep the design large. Even if you follow all the suggestions above, you can still end up with difficulty seeing the playful pattern if the item is scaled too small – so be sure to consider the size.
Pro Tip: Patterned heat transfer vinyl cannot be layered onto each other. If you need to incorporate another vinyl, use what is called the Slice and Set technique to set the design up so that the pattern vinyl only makes direct contact with the base below (not other vinyl layers). See how to do Slice and Set here!

Download Abbi’s FREE SVG Files For Patterned Vinyl
Are you looking for some fun SVGs that work well with patterned vinyl? Find my full collection of SVG cut files perfect for this patterned vinyl in the Craft Vault! These SVG files are free when you join my email list!
Already a member? Log in and start browsing this summer vibes SVG collection.
Not a member yet? Join here!
Here is a list of all the designs you can download!

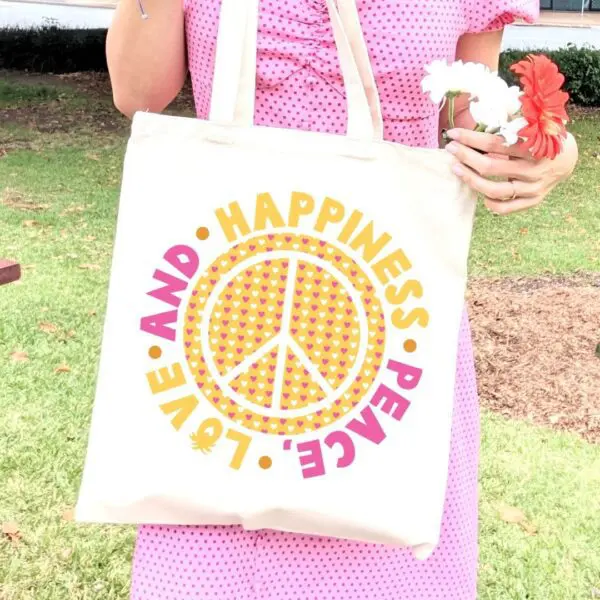
How To Use Patterned Heat Transfer Vinyl: A T-shirt Tutorial
Let’s create a simple t-shirt project using some patterned iron-on vinyl. I am using my exclusive design from Expressions Vinyl (available for a limited time). Check out all of Expressions Vinyl patterns here!
Supplies For Patterned Iron On Vinyl T-shirt Project
- Cutting machine (Cricut Maker, Cricut Explore, Silhouette, or any machine that works with SVG cut files)
- Patterned vinyl
- Patterned vinyl-friendly design – check out this summer collection in the Vault!
- Weeding tool
- Cricut mat
- Brayer tool
- EasyPress or similar heat press
- Heat safe mat
- Butcher paper (optional)
- T-shirt or another blank you wish to apply the design to
How To Layer Iron-On Vinyl Easily With Patterned Vinyl!
New To Vinyl? You Need These Hacks!
Vinyl is fun to craft with but can also cause some headaches. Check out these 25 Sanity Saving Vinyl Hacks every Cricut crafter should know!
Cricut Design Space Set Up
- To get started, choose a design for your project, keeping in mind the tips for best practices that were outlined above.
- Upload the design to Cricut Design Space. New to Cricut? Learn how to upload an SVG cut file and more in this free beginner’s workshop!
- Scale the image to your preferred size. Since I am creating a t-shirt, I will measure my shirt and then set the scale accordingly. Check out my tutorial on using templates in Design Space to find the perfect size for your project!
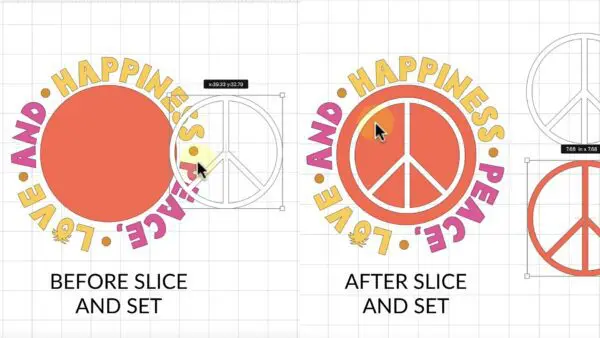
Slice And Set Technique For Layering Heat Transfer Vinyl
- Duplicate the entire grouped design. Set it aside for now. With some designs, you will need pieces from the original, so always have a duplicate.
- Ungroup the file by right-clicking and selecting Ungroup.
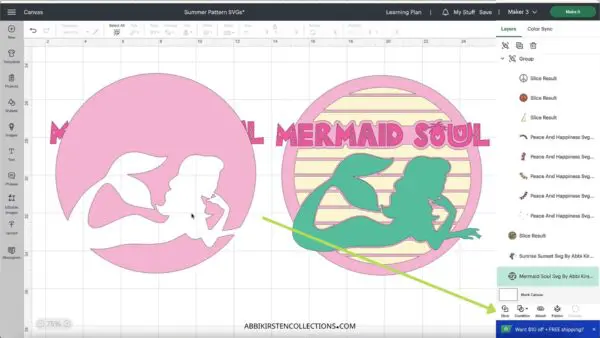
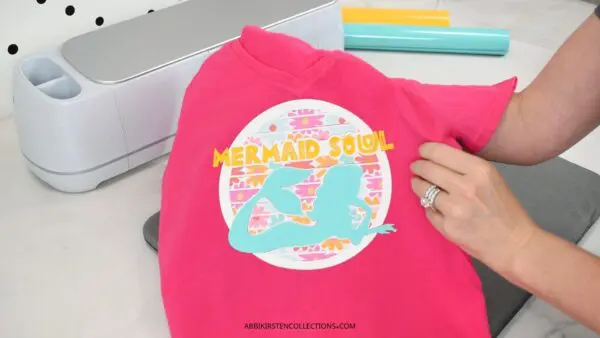
- You can only slice two layers at a time, so choose two to start with. With my mermaid, I selected the green mermaid and pink circle base. To select two items, click on each layer you want to select in the Layer’s Panel while holding your shift key.
- With the two layers selected, click the Slice tool at the bottom of the Layer’s Panel.
- Once you click on the Slice tool, you will be able to pull the design apart. You will only need the bottom result in this example. You can delete the rest.
- With some designs, you need to repeat this more than once. With the mermaid design, I used the Arrange Tool to send the pink circle result to the back and Sliced again with the Mermaid Soul words.
- Next, pull any missing parts from your duplicate back over so the design appears as it did before, but now there is a sliced result underneath. See how to do this in the video tutorial.
Cutting The Patterned Vinyl
- Save your project and then send the item to the cut screen by clicking the Make It button.
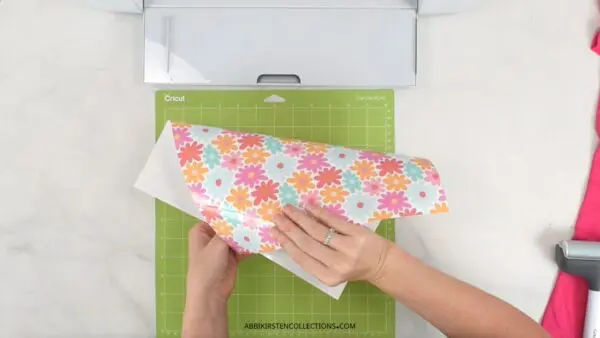
- Place the iron-on vinyl shiny side down (or pretty side down) on the cutting mat.
- In Design Space, toggle on the Mirror icon so that the design will face the correct direction once ironed on. Note: If you are using adhesive vinyl, you DO NOT need to mirror.
- Select your material setting. I used the iron-on vinyl setting.
- Let Cricut cut the design, then unload the mat, flip the mat over, and peel the may away from the material.
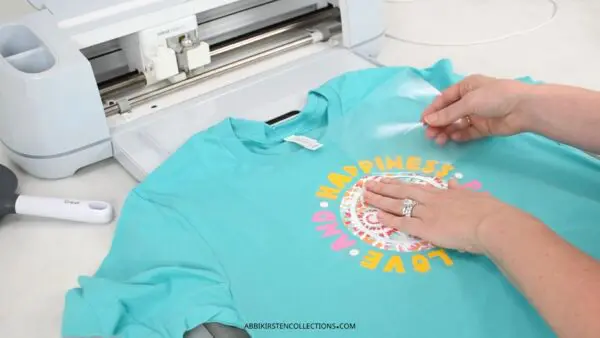
Applying the Patterned HTV To The Shirt
- Heat your EasyPress or similar press to 305F/105 C for 20 seconds.
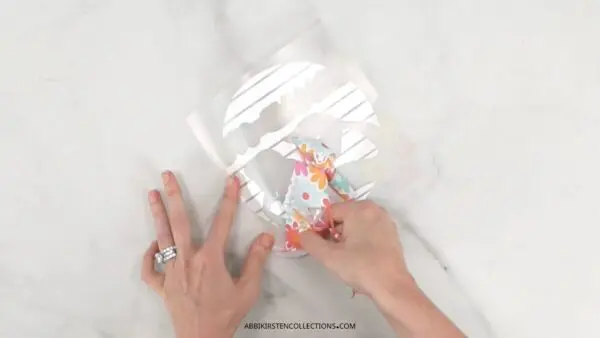
- Weed the HTV vinyl with your weeding tool to remove the unwanted remaining vinyl and reveal your design.
- Run a lint roller over the t-shirt or fabric to remove any debris or lint.
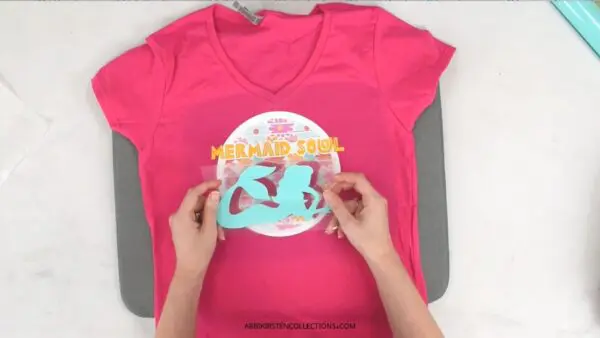
- Place your biggest piece of the design down first with the liner up (use a ruler to measure a center point if necessary).
- Place your heat press down for 15-20 seconds. Note: if your layers need precise alignment, I recommend only pressing the first few layers for 10-15 seconds and then a final press of 20 seconds for the last layer.
- Remove the heat press and let the material cool for 1-2 minutes until cool to the touch.
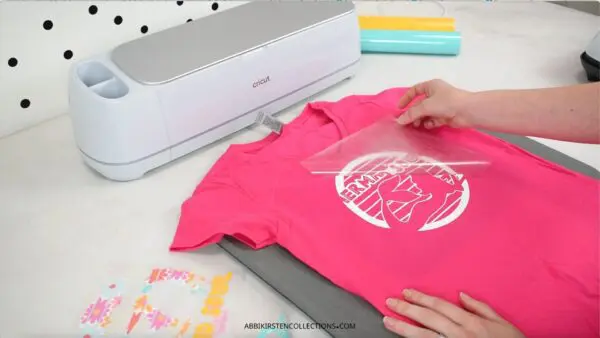
- Peel the carrier sheet off to reveal your design!
- Save the carrier sheet.
Note on Heat Transfer Vinyl Shrinking
Heat makes iron-on vinyl shrink, so if you need the alignment of your vinyl layers to be super precise, I recommend heating the first layers at one for 10-15 seconds. Just long enough to get them tacked down without shrinking the vinyl too much.
It’s super important that you wait for the HTV to cool completely before trying to remove the liner and proceed to the next layer.

Layering The Heat Transfer Vinyl
- Line up and place the next layer of the patterned vinyl onto the shirt. Depending on the design, it might take a bit of patience, and there may be some very mild imperfections with this layered approach.
- Once the next layer is placed, grab the carrier sheet liner from the first layer that was pressed on and cover the design to protect any overhang of HTV on your shirt. In other words, we don’t want the heat press to touch any exposed iron-on vinyl. You can also use uncoated butcher paper.
- Press for 15-20 seconds, let cool, and peel both liners off. (Again, with more layers, I would advise only 10-15 seconds until you reach the final layer).
- Repeat steps 1-3 if you have another layer to add! Then your layered iron-on patterned vinyl t-shirt is complete!
What other questions do you have about using patterned vinyl with your cutting machine? Let me know in the comments below! And don’t forget to share your finished projects in our Facebook group. Happy crafting!
110+ Items To Sell With Cricut
Looking to profit from your crafting efforts? Check out these 110+ ideas to start selling products made with your Cricut machine!
- Earrings
- Phone cases
- Hand lettered signs
- Party Decor
- Read More

About Abbi Kirsten
Welcome to my colorful corner of the internet, where we play with vibrant crafts and unlock your creative magic! Hang out with me and get lost in a fun array of projects, tutorials, and products, from stunning papercraft ideas to flower templates, Cricut help for beginners, and endless crafter’s hacks.
Join A-Star Crafters and participate in monthly Craft-Alongs in our community Facebook group!