Layered Cricut Cards For Beginners: DIY Greeting Cards for all occasions
This post may contain affiliate links that won’t change your price but will share some commission.
How To Make Easy Cricut Cards For Beginners
Are you just starting out with your Cricut machine and feeling a bit overwhelmed? Don’t worry – we’ve all been there! Making custom cards is a great way to get acquainted with the many possibilities owning a Cricut can bring, but it can be difficult to know where exactly to start. In this blog post, we’ll walk through how to make quick and easy Cricut cards for beginners.
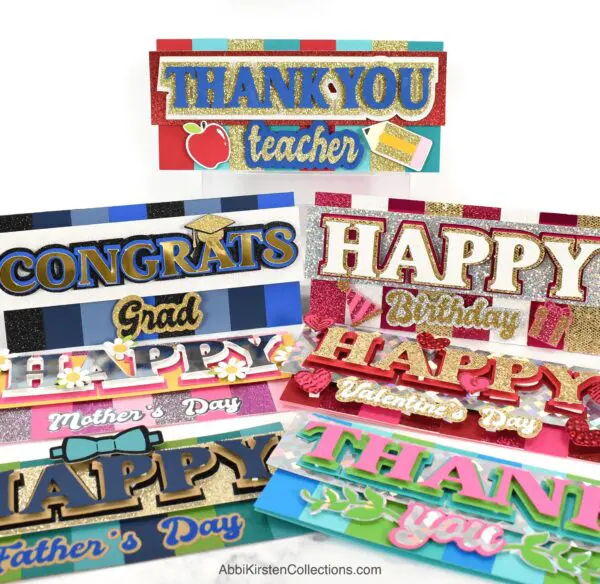
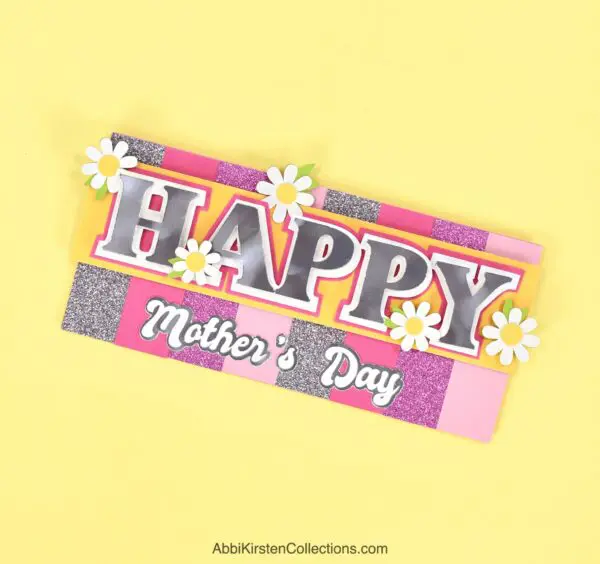
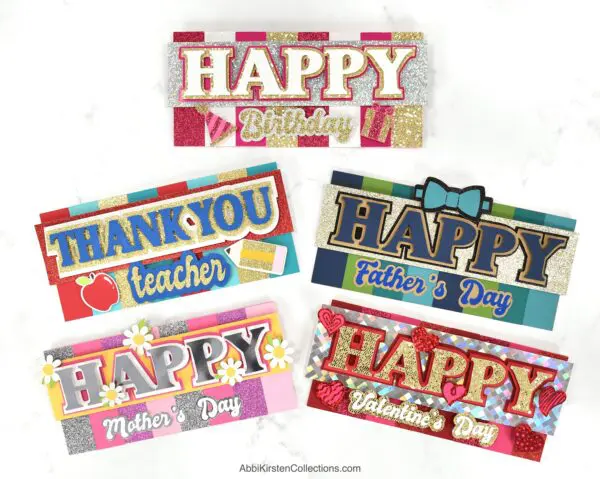
The cards in this tutorial are color block style but also designed with slimline fashion, which can be great as money-holder cards! I have a special pocket that goes inside the card, which can hold money or a gift card, making it perfect for a last-minute birthday card or a greeting card for many occasions!
What Do I need to make cards with Cricut?
With a little creativity and the right tools, you’ll be able to make professional-looking cards in no time using your Cricut machine.
At the very minimum, you’ll need:
- A Cricut machine
- Cardstock
- Adhesive
However, if you want to take your card-making to the next level, you’ll want to invest in a few more items.
- A scoring stylus or scoring wheel will make it easier to fold your cards neatly.
- Bone tool
- Embellishments, such as rhinestones, stickers, and ribbon, add the finishing touches to your cards.
- You may also want to consider distress inks or watercolors for cards too!
What is the best Cricut for card making?
When it comes to making beautiful cards, choosing the right Cricut can make all the difference. The best Cricut for creating cards depends on your specific needs and preferences.
All the Cricut machines, whether you choose the Maker, Explore, or Joy models, can make cards easily with or without the card mat.
If you are interested in seeing the card mat in action, check out this post on making cards in minutes with the card mat!
If you’re looking for versatility, the Cricut Maker or Maker 3 is a great choice. The Maker can handle a wide range of materials and comes equipped with a rotary blade that can cut through fabric and other textiles with ease.
On the other hand, if you’re a beginner or looking for a more budget-friendly option, the Cricut Joy might be perfect for you. It’s smaller and more portable than other models and can still handle many card-making tasks with ease.
What is the best cardstock paper for Handmade cards?
Choosing the right paper can make a significant difference when it comes to creating stunning Cricut cards.
Here are some tips for choosing paper for card making.
- Choose the right paper thickness. 65-100lb cardstock is best in general for cardmaking.
- Mix textures and finishes such as metallic or glitter cardstock.
- Avoid really thin papers that will bend, rip or lose shape easily
- Shop from the right resources: Check out 12×12 Cardstock Shop for tons of cardstock options!
Supplies For Making Cards with Cricut
- Cardstock in various colors or textures
- Cricut machine (Make, Explore, or Joy machines can all work. You can use other cutting machines that are compatible with SVG files too).
- Cricut mat
- Bone tool, scoring wheel, or scoring stylus (optional)
- Foam tape or cubbies
- Bearly Art glue
- Cricut pens (optional)
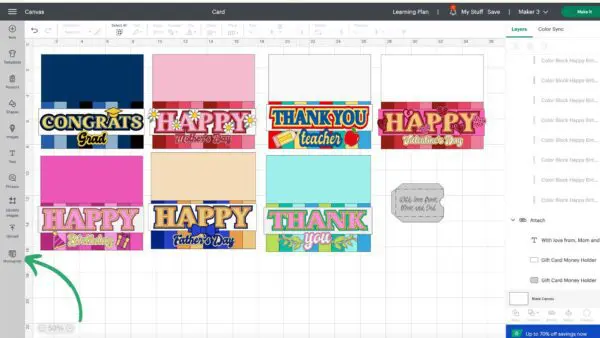
Download the Color Block Card SVG Cut Files For Cricut
Premium AKC Members can get all these color block card templates in the Craft Vault.
If you are already a member, log into the Vault and find the whole color block card collection here! Below are links to each Cricut card SVG design.

Premium Members Log In
Already a Premium Member? Click the links below, log into your account, and start downloading!
These all come with an optional gift card holder SVG as well. For more gift card holders, check out my teacher appreciation gift card holders and coffee mug gift card holders too!
Find more Cricut cards for beginners here in the AKC Craft Vault!

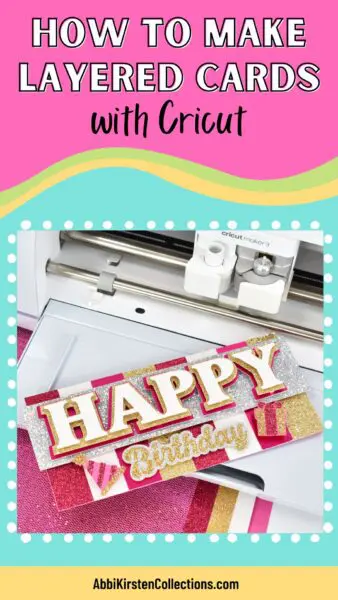
3D Layered Cricut Card Video Tutorial
Watch the full step-by-step video tutorial for layering these 3D color block cards, or keep reading for a step-by-step written tutorial!
Design Space Set Up for handmade cards
Upload the color block SVG of your choice to Design Space. Learn how to upload an SVG file to Design Space here.
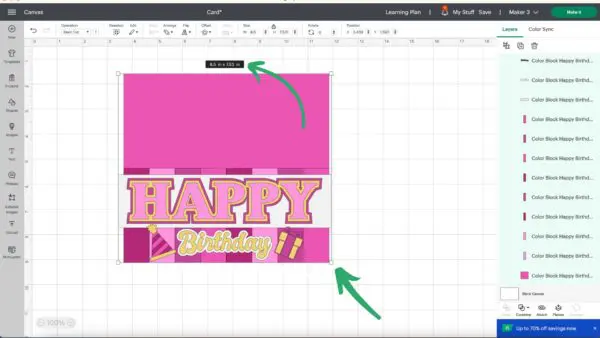
Scaling Your Card
To adjust the size of your card, type in the dimensions at the top of Design Space or grab the corner of the design and scale it up or down. I set my cards to 8.5 inches wide by 7.5 inches high.
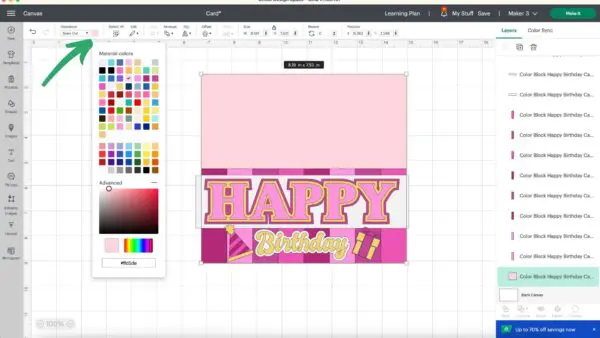
Changing The Color of the cards
Make these cards your own by playing around with different colors for the front of the card. Right-click and select Ungroup to select layers individually.
You can use the color swatch next to Operation in Design Space to change colors and visualize different options. Ultimately the color of your cards depends on the color of the cardstock you load onto your Cricut mat.
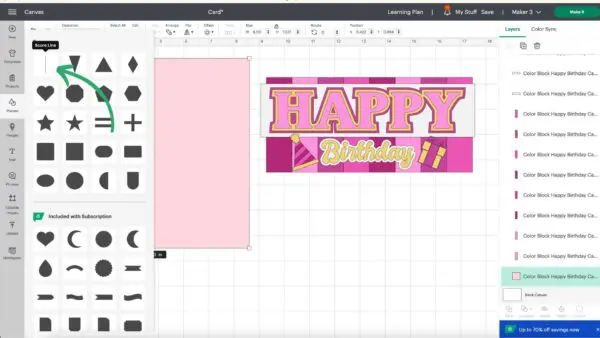
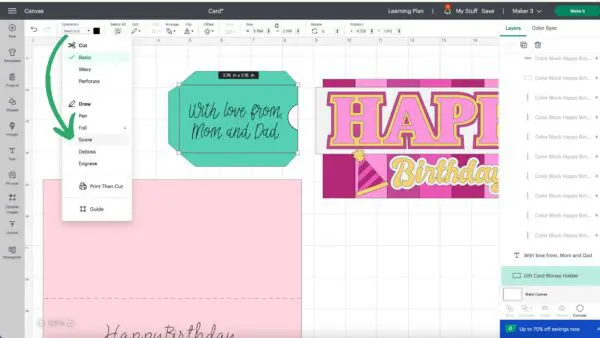
Adding Score lines
Scoreline makes the cards easier to fold though this step is optional.
- Add a score line from the shapes panel. Scale up if needed by pulling at the corner handles with your mouse.
- To rotate the scoreline, select it and type in 90 at the top left where the Rotate input box is.
- Select both the card base and scoreline, then click on Align > Center.
- Use the Attach tool at the bottom of the Layer’s Panel to hold the scoreline in place on the base of the card.

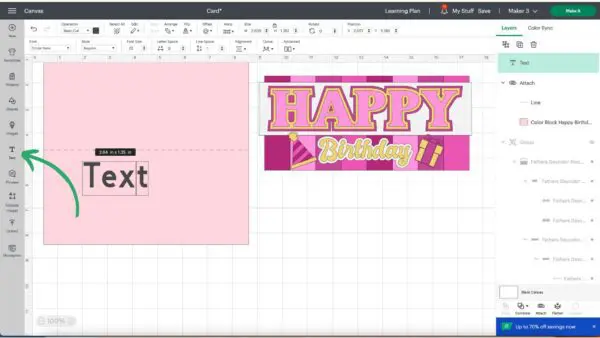
Adding Writing To Your Card
If you wish to add a message to the inside of the card, click on the text tool to the left and type out your message on the canvas. You will need to change this to a writing font for Cricut to write with a pen.
How To Find a Writing Font
Click on your text, then select a font in the dropdown option and choose one that is a writing font. Use the filter option to find the writing style fonts.
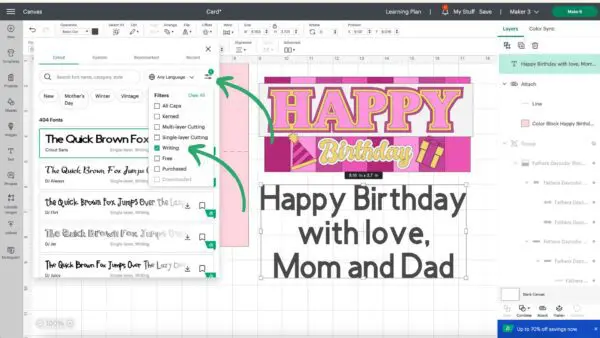
Adjust the scale of your text and place it over the card where you wish the message to appear. You can also adjust the letter and line spacing at the top of Design Space when text is selected.
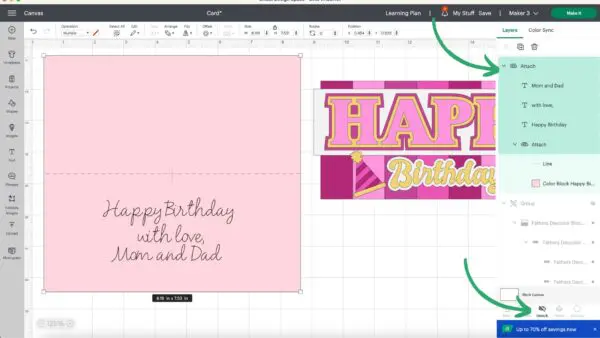
Attach the text to the card using the Attach tool; otherwise, the text will shift when you click on the Make It button.
Keep in mind this will be the inside of your card, so be sure to place your paper down the correct side when going this route.
Setting Up the gift card/money holder
If you are using the gift card holder instead, import the SVG, change the black lines that come with the gift card pocket SVG to the Score operation, and then attach both the scoreline and your text to the gift card pocket.
Customize the Card Occasion
If you want to add your own custom phrase for the occasion to the card, such as Happy Anniversary, etc., type out the message using the text tool, then add two offsets in Design Space to create the layered effect! Learn more about offsets here!
If you like the fonts I chose, they are Creative Vintage font and the Autolova font.
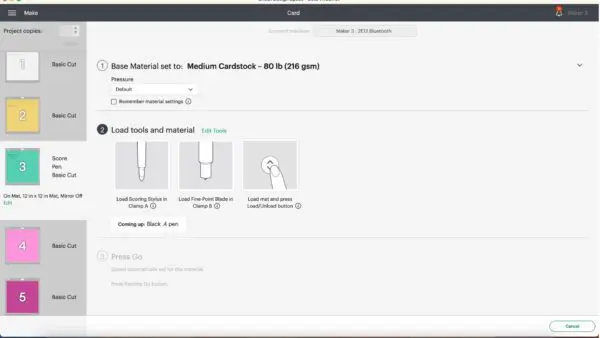
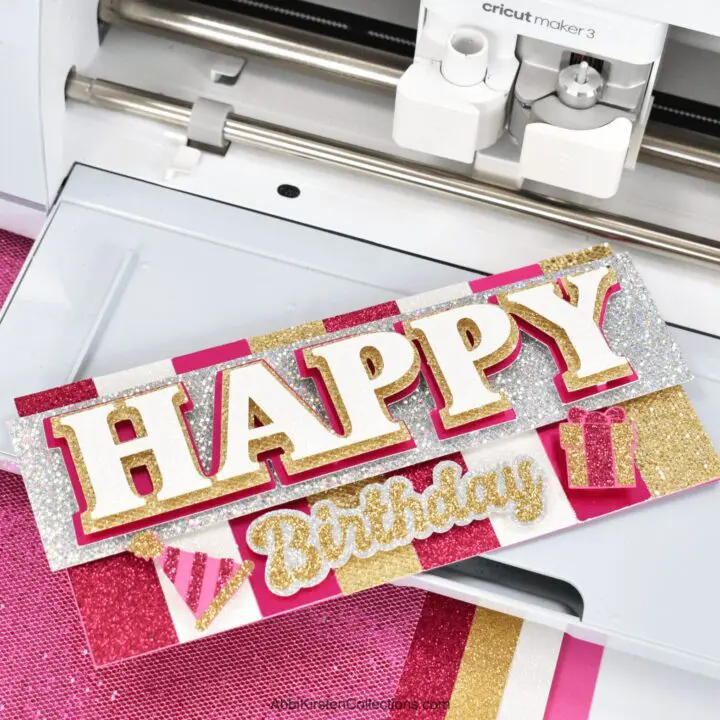
Cutting Out Your Cards On Cricut
Select your material in Design Space. I used medium cardstock, but if you are including things like glitter cardstock or metallic paper, be sure to browse all materials and select the right setting.
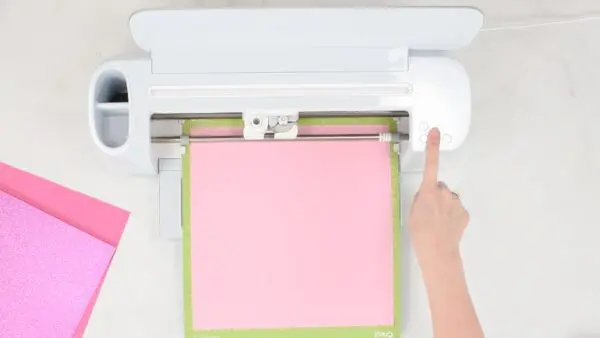
Load your paper onto your cutting mat. I like to use a brayer tool to press the paper to the mat.
Repeat this for all the colors. These color block card designs are ideal for using up paper scraps in your craft stash since they don’t require a lot of paper per cut.
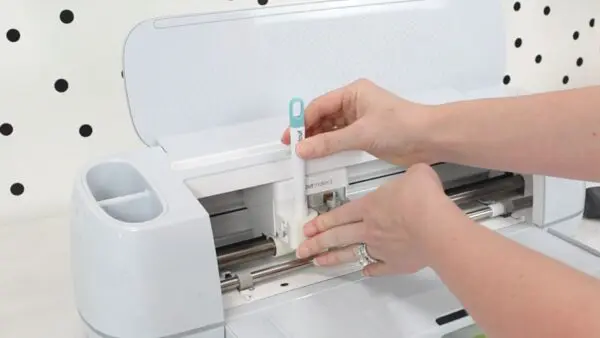
If you are using a scoring stylus or pen, Cricut will ask you to load that in clamp A to perform those tasks.
Getting perfect cuts with cardstock on Cricut can have its challenges, be sure to read my 5 pro tips for cutting cardstock with your Cricut to avoid ripping!
Assembling The Color Block Cards
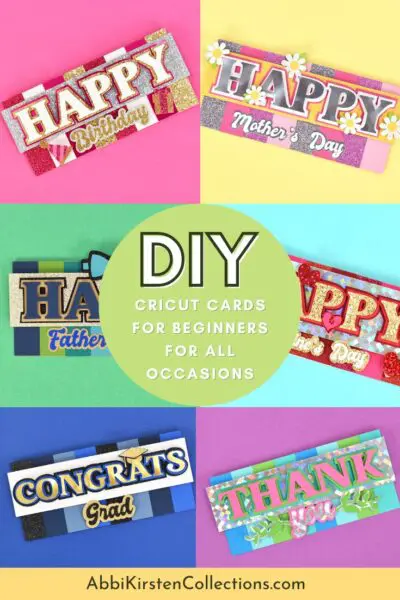
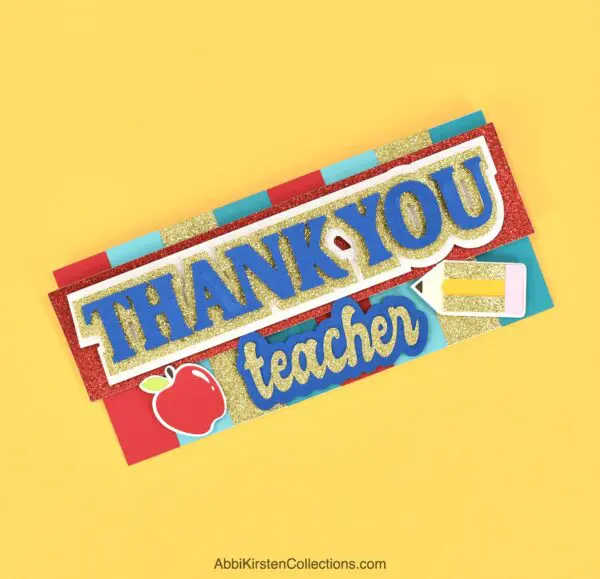
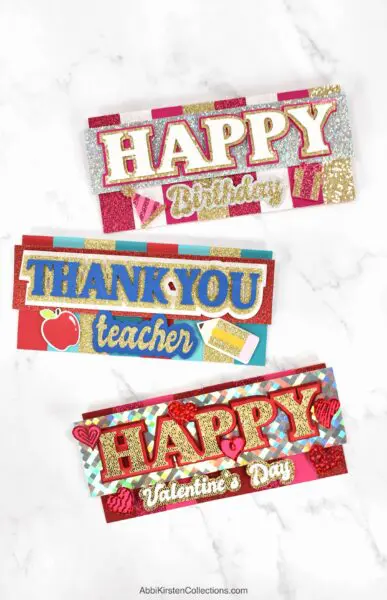
In the photos below, I am featuring the Happy Birthday cards, but you will see a Mother’s Day version in this video and several other designs available in the Color Block Card Collection in the AKC Craft Vault, such as a graduation card, father’s day card, teacher appreciation card and more!
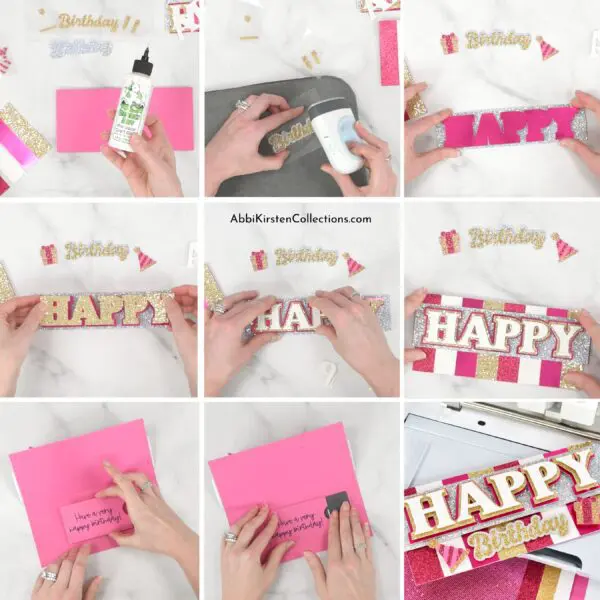
- Cut out your cardstock on Cricut.
- If you used a scoring stylus (or scoring wheel) or pen to write, load those in clamps A or B when Cricut Design Space prompts you on the screen.
- Remove the cardstock from the mat (it can be helpful to flip the mat over and peel the mat away from the cardstock to avoid curling)
- Repeat for all colors of cardstock
- Crease the card base in half. I like to use a bone tool for this.
- Begin to add 3D foam cubbies to the back of the letters and layer the design from largest to smallest.
- If you are using HTV for decorative elements or letters, heat your EasyPress Mini to the medium setting.
- Line up your HTV and press for 10-15 seconds at a time.
- Use glue and/or tape to add all the elements to your card base.
- If you cut out the money/gift card holder, crease those scoreline lines and add glue to the back tabs. Place this inside the card.
- Write in a message or slide in a gift card, and you are finished!

What About An Envelope?
Because these DIY greeting cards are made in layers with thick foam cubby tape, I do not recommend trying to create or place them into an envelope.
Even in theory creating an envelope template to fit a card like this would have to be quite large as a design and impossible size-wise to cut out seamlessly on a Cricut.
Instead, I recommend wrapping the card loosely in some tissue paper and tying a ribbon around it. If you are giving a gift too, just stick the card inside a gift bag amount the tissue paper.

Cricut Card Mat, Inserts, and cutaway cards
You might be wondering about the Cricut card mat and making Cricut insert cards. Both the Cricut Maker models and Explore models have a full-size card mat, and the Cricut Joy has a card mat option too!
- Full-size card mat tutorial for the Maker and Explore models (these are watercolor cards with Cricut watercolor markers!).
- Cricut cutaway cards are yet another option for the card mat too!
These meaningful greeting cards are 10x better than store-bought cards. You can customize the cardstock you use and choose different colors and textures too! What other Cricut cards for beginners would you like to see? Tell me in the comments!
More Cricut Cards For beginners
- 18+ Birthday Cards To Make With Cricut
- Loads of Love Valentine’s Day Card
- Cards With Cricut Watercolor Markers
- 19+ Fall Card Ideas To Make With Cricut
- Christmas Cards With The Cricut Joy
Layered Cricut Cards For Beginners: Diy Greeting Cards For All Occasions
These slimline, color block cards are great for all your special occasions and easy for beginners to make, too! The sparkling, colorful greeting cards can be customized in Cricut Design Space, so you can add personalized messages or add money holders or gift card tabs. Get these templates today and have cards ready whenever you need them.
Materials
Instructions
- Gather all your supplies and make sure your work area is clean.
- Upload your chosen template and customize it in Cricut Design Space.
- Cut out the design using your Cricut.
- If you used a scoring stylus (or scoring wheel) or pen to write, load those in clamps A or B when Cricut Design Space prompts you on the screen.
- Unload the cardstock from the Cricut machine
- Carefully peel the mat away from your cut designs.
- Repeat for each color and layer.
- Fold the card in half along the score lines or using a bone tool.
- Add foam or Cubbies to the back of the letters.
- Layer the card from the biggest element to the smallest element.
- Add extras with glue, tape, or in the case of heat transfer vinyl, an Easy Press.
- If you added the money/gift holder, fold along the scoreline and add glue to the back of the tabs so you can place it inside the card.
Add a message, money, or a gift card, and you are done!