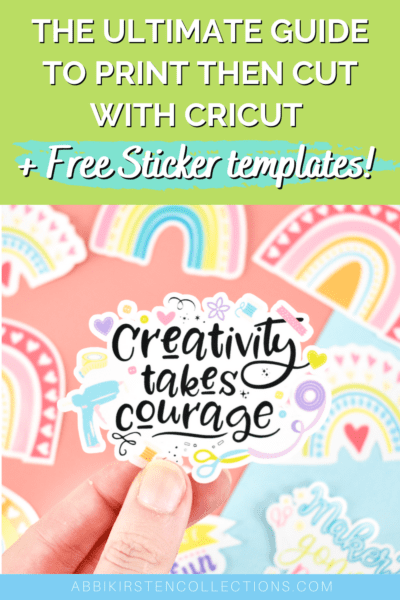
How To Print Then Cut On Cricut – Print Then Cut vs Cut Image Cricut (Full Cricut Sticker Tutorial)
This post may contain affiliate links that won’t change your price but will share some commission.
Learning how to use your Cricut machine can be both exciting and daunting, so it’s no surprise that one of the biggest questions beginners ask is how to Print Then Cut with Cricut. And what is the difference between Print Then Cut, a basic cut, and a layered SVG cut file?
- First, I’ll go over the distinct characteristics of a Print Then Cut image versus an SVG cut file.
- Then, you’ll have my full tutorial on how to make stickers with Cricut.
- And I’ll also show you how to calibrate your machine if you’ve never done Print Then Cut before.
NOTE: Print Then Cut works with all Cricut models except the first Joy machine because of its compact size. (However, Print Then Cut is available with the Joy Xtra and Joy 2.)
What You Will Learn In This Tutorial
- Understanding What a Print Then Cut Process Is On Cricut
- What Supplies Do I Need for Print Then Cut Stickers
- The Format You Need for Print Then Cut Projects
- Download FREE Sticker Templates for Cricut
- Easily Recognize a Print Then Cut Image in Design Space
- How to Calibrate Your Cricut for Print Then Cut
- How to Make Stickers With Cricut
- Advantages and Disadvantages of Print Then Cut
- What is the Difference Between Print then Cut and a Cut Image for Cricut?
- Which Printer is Best for Cricut?
- How to Turn an SVG File into a Print Then Cut
What Does It Mean To Print Then Cut on Cricut?
The best way to understand Print Then Cut is to think of it like this: you print a colored image out on your computer (for example, a gift tag), and naturally, without a Cricut, you would need to cut out the printed gift tag by hand with scissors. But with Print Then Cut, Cricut replaces the part where YOU have to do the cutting. Instead, your Cricut machine does the work for you with incredible precision!
The Print Then Cut feature on your Cricut machine is a relatively simple process. The most important thing is to know which formats to use and how to calibrate your Cricut machine so the cut is accurate.
Let’s get started and I’ll teach you how to Print Then Cut on Cricut and make stickers with Cricut!
What Tools Or Supplies Do I Need To Print Then Cut with my Cricut?
- Cricut machine (except for the first Cricut Joy machine)
- Inkjet printer (I’ve successfully used a laser printer, but Cricut recommends an Inkjet for best results).
- Cardstock, sticker paper, waterslide, or printable vinyl are all things you can print on with most printers. Be sure to check your printer specs to make sure it can handle thicker materials like cardstock. Keep reading for my printer recommendations below. Because I’m teaching how to make stickers with Cricut, I’ll opt for sticker paper or printable vinyl.
- Cricut mat – the standard green mat is usually best.
- Brayer tool, which can come in handy when working with sticker paper or printable vinyl.
- An image file (Get my designs shown below in the Craft Vault.)
What Image Format Do I Need for Print Then Cut?
Print Then Cut works with JPEG or PNG images. A JPEG or PNG image is a single layer image where all the colors have been flattened together; no layers are present – it is a color-blended pixelated image; for example, a clipart image or a photo.
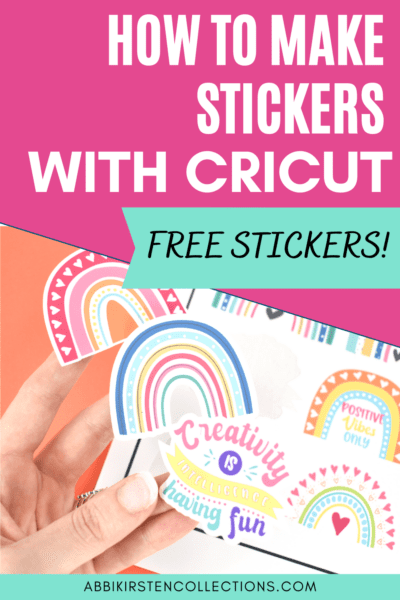
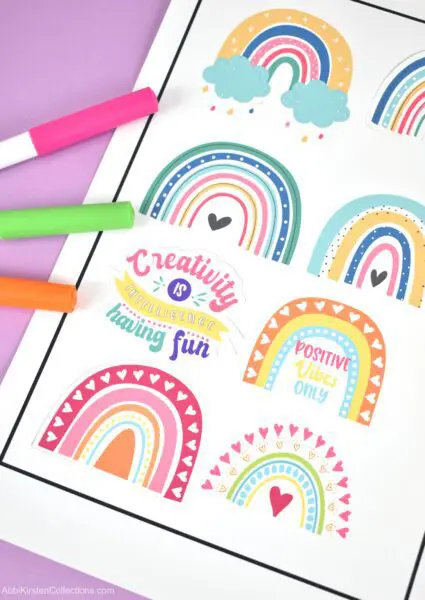
Download Free Sticker Image Templates for Cricut
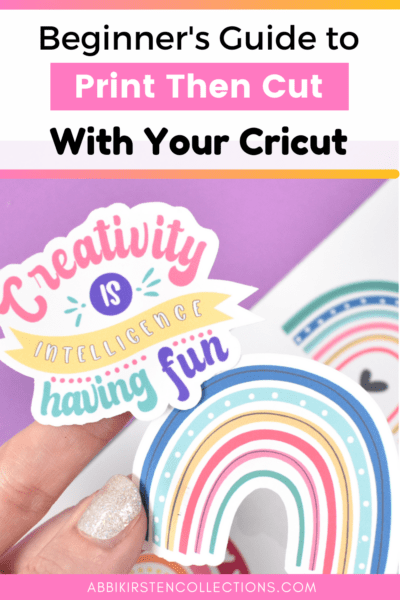
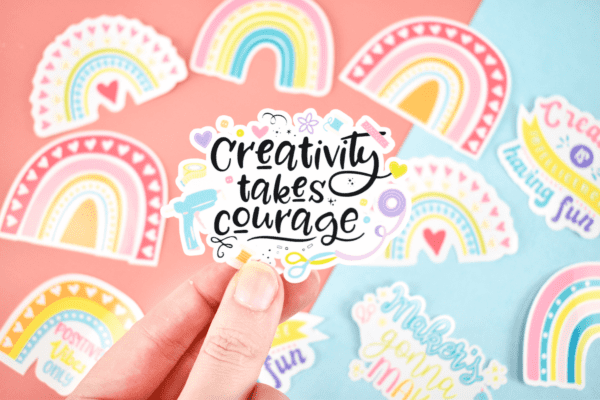
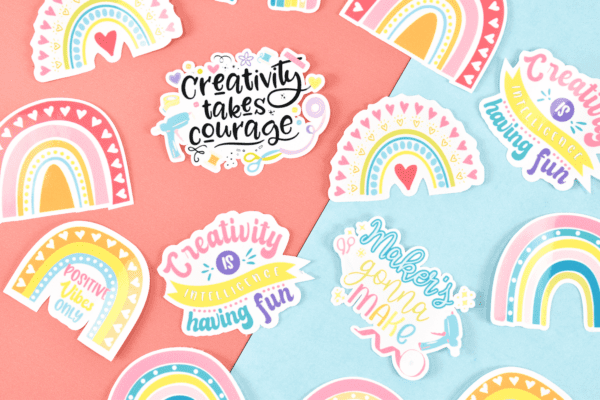
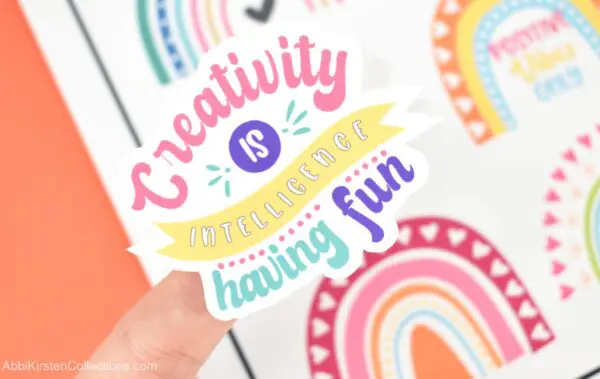
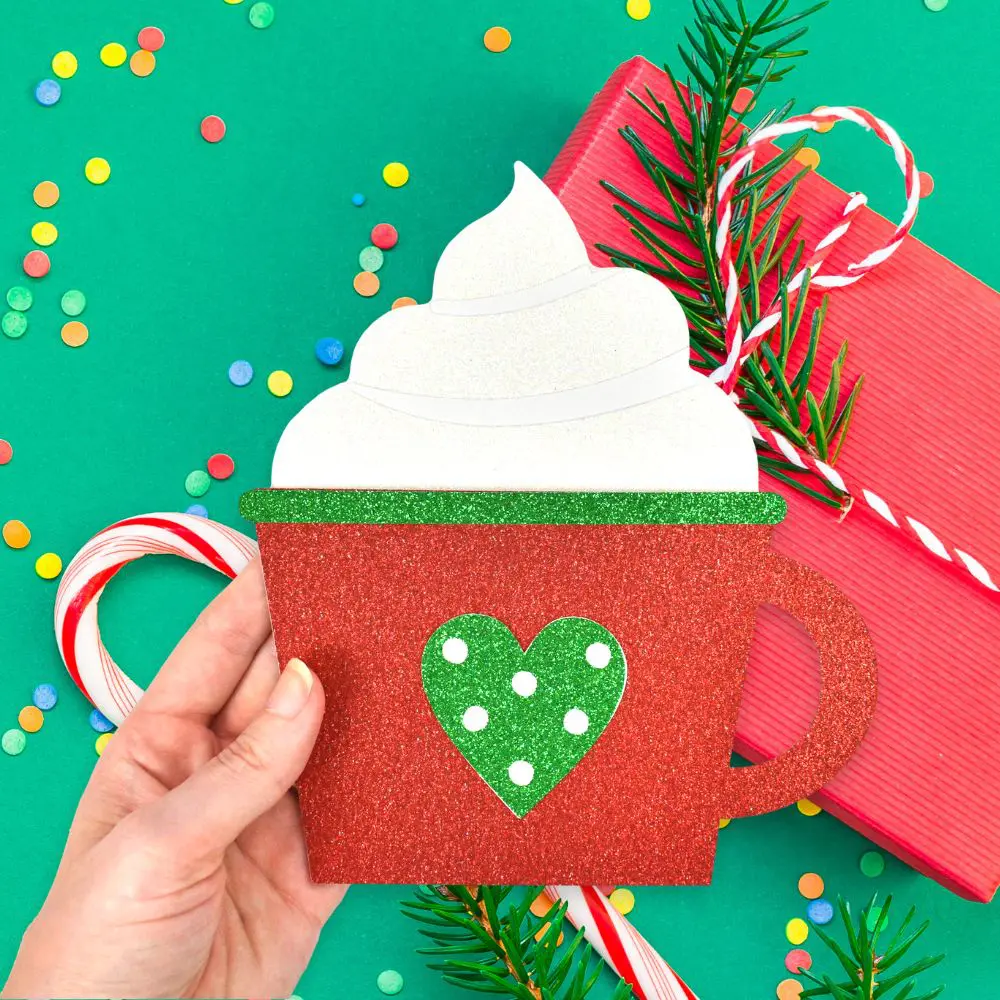
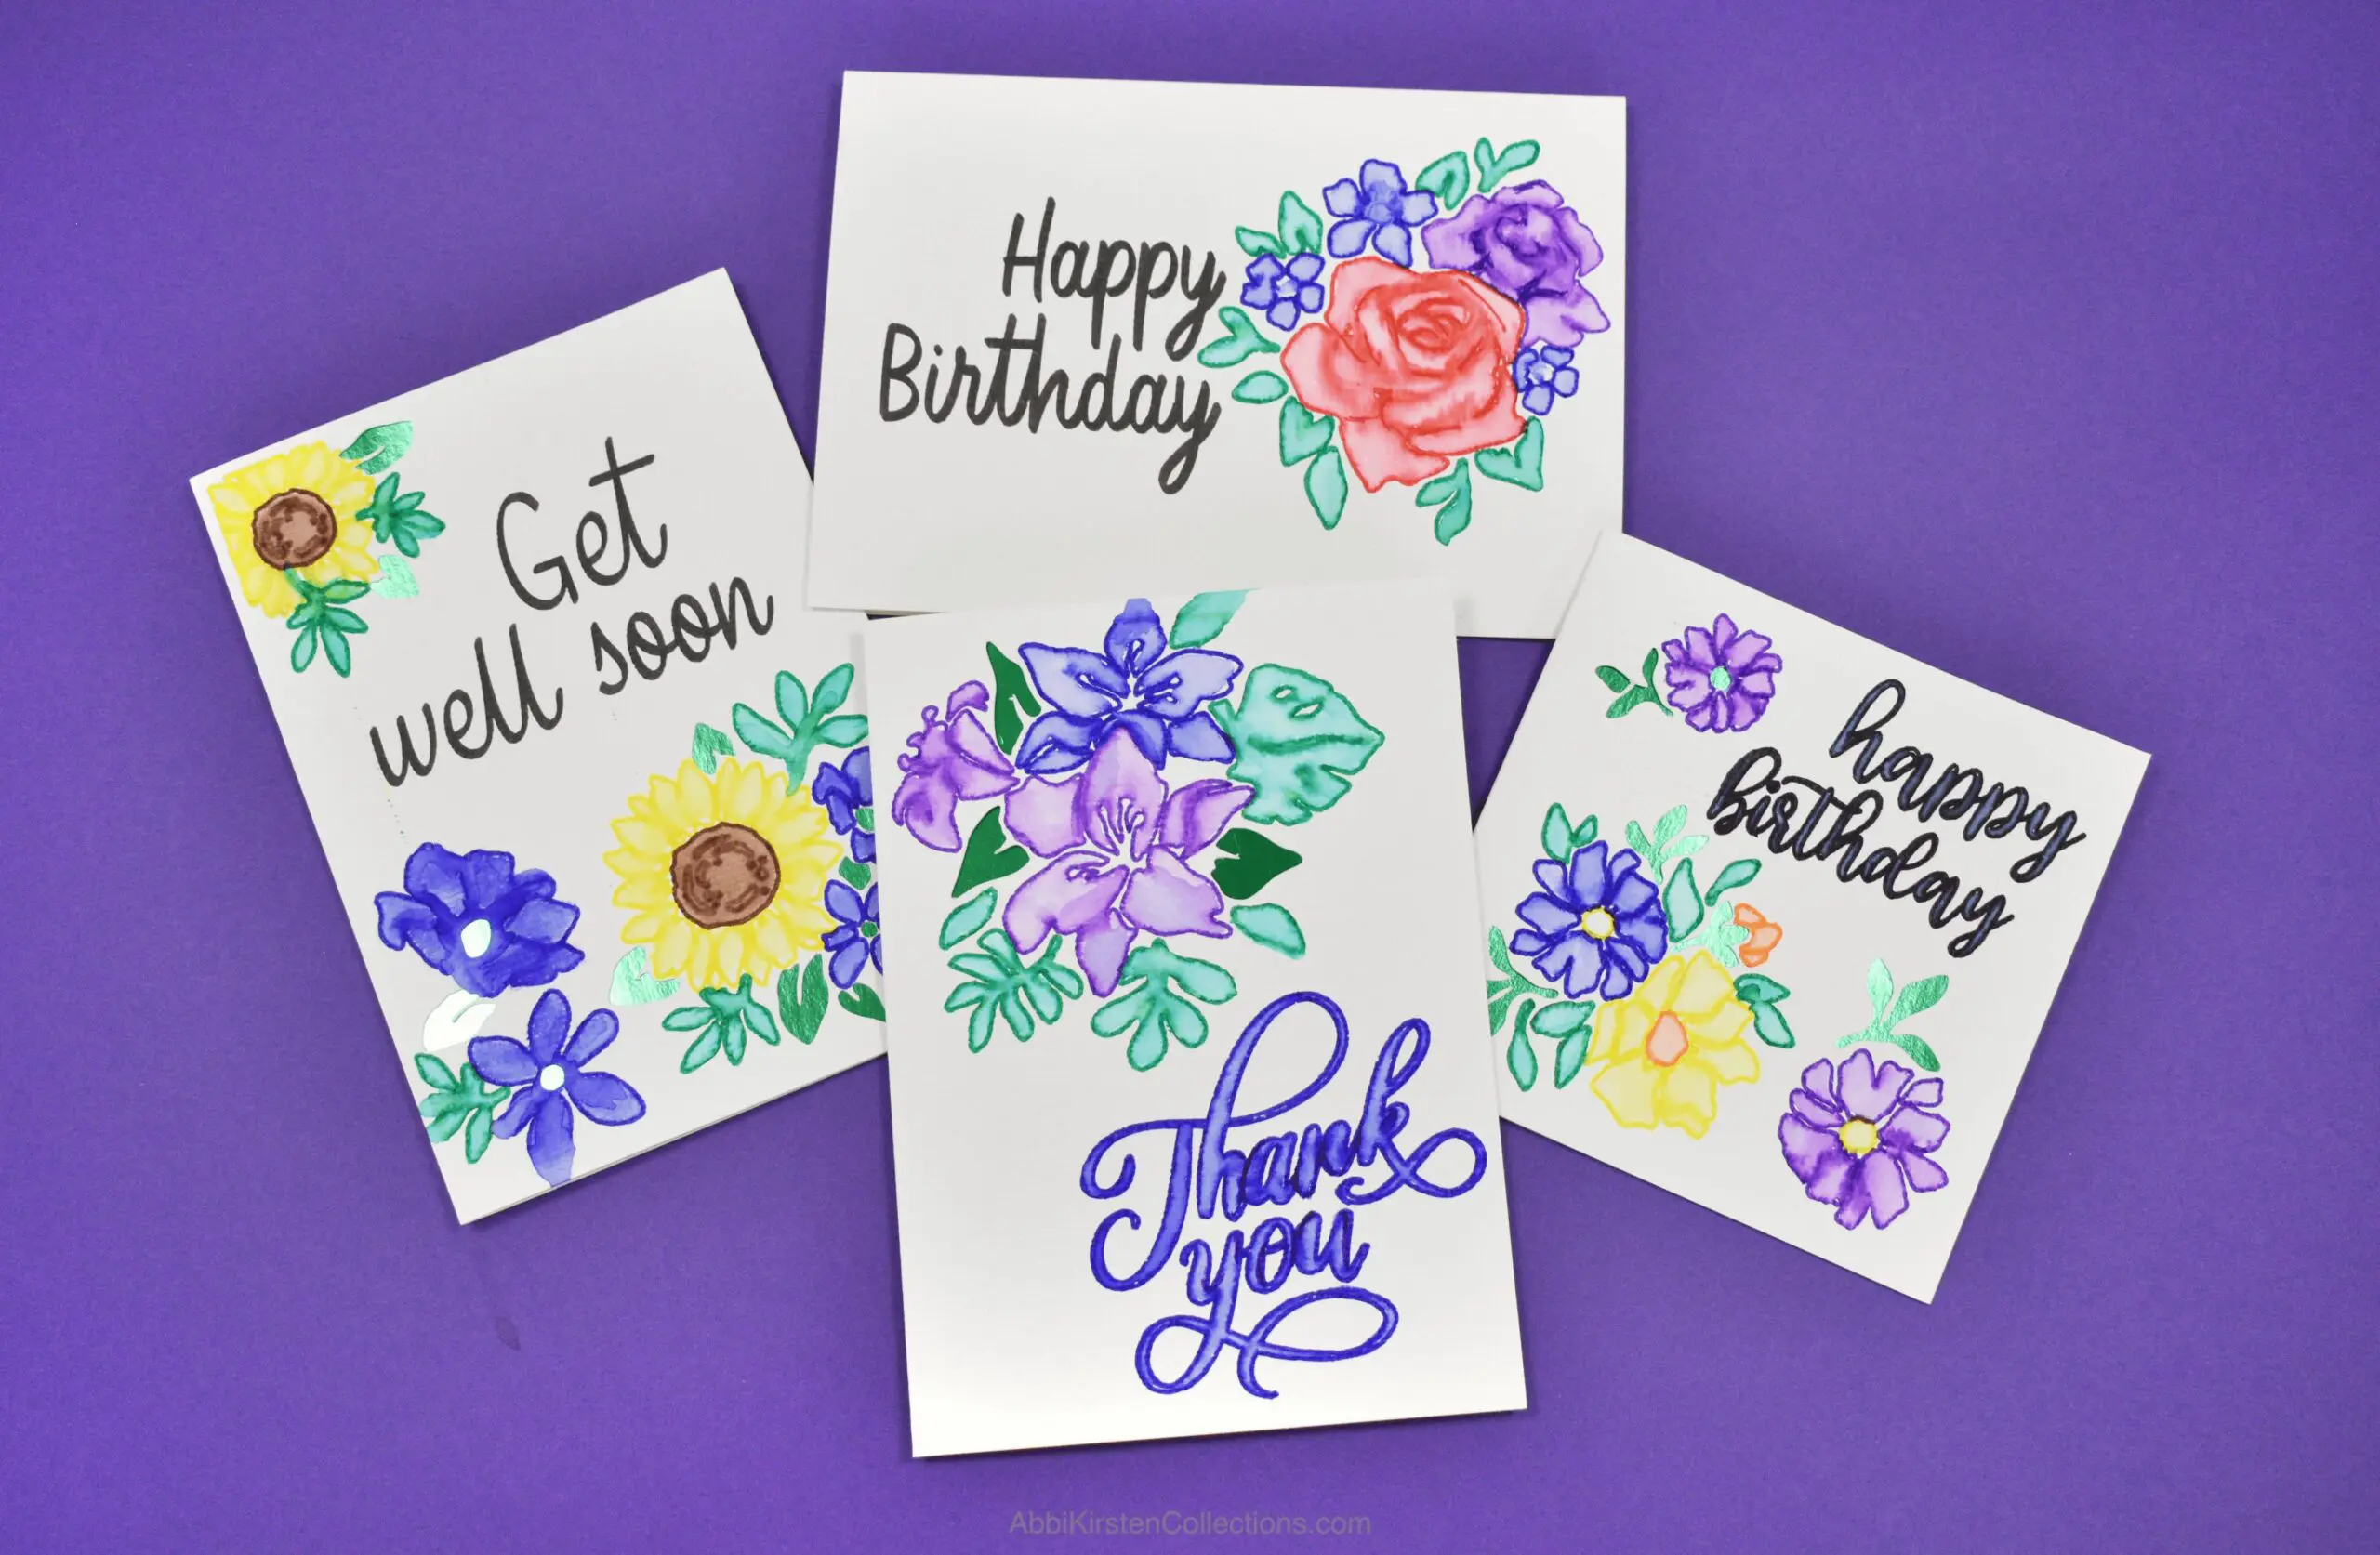
You can download my FREE creativity takes courage and rainbow image designs to make stickers with Cricut as shown in this tutorial.
To access the free sticker image files, sign up via the form below or log into your existing account. Once inside, search design #485 at the top search bar or type in the keyword “stickers.”
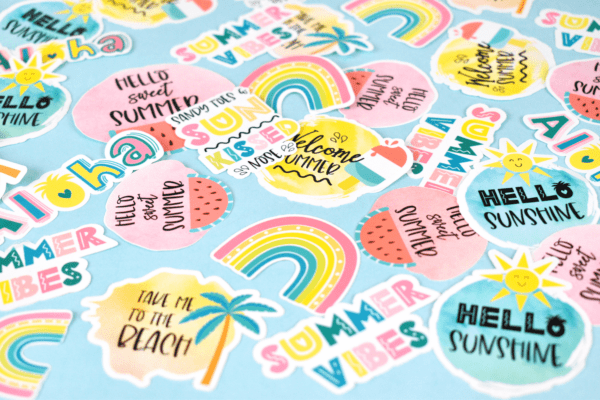
You can also access my free beach summer stickers in the Craft Vault using the keyword “summer.”
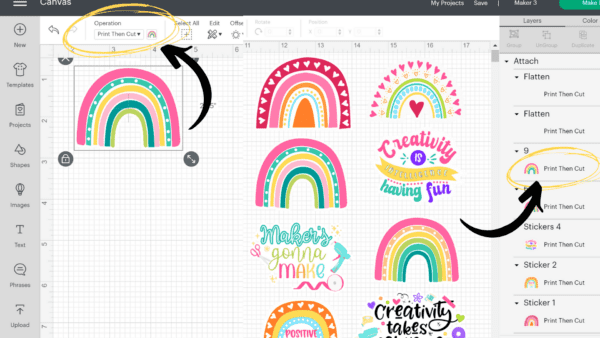
How To Recognize a Print Then Cut Image in Design Space
By uploading your image to Cricut Design Space and importing it onto your Canvas, the Operation-type is then visible in the Layers Panel to your right, which is the easiest way to tell what kind of image is on your Canvas.
The Importance of Print Then Cut Calibration
If you’ve never Print Then Cut with your Cricut before, you will need to take a few minutes to calibrate your machine. Calibration ensures you get the most accurate cut with your machine, so don’t skip this step!
You only need to calibrate your Cricut once, not every time you Print Then Cut. The only time I have ever needed to calibrate my machine a second time is on the rare occasion when Cricut Design Space does a significant software update.
The Print Then Cut process works with all Cricut models. The exception is that the first Cricut Joy cannot perform Print Then Cut (but Joy Xtra and Joy 2 can).
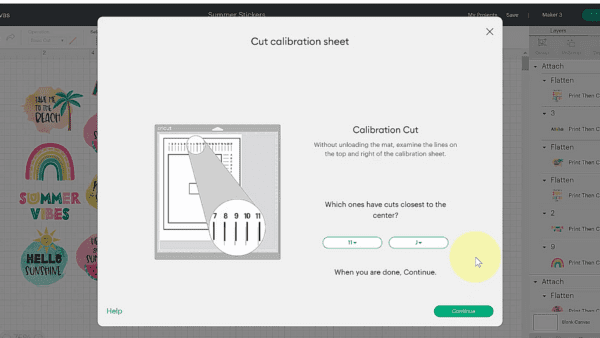
How to Calibrate your Cricut Machine for Print Then Cut
Fortunately, calibrating your machine for Print Then Cut is pretty easy, and Cricut gives you prompts each step of the way.
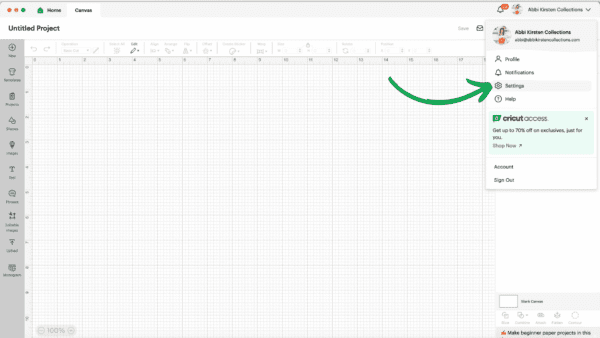
- Start Design Space and open up a new canvas. Click on your profile at the top right-hand side and select Settings.
- Toggle over to the Machines tabs and look for the Calibration option. Select the dropdown and your model of Cricut machine, then click Start.
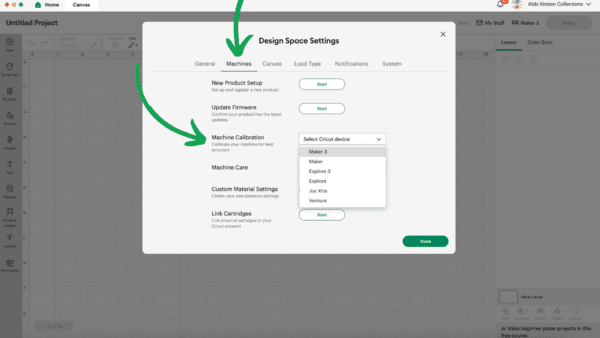
- Select which item you’re calibrating. In our case, it would be for the Print Then Cut process.
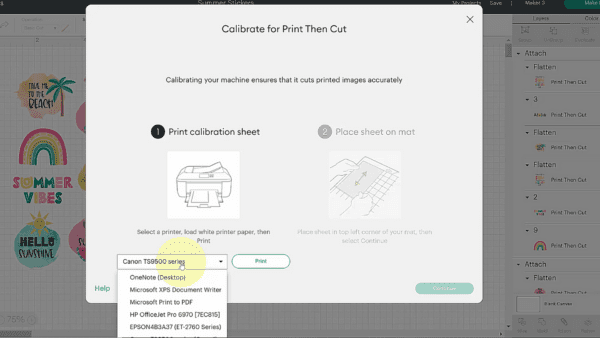
- Select your Printer, and Cricut will print a test calibration sheet. You can use regular copy paper for this.
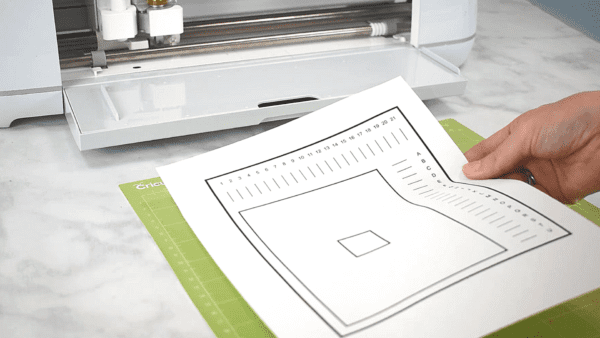
- Follow the cues and click Continue to proceed to the next screen. Cricut will prompt you to load your printed calibration sheet.
- Once you load this sheet onto the Cricut mat and press GO when prompted, Cricut scans the black registration box. A registration box is how Cricut knows where to cut on your mat.
- Cricut will ask you how accurate the cut is. Usually, the first time around is not very accurate, so in that case, select NO and let Cricut perform cuts where all the letters and numbers run on the top and sides.
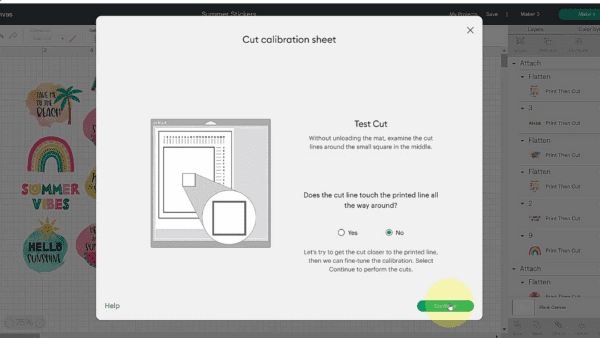
- When Cricut starts cutting out the lines along the top and the bottom, you’ll be prompted to select which letter and which number is most accurate. Look for the one that has the cut right down the center of the black line.
- Several of the steps are usually performed a second time, as prompted by Design Space. Once you go through it a second time, the calibration box will disappear, and you’re all set.
How to Make Stickers with Cricut – Video Tutorial
Watch the video below to see me go through the entire Print Then Cut calibration process and how to perform your first Print Then Cut project by making stickers! Click here to save the video for later on YouTube.
How To Print Then Cut With A Cricut – Step by Step Print Then Cut Tutorial
Now that we’ve calibrated our Cricut machine, it’s time to Print Then Cut a design!
- To upload a Print Then Cut image, go to the Upload button in the Design Panel to your left and import a PNG or JPEG image. If you want to use my sticker images here, you can get them FREE in my Craft Vault (just sign up above). You’ll be able to tell what kind of image you’re bringing in by hovering over it when browsing the files on your desktop to reveal the specs.
- Cricut will ask if you want the image to be simple or complex. I always select complex so that no details are lost.

- Bring the image into the canvas of Design Space by selecting it under Recently Uploaded. The Layers Panel to your right will tell you it is a Print Then Cut image.
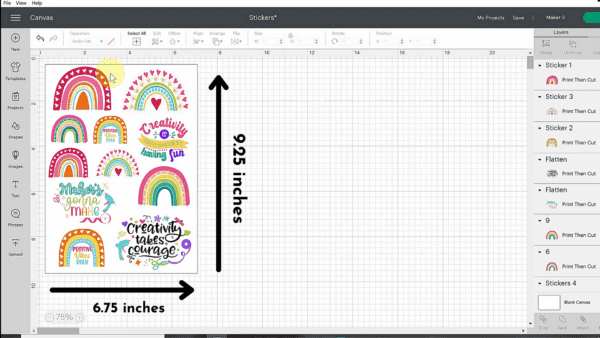
- Scale your image to size. Use the arrow at the bottom right corner of your image to scale it larger or smaller. Likewise, you can type in exact dimensions in the top edit bar.

How Big Can You Print On Cricut?
You may wonder how big Cricut can Print Then Cut. Because there has to be room for the registration marks, Cricut only allows images to be scaled as big as 9.25 x 6.75 inches as a Print Then Cut. If it’s sized incorrectly, a yellow exclamation point will appear in the Layers Panel. Plus, Cricut will notify you that the project is incompatible if you try and go to the Cut Screen.
How to Print From Design Space
Click on the Make It button, and Cricut will lay out your Print Then Cut images as it sees fit. Notice the black outlined box around the images on each page. These are known as Registration Marks, and this is how Cricut knows precisely where to cut on your mat.
Next, send your images to your Printer. You will need an inkjet printer. Click the Send to the Printer button.
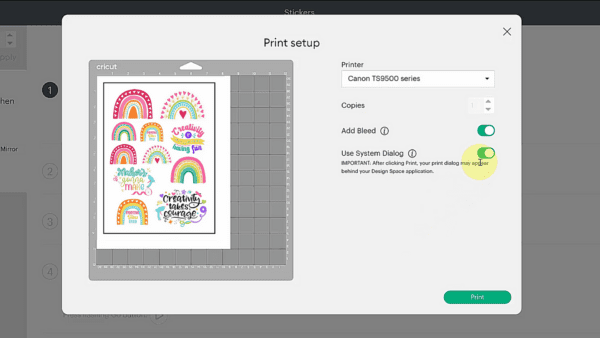
To Add Bleed Or Not To Add Bleed?
I almost always recommend that you keep the Add Bleed on; this means that Cricut will print your image with a little extra color around the edges, so once cut, it will be edge-to-edge color and not result in a thin white border around your design. The only exception would be stickers, which look nice with a white offset. (This is applicable to our sticker tutorial today.)
With these free sticker designs for Cricut, I already added the white offset so you don’t need to. But if you want to learn how to use the Offset tool for stickers and other Print Then Cut Projects, click here.
Make sure System Dialog is also toggled on because we want control over our paper selection made with our printer system box. When you’re ready and have loaded your Printer with your cardstock, printable vinyl, etc., click the green Print button.
Your Printer’s system dialog box will open, and you can select the paper type and print quality from there. (Refer to your Printer’s manual for help with this.)
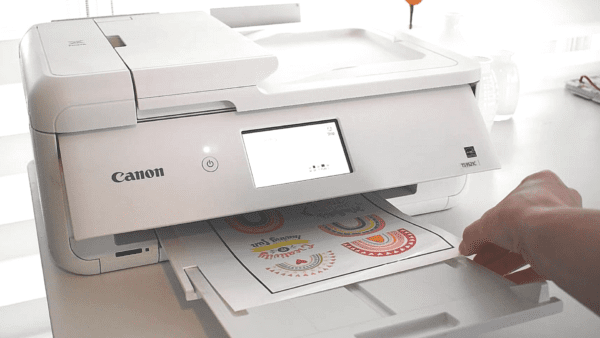
Once the item has printed, place it onto your mat at the top left corner, exactly as shown on the Cut Screen.
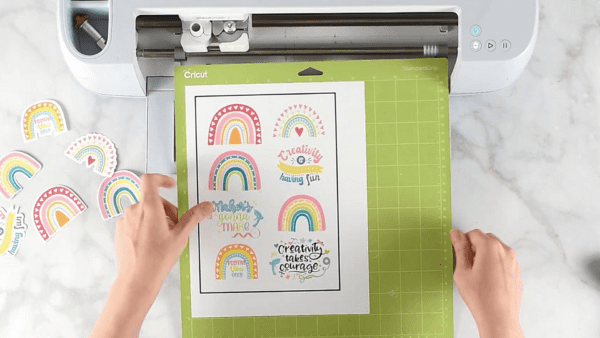
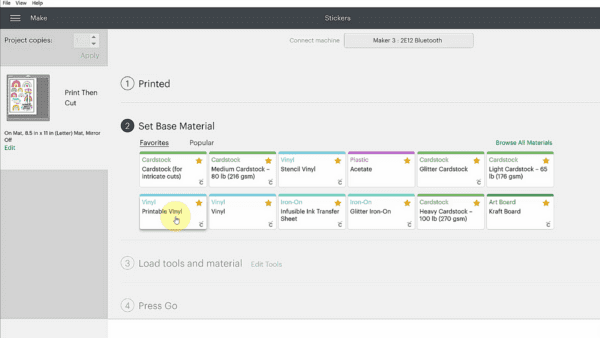
Load the mat onto your Cricut after selecting your material on the cut screen. Material options will generally be cardstock, printable vinyl, sticker paper, waterslide paper, etc. You can find these by clicking Browse All Materials on the final cut screen.
Click GO, and your Cricut will scan the black registration box, and then cut out the image design.
Advantages and Benefits of Print Then Cut
- It’s quick. Unlike layered SVG files, which take time to cut out many colors of material to complete the final project, Print Then Cut allows you to cut only once per image result while preserving all the colors of your design through printing.
- It’s colorful. Since you’re using a printer, a blend of colors can be used with your image.
- Less material waste. The colors are blended as inkjet-printed images and therefore do not require several different pieces of colored material to complete the project.
Disadvantages of Print Then Cut
- Smaller projects. One of the biggest downsides to Print Then Cut is the size. Because there has to be room for the registration marks, Cricut only allows images to be scaled as big as 9.25 x 6.75 inches.
- Inkjet printer required. Owning or having access to a colored inkjet printer is what makes Print Then Cut possible – this may be an incurred cost if you do not yet own a printer.
- Limited materials. With SVG cut files, you can use paper, vinyl, wood, fabric, iron-on, leather, and more. However, Print Then Cut with a Cricut is used with cardstock, paper, waterslide, sticker paper, or printable vinyl.
What is the Difference between Print then Cut and Cut image for Cricut?
One of the most common questions for Cricut beginners is, what is the difference between a Print Then Cut and an SVG Cut File? First, we need to understand what an SVG file is before contrasting a cut file to a Print Then Cut image.
- An SVG cut file is a graphic format that stands for scalable vector graphics. In the world of Cricut, they are vital to crafters who wish to build a project from layers of materials in various colors, such as vinyl, fabric, paper, wood, etc.
- A PNG or JPEG image (the format used for Print Then Cut) is just like clipart images or pictures you would take on your phone or camera.
Print Then Cut Vs. Basic Cut File
Print Then Cut (a.k.a PNG or JPEG image format) – Blended image where all colors are flattened and printed as one single layer. You will use ink from a printer to manifest the image’s result.
SVG Cut File – Each color is represented by a layer that can be ungrouped, cut out on a specific material, and built into a final design. You will use a material such as vinyl, paper, iron-on, infusible ink, etc., to build the design in layers.
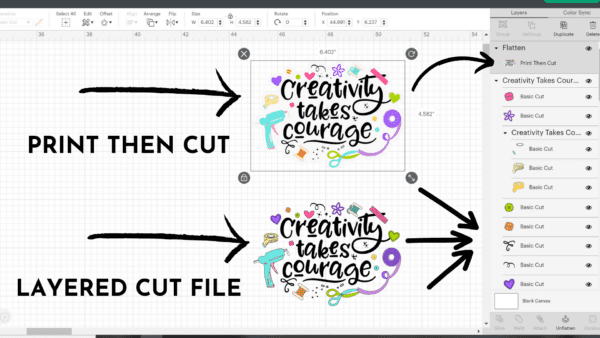
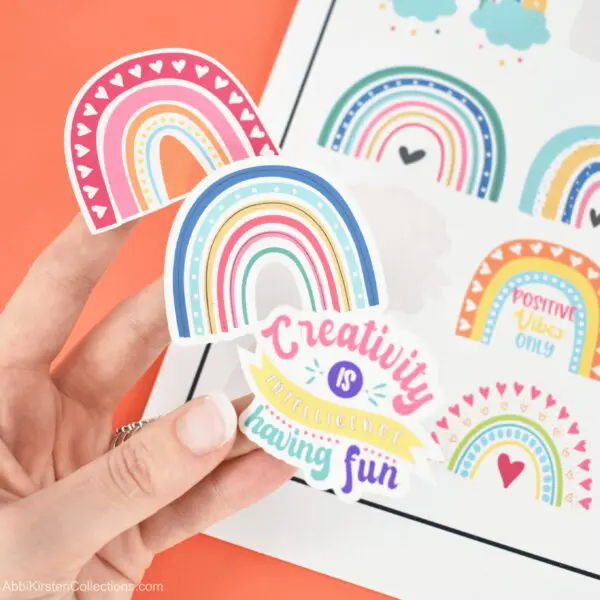
Here is a side-by-side example of my creativity takes courage design. The one on the left is in layers (an SVG cut file) the one on the right is a flattened image (PNG or Jpeg).
What Printer is Best For Cricut?
Many crafters ask me which Printer is best for Print Then Cut with your Cricut. Here’s the deal: if you already have a printer, don’t run out and buy a new one. Try a Print Then Cut with your printer first and check the printer settings on your computer to ensure the best results. You need to change the Print Quality from Standard to High in your printer dialog box. Refer to your printer’s manual for this.
If you do not have a printer and are looking for recommendations, I have three I usually suggest.
- HP Envy (most afforable but tends to use more ink)
- Canon Pixma models (more expensive but great print quality plus they’re made for crafting)
- Epson Ecotank (the most expensive model but very economical on ink – and these printers are great workhorses)
How do I Turn an SVG into a Print Then Cut?
Cricut Design Space makes it super easy to turn any layered SVG into a Print Then Cut image with the help of the Flatten tool in the Layers Panel.
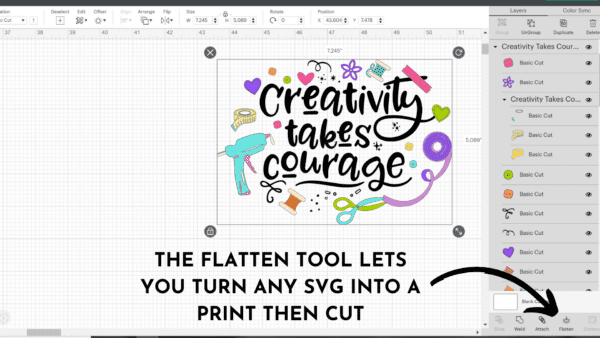
Here’s how I change any layered SVG cut file in Design Space to a Print Then Cut design.
- Bring in your SVG of choice using the Upload button.
- Select the image in full.
- Click the Flatten tool at the bottom of the Layers Panel.
That’s it! Now you can print this image out instead of cutting it in layers.
Converting An Image (PNG or JPEG) into an SVG Cut File
To convert JPEG and PNG images into layered SVG files isn’t as easy. File conversion requires the image to be significantly altered and Cricut Design Space does not have the tech for this process. If you’ re interested in learning how to do some one-click magic to convert an image into an SVG cut file, review this post here.
Ready to Customize and Make your Own SVG Cut Files?
If you’re ready to learn how to master photo to SVG conversions and design your own SVG cut files, you don’t want to miss my FREE Magic of SVGs Workshop!
Where Can I Find the Best Images and SVG Files for My Cricut Crafts?
So the last question you might be asking is, where is the best place to find PNG, JPEG, or SVG cut files to use with Cricut?
Here is a List of my Go-to Resources
- Abbi Kirsten Collections – Yes, I have a Craft Vault with lots of goodies inside right here. Click here to set up a FREE account. Remember to grab these free stickers to print with your Cricut.
- Creative Fabrica – The largest digital platform for crafters – full of images, SVG cut files, and fonts!
- Etsy – Etsy has a ton of sellers who have designed amazing clipart and SVG cut files. A few of my favorite shops for Print Then Cut images are Lovely to C U, Lagartixa Shop, and My Cute Lobster Designs.
- Design Bundles – Not only does Design Bundles have lots of clipart, but also amazing fonts!
- Freepik – One of my favorite free sources for clipart images and vectors.
Did you enjoy this tutorial on making Print Then Cut stickers with a Cricut? What other questions do you have? Ask away below in the comments!
Want more designs to make stickers with your Cricut machine? I have a Summer Lovin sticker collection for our A-Star Crafters!
Want to Sell Stickers You Make with Cricut?
Discover how to create unique planner stickers so that you can stand out on Etsy. Now that you have learned how to make stickers with Cricut, you can learn to sell the stickers that people actually want to buy with 5-Star Etsy Sticker Pro, Mim Jenkinson.
About Abbi Kirsten
Welcome to my colorful corner of the internet, where we play with vibrant crafts and unlock your creative magic! Hang out with me and get lost in a fun array of projects, tutorials, and products, from stunning papercraft ideas to flower templates, Cricut help for beginners, and endless crafter’s hacks.
Join A-Star Crafters and participate in monthly Craft-Alongs in our community Facebook group!


Inkjet printers are not my favorite printer. Things from such printer can simply smudged if damp at all. I love the color laser printer I have. What makes it unusable for Print and Cut?
Laser printers can be used with Cricut but depending on the image may not always cut successfully because the laser can be harder for the machine to read. Good quality printers like Canon Pixma or HP Envy have worked well for me and as long as I give it 2 minutes to dry I have never received any smudges. 🙂
How do I make inkjet stickers waterproof?
Hi! I love the Luxoton waterproof sticker paper for this. it’s all in the paper! https://amzn.to/3A5YFAw
Thank you a TON!