Paper Southern Magnolia Flower Template: Step-By-Step Paper Flower Tutorial
This post may contain affiliate links that won’t change your price but will share some commission.
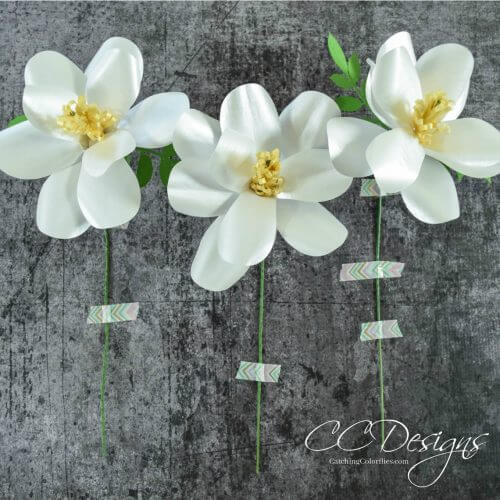
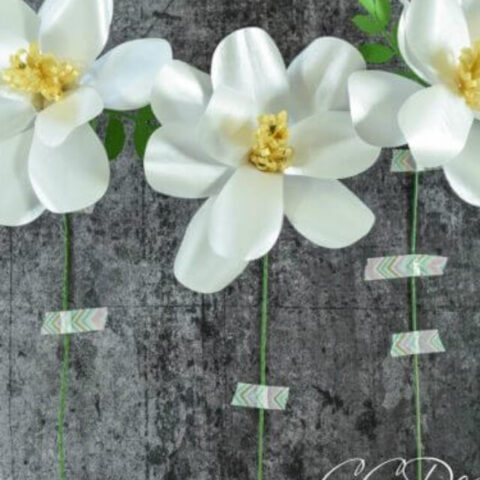
Paper Southern Magnolia Flower Tutorial
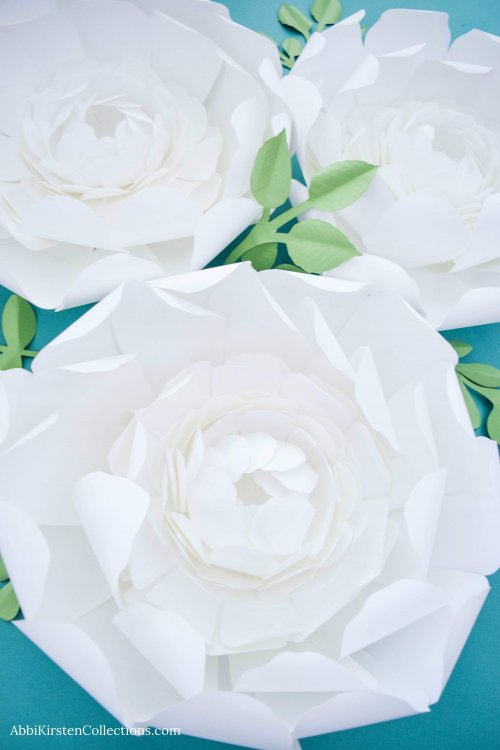
If you are looking for silent elegance and subtle strength, look no further than the grand statement made by the southern magnolia flower. They have a simplistic beauty, and they make any space inviting and charming. Real southern magnolias herald the beginning of warmer weather and the coming summer. The edible leaves have been used as medicine to promote healthy digestion, weight loss, and more! Southern magnolias inspire happy thoughts and bloom into creamy white flowers, although there are purple and pink magnolias, too! The magnolia grandiflora Bracken Brown Beauty evergreen tree has deep green leaves on top and a cinnamon-colored brown underneath.
So, you know me, I pulled out my craft supplies and designed a paper flower version. I made about eight of these paper southern magnolia flowers, and they are currently nestled on my mantel with a garland of dark green magnolia leaves! I think it would be lovely to add these to front door wreaths or wedding bouquets. A vase full would be the perfect housewarming gift!
Today, I’m giving you my paper magnolia tutorial with step-by-step instructions and a video tutorial so you can make your own majestic paper magnolia flower, too!
Let’s dive right in, shall we?
Related Posts – More Paper Flower Tutorials!
- Spring Tulip Paper Flower Tutorial
- DIY Paper Flower Pomander Balls
- Step-by-Step Paper Peony Tutorial
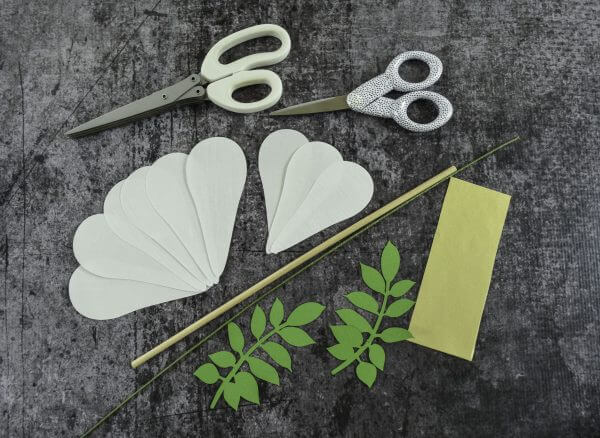
Supplies For Paper Southern Magnolia Flowers
- Hot glue gun
- 65-pound cardstock (I suggest white, yellow-gold, and green colors)
- 18 gauge wire
- Wire clippers
- Cricut Explore Air 2 Machine (or other cutting machine)
- Scissors
- Thin dowel for rolling
- Fringe scissors (optional)
- Floral tape (or corsage tape)
- Leaf template (optional)
- Magnolia Flower Templates (available as SVG files for cutting machines or as PDF files if you are hand-cutting)
You can also try crepe paper for a softer magnolia flower or get the instructions for a giant magnolia paper flower!
How To Make Paper Southern Magnolia Flowers
You can follow the written instructions or watch the video tutorial for the paper magnolia flowers on my YouTube channel (link below the directions).
I recommend that you gather all the supplies you will need and ensure you have a clean workspace – especially when working with white paper flowers! Be sure to prep and pre-cut petals before beginning assembly.
Prep The Magnolia Flower Parts
Using the template and your Cricut cutting machine or scissors, cut out the following magnolia petals:
- 3 white (or other color) small petals measuring 3.6 H x 1.7 W
- 6-7 larger white magnolia petals measuring 4.2 H x 1.9 W
- A rectangle of gold for the stamen measuring 5” by 2”
- Cut out the magnolia flower leaves if you are using them.
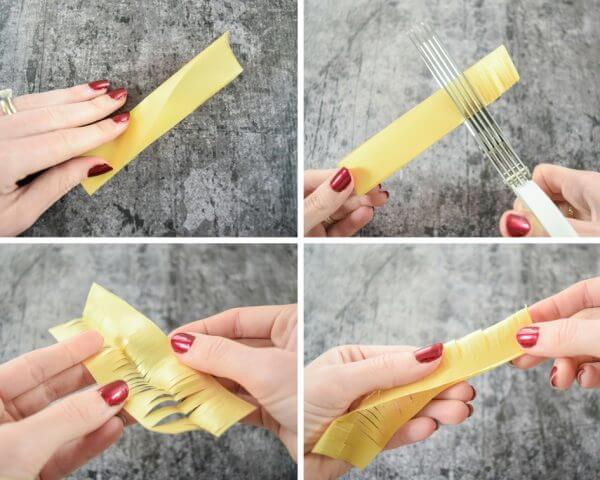
Assemble The Stamen Center of the Magnolia
- First, fold your stamen rectangle in half lengthwise.
- Using fringe or regular scissors, cut small slits down the entire length of the folded side.
- Then, open the rectangle, reverse the fold, and glue the two non-fringed ends together.
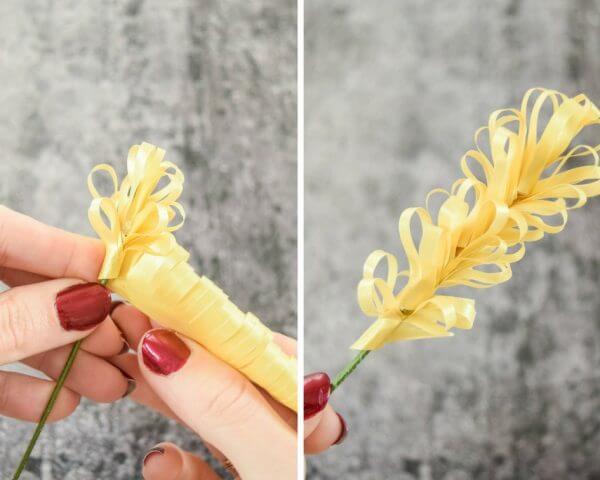
- Using your 18-gauge wire, bend one end into a loop.
- Add some glue to the edge of the paper and wrap it down the wire stem, adding glue as you go.
- Trim the stem down if you wish.
Assemble The Paper Magnolia Petals
- Starting with the three smaller petals, use a thin dowel to curl the edges of the petals backward. Use your fingers to slightly crease the bottom center of the magnolia petals.
- Add glue to the bottom tip of the petal and glue it around the magnolia yellow stamen and pinch firmly until dry.
- Curl and slightly crease the remaining large petals as we did with the first three. Glue your next petals in place in between the first three small petals to create a blooming effect.
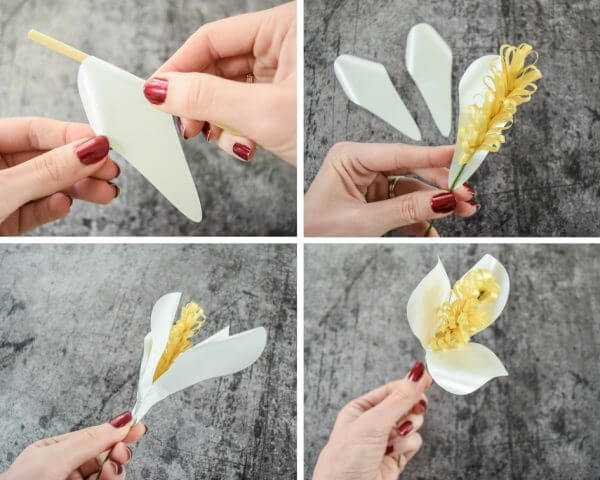
- Keep adding one petal at a time until you have used the remaining six or seven large petals.
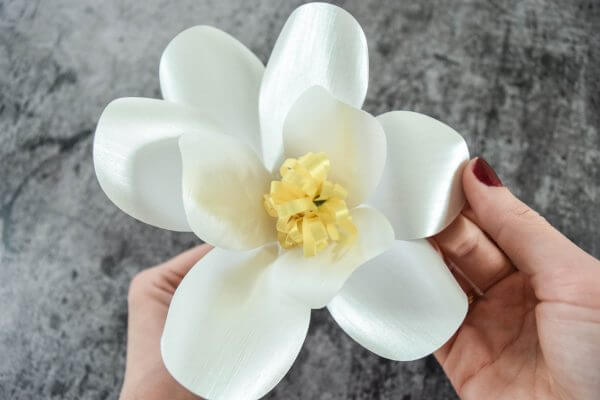
- Repeat the last two steps until you feel the flower is fairly even and looks like it is blooming.
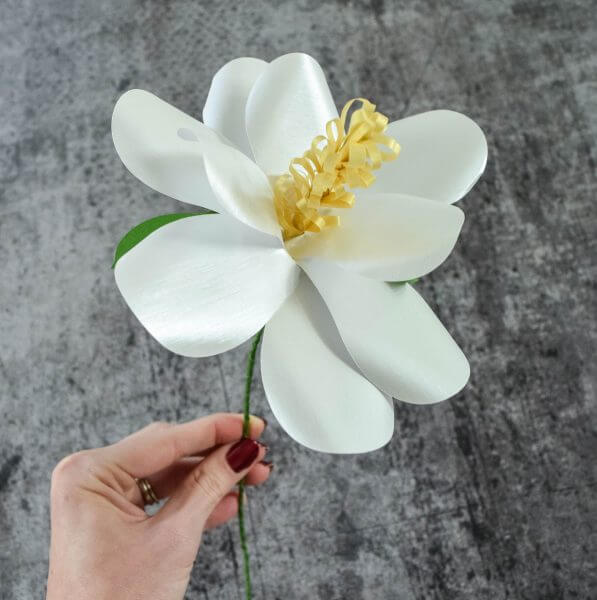
- To finish the bottom of the magnolia, cut about 6 to 8 inches of corsage or floral tape. Add a small bit of glue at the base of one of the petals, then wrap the corsage tape down the stem to hide the bottom of the paper petals.

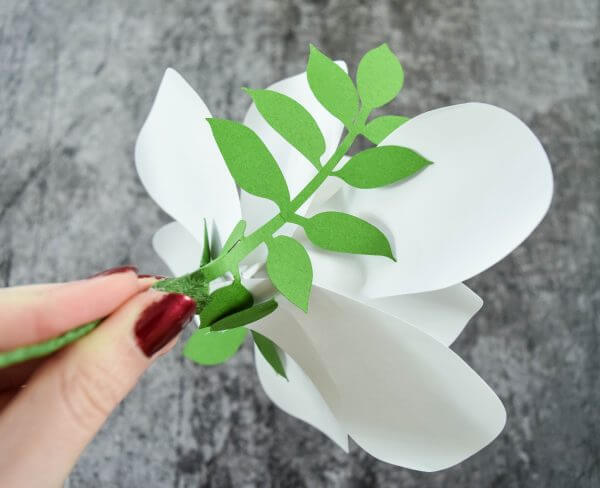
- Optional: add greenery or paper magnolia leaves by gluing them to the underside of the paper flower. You can elevate the leaf cut-outs by adding vein impressions with my Paper Blooms Shaping Mat & Rolling Tool Kit.
Enjoy this fun piece of Southern flair! Tell me what you did with your beautiful magnolia paper flowers, and show me how they turned out!
Step-by-Step Video Tutorial for the Paper Southern Magnolia Flower
Related Posts – More Paper Flower Tutorials!
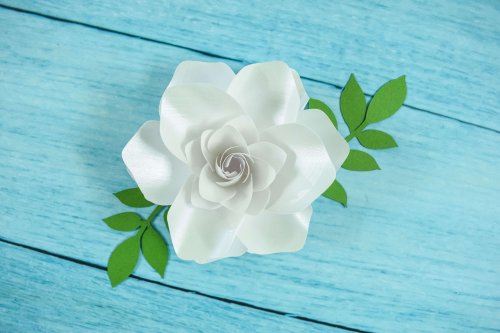
Southern Magnolia Paper Flowers
Learn how to make these stunning Southern-style magnolia paper flowers! With this easy step-by-step tutorial, you can make classic flowers that fit perfectly in Southern or farmhouse-style decor.
Materials
Instructions
Prep The Magnolia Flower Parts
Using the template and your Cricut cutting machine or scissors, cut out the following magnolia petals:
- 3 white (or other color) small petals measuring 3.6 H x 1.7 W
- 6-7 larger white magnolia petals measuring 4.2 H x 1.9 W
- A rectangle of gold for the stamen measuring 5” by 2”
- Cut out the magnolia flower leaves if you are using them.
Assemble The Stamen Center of the Magnolia
- First, fold your stamen rectangle in half lengthwise.
- Using fringe or regular scissors, cut small slits down the entire length of the folded side.
- Then, open the rectangle, reverse the fold, and glue the two non-fringed ends together.
- Using your 18-gauge wire, bend one end into a loop.
- Add some glue to the edge of the paper and wrap it down the wire stem, adding glue as you go.
- Trim the stem down if you wish.
Assemble The Paper Magnolia Petals
- Starting with the three smaller petals, use a thin dowel to curl the edges of the petals backward. Use your fingers to slightly crease the bottom center of the magnolia petals.
- Add glue to the bottom tip of the petal and glue it around the magnolia yellow stamen and pinch firmly until dry.
- Curl and slightly crease the remaining large petals as we did with the first three. Glue your next petals in place in between the first three small petals to create a blooming effect.
- Keep adding one petal at a time until you have used the remaining six or seven large petals.
- Repeat the last two steps until you feel the flower is fairly even and looks like it is blooming.
- To finish the bottom of the magnolia, cut about 6 to 8 inches of corsage or floral tape. Add a small bit of glue at the base of one of the petals, then wrap the corsage tape down the stem to hide the bottom of the paper petals.
Optional: add greenery or paper magnolia leaves by gluing them to the underside of the paper flower. You can elevate the leaf cut-outs by adding vein impressions with my Paper Blooms Shaping Mat & Rolling Tool Kit.

About Abbi Kirsten
Welcome to my colorful corner of the internet, where we play with vibrant crafts and unlock your creative magic! Hang out with me and get lost in a fun array of projects, tutorials, and products, from stunning papercraft ideas to flower templates, Cricut help for beginners, and endless crafter’s hacks.
Join the Member Vault and participate in my monthly Craft-Alongs in my Facebook group to access all the magic!