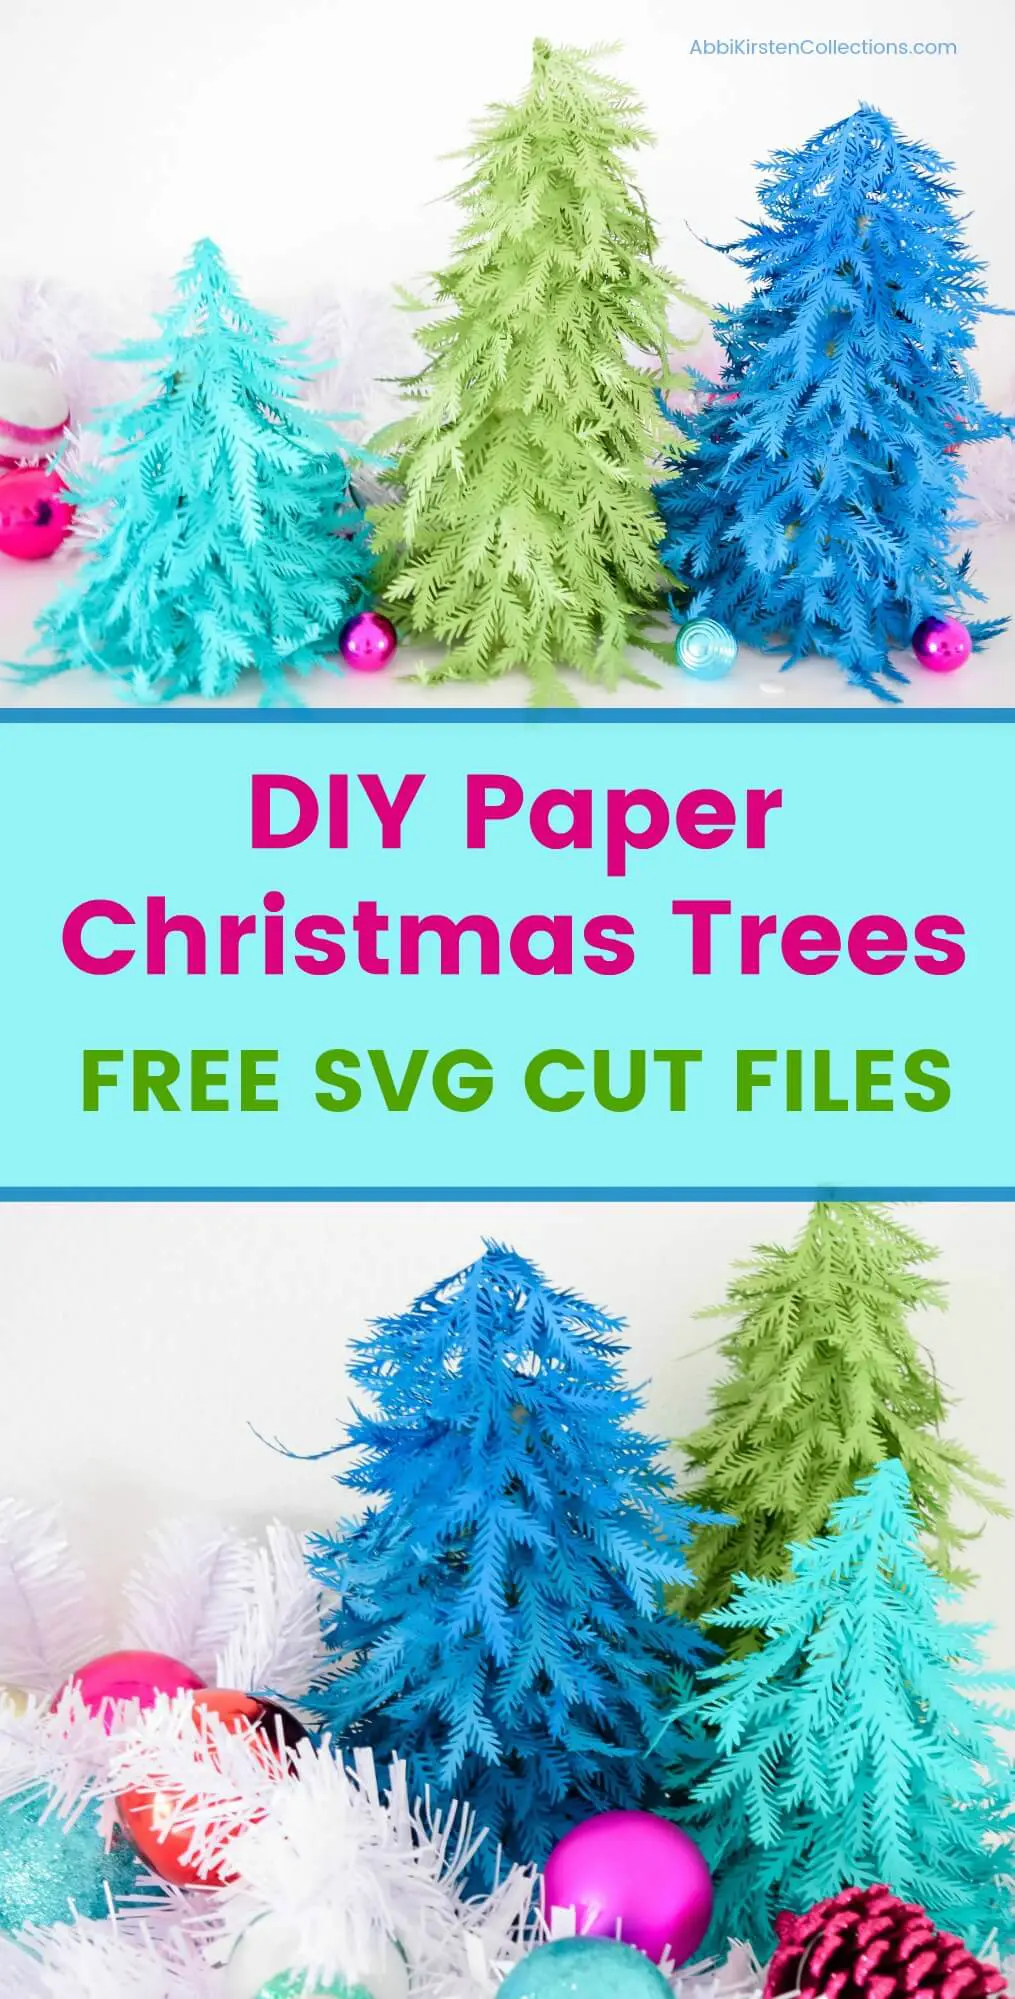
Paper Christmas Tree Craft: Free Christmas Tree Template
This post may contain affiliate links that won’t change your price but will share some commission.

Every year I love to let Christmas come alive with colorful Christmas projects that can double as decor for your home or tree. Last year I did my first take on my 3D paper Christmas tree and this year, I am going for round two with this ornate DIY paper Christmas tree craft!
I made a special set of Christmas pine needles as SVG cut files that can be used to create an almost realistic small Christmas tree from paper! This Christmas tree template is a must to use with your cutting machine because of how intricate the details. I’m convinced if you tried to hand cut this, your hand will fall off, and that’s a liability issue for me. Just kidding. But seriously, you will want a cutting machine.
These templates are totally free for your personal use in my free craft resource library! And this project is perfect for a tablescape display for your home of holiday gathering!
Supplies Needed to Make Colorful Paper Christmas Trees
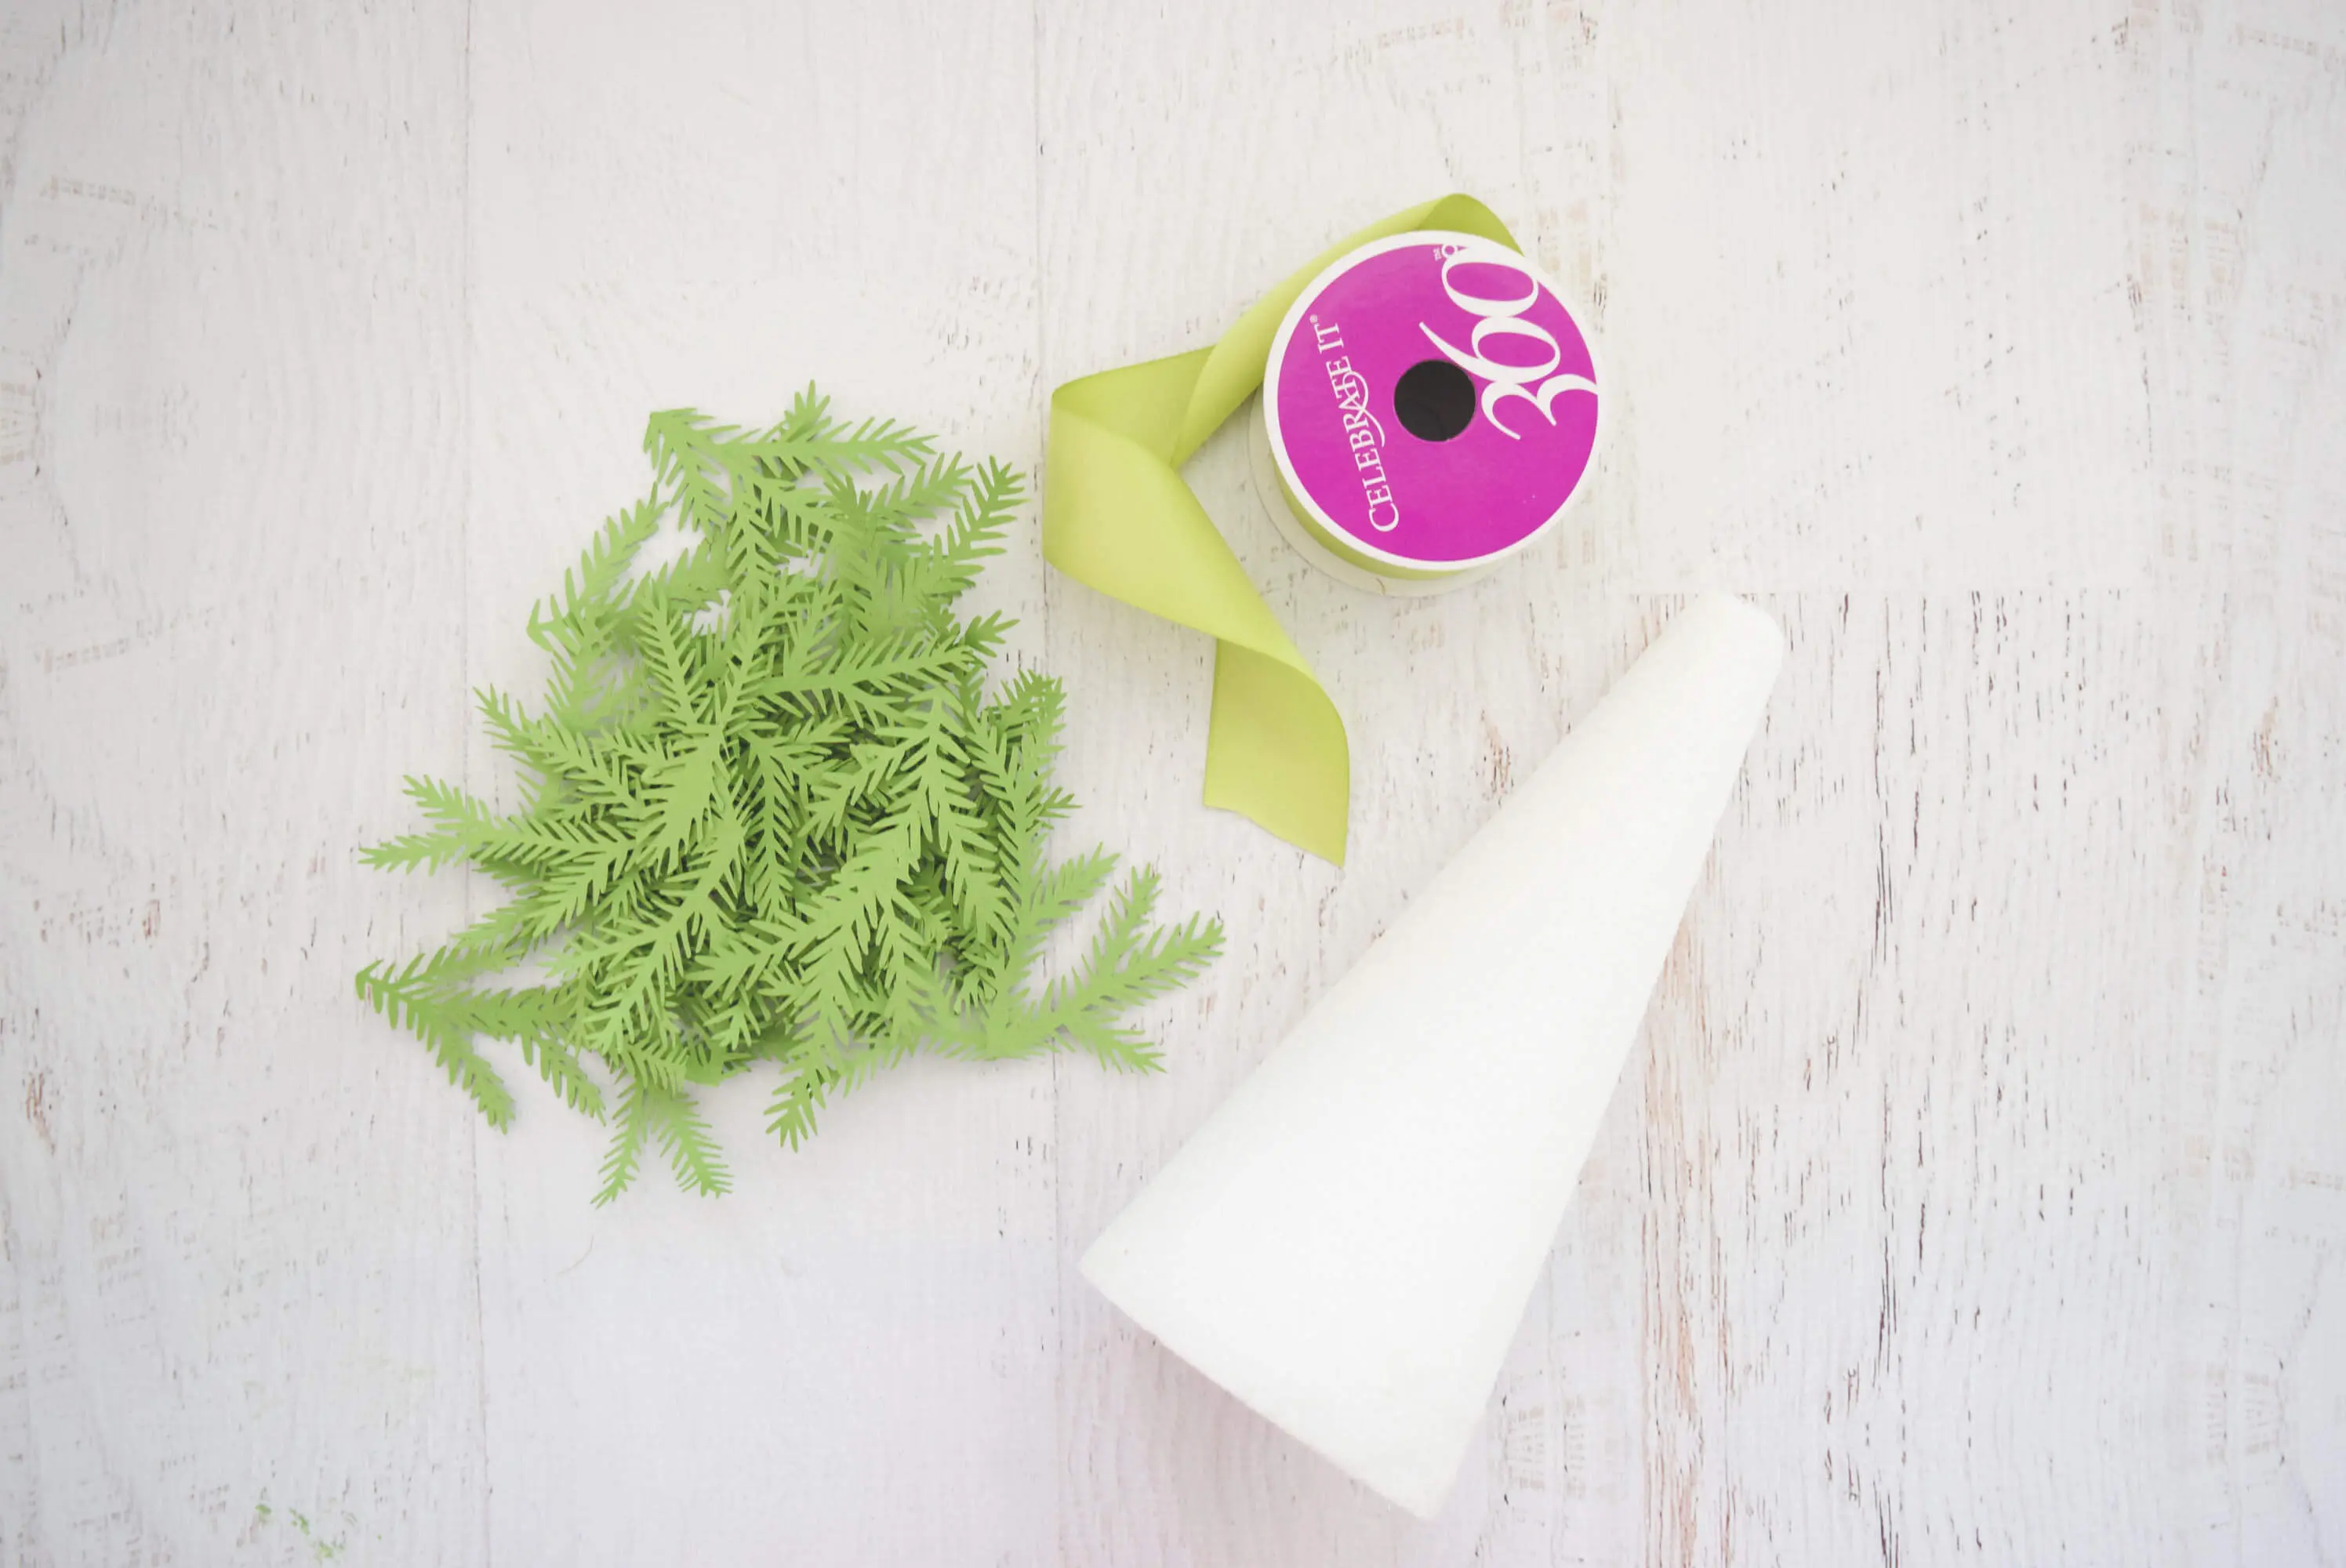
Here are the supplies you will need to make this paper Christmas tree craft.
- Foam tree bases in various sizes (find them at craft stores as well)
- Christmas tree template (find them at the bottom of the post for free!)
- 65 pound cardstock in choice colors
- Cutting machine (I love my Cricut!)
- Glue gun
- Ribbon (With my second tree, I found tulle worked better, so opt for that if you can)
- Patience (these trees are not at all hard to make, but the pine needles do take a little time to cut out on your machine. Wrap some Christmas presents in between loading paper!)
How to Make Colorful Paper Christmas Tree Crafts
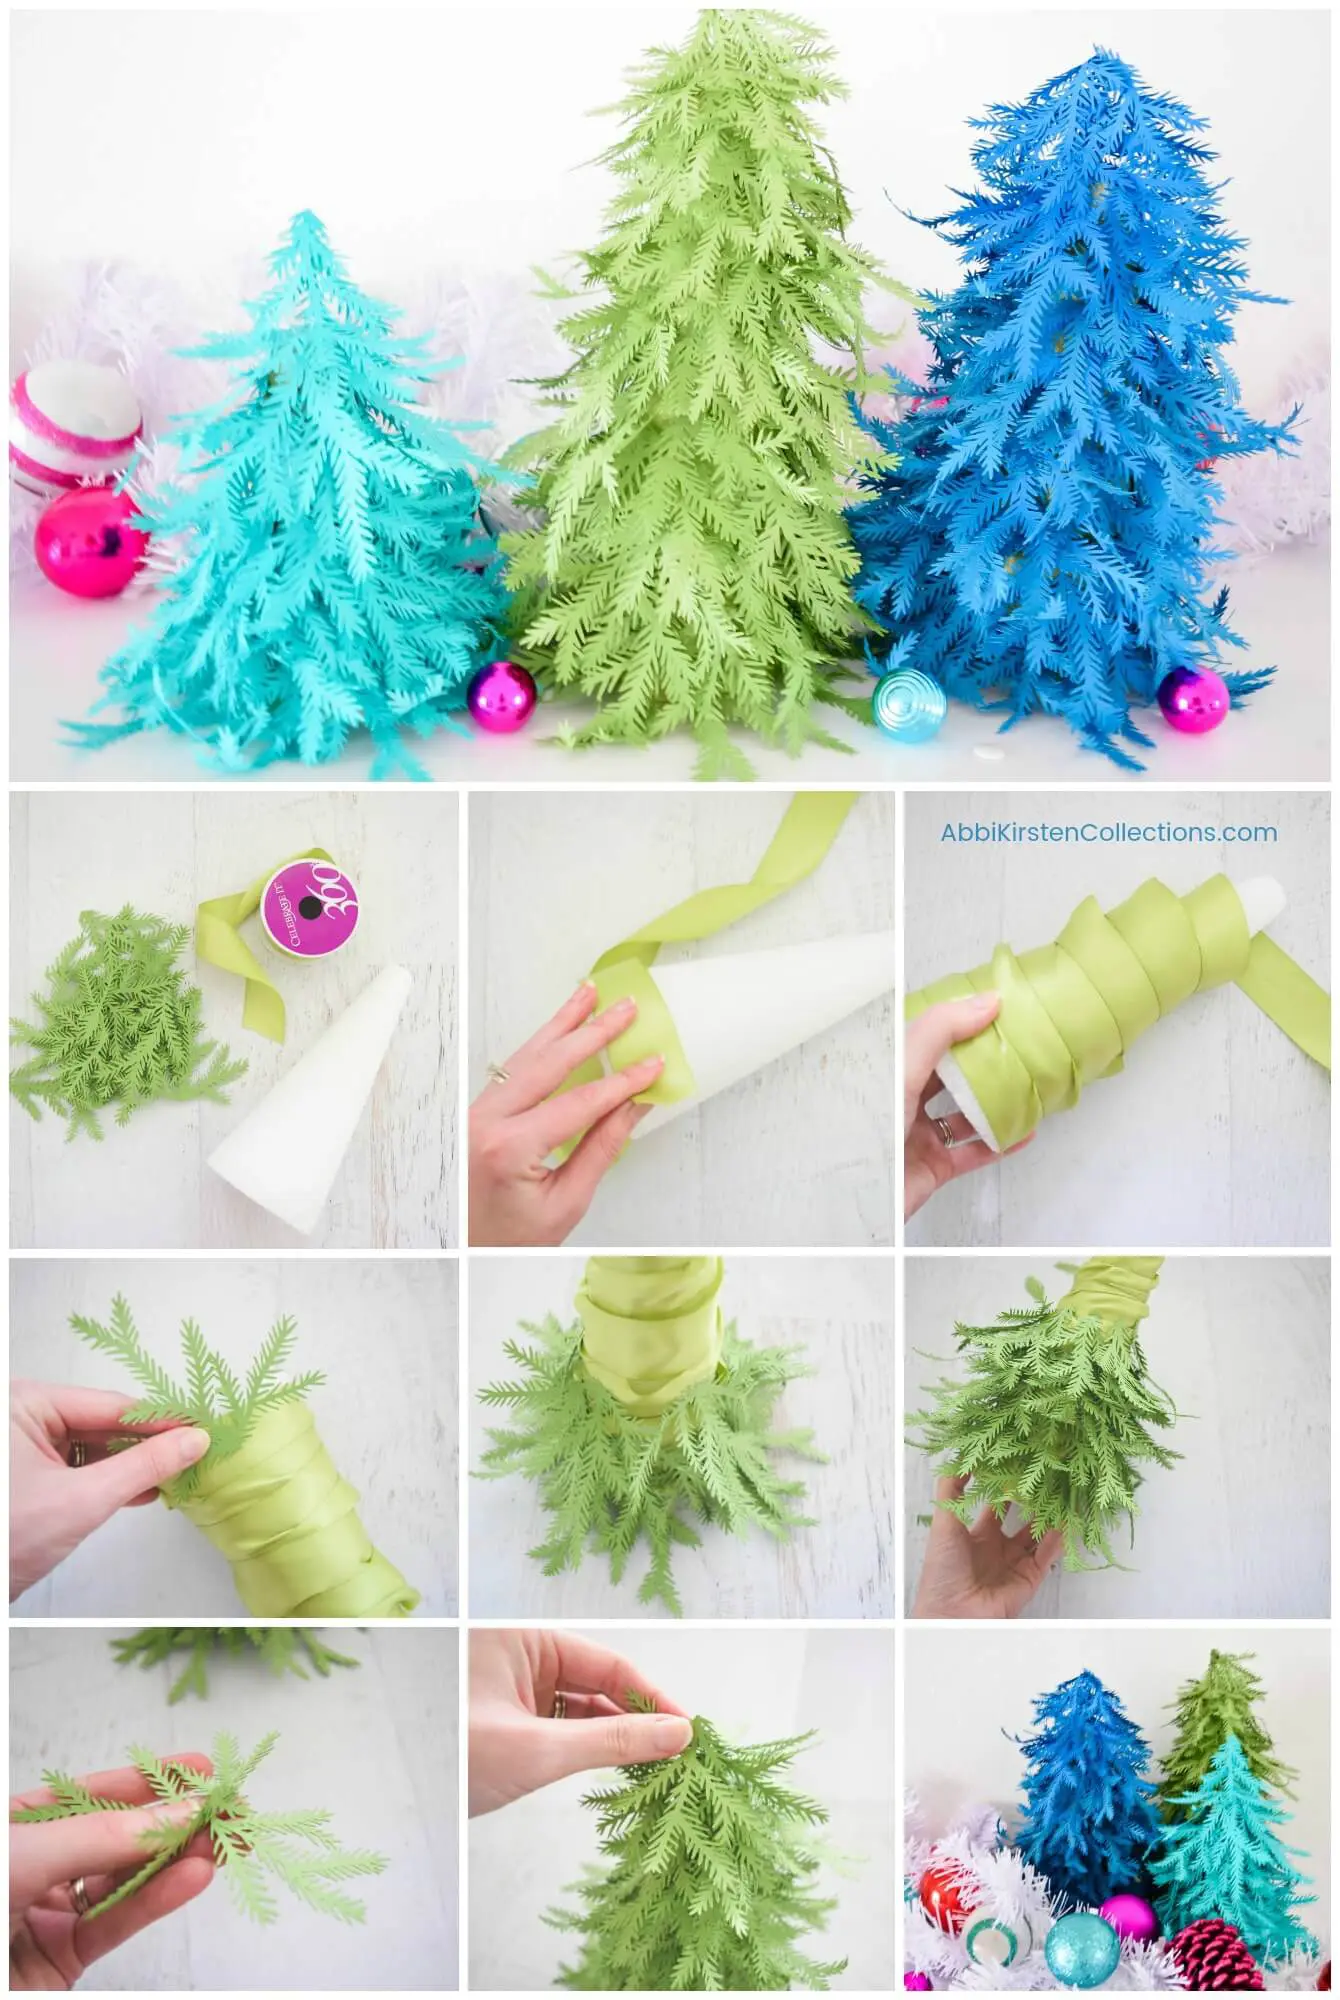
Step 1: Cut the Pine Needles (Use Your Cutting Machine!)
Gather your supplies and get all your pine needles cut out. Depending on the size of your foam tree base, everyone will have a different count. For my largest one I used roughly 30-35 pieces.

Related Posts
Giant Paper Holly Garland with Free Template
DIY FALALA Tinsel Christmas Tree Letters
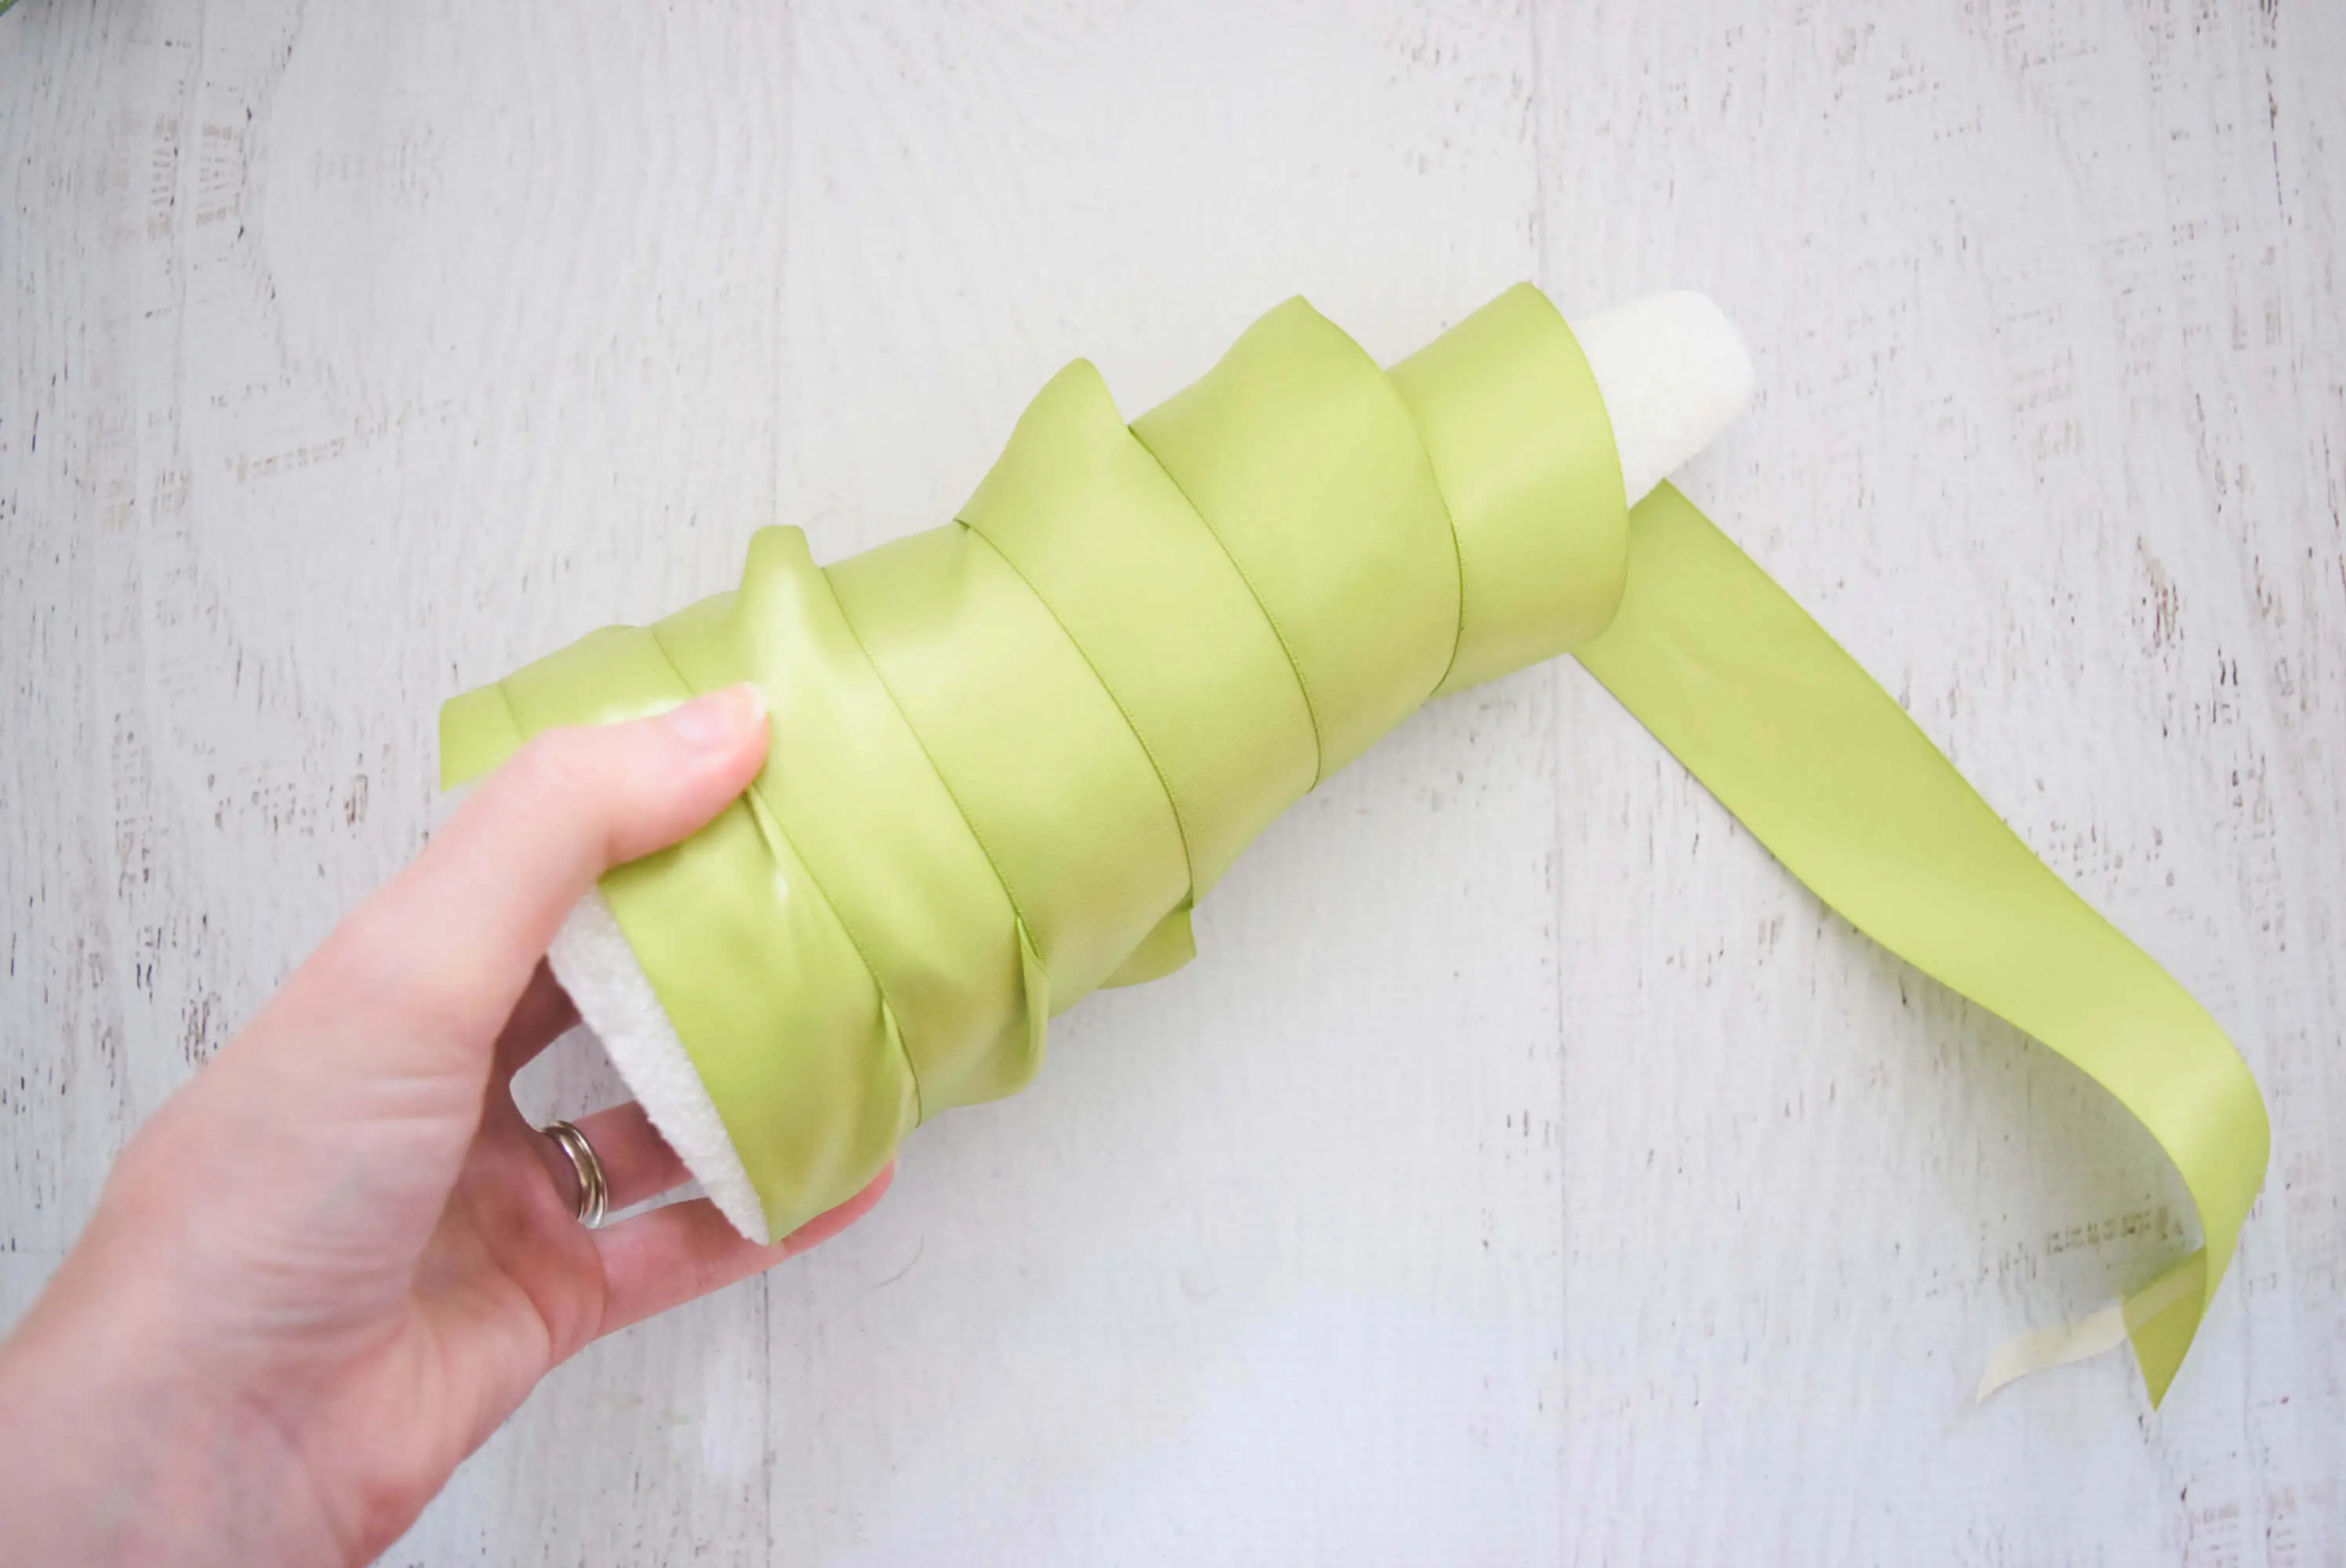
Step 2: Wrap Tree Base with Ribbon
Wrap your foam tree base with ribbon or tulle close in color to your paper choice. I found that tulle wraps a little more neatly though I managed to make the ribbon work fine too!
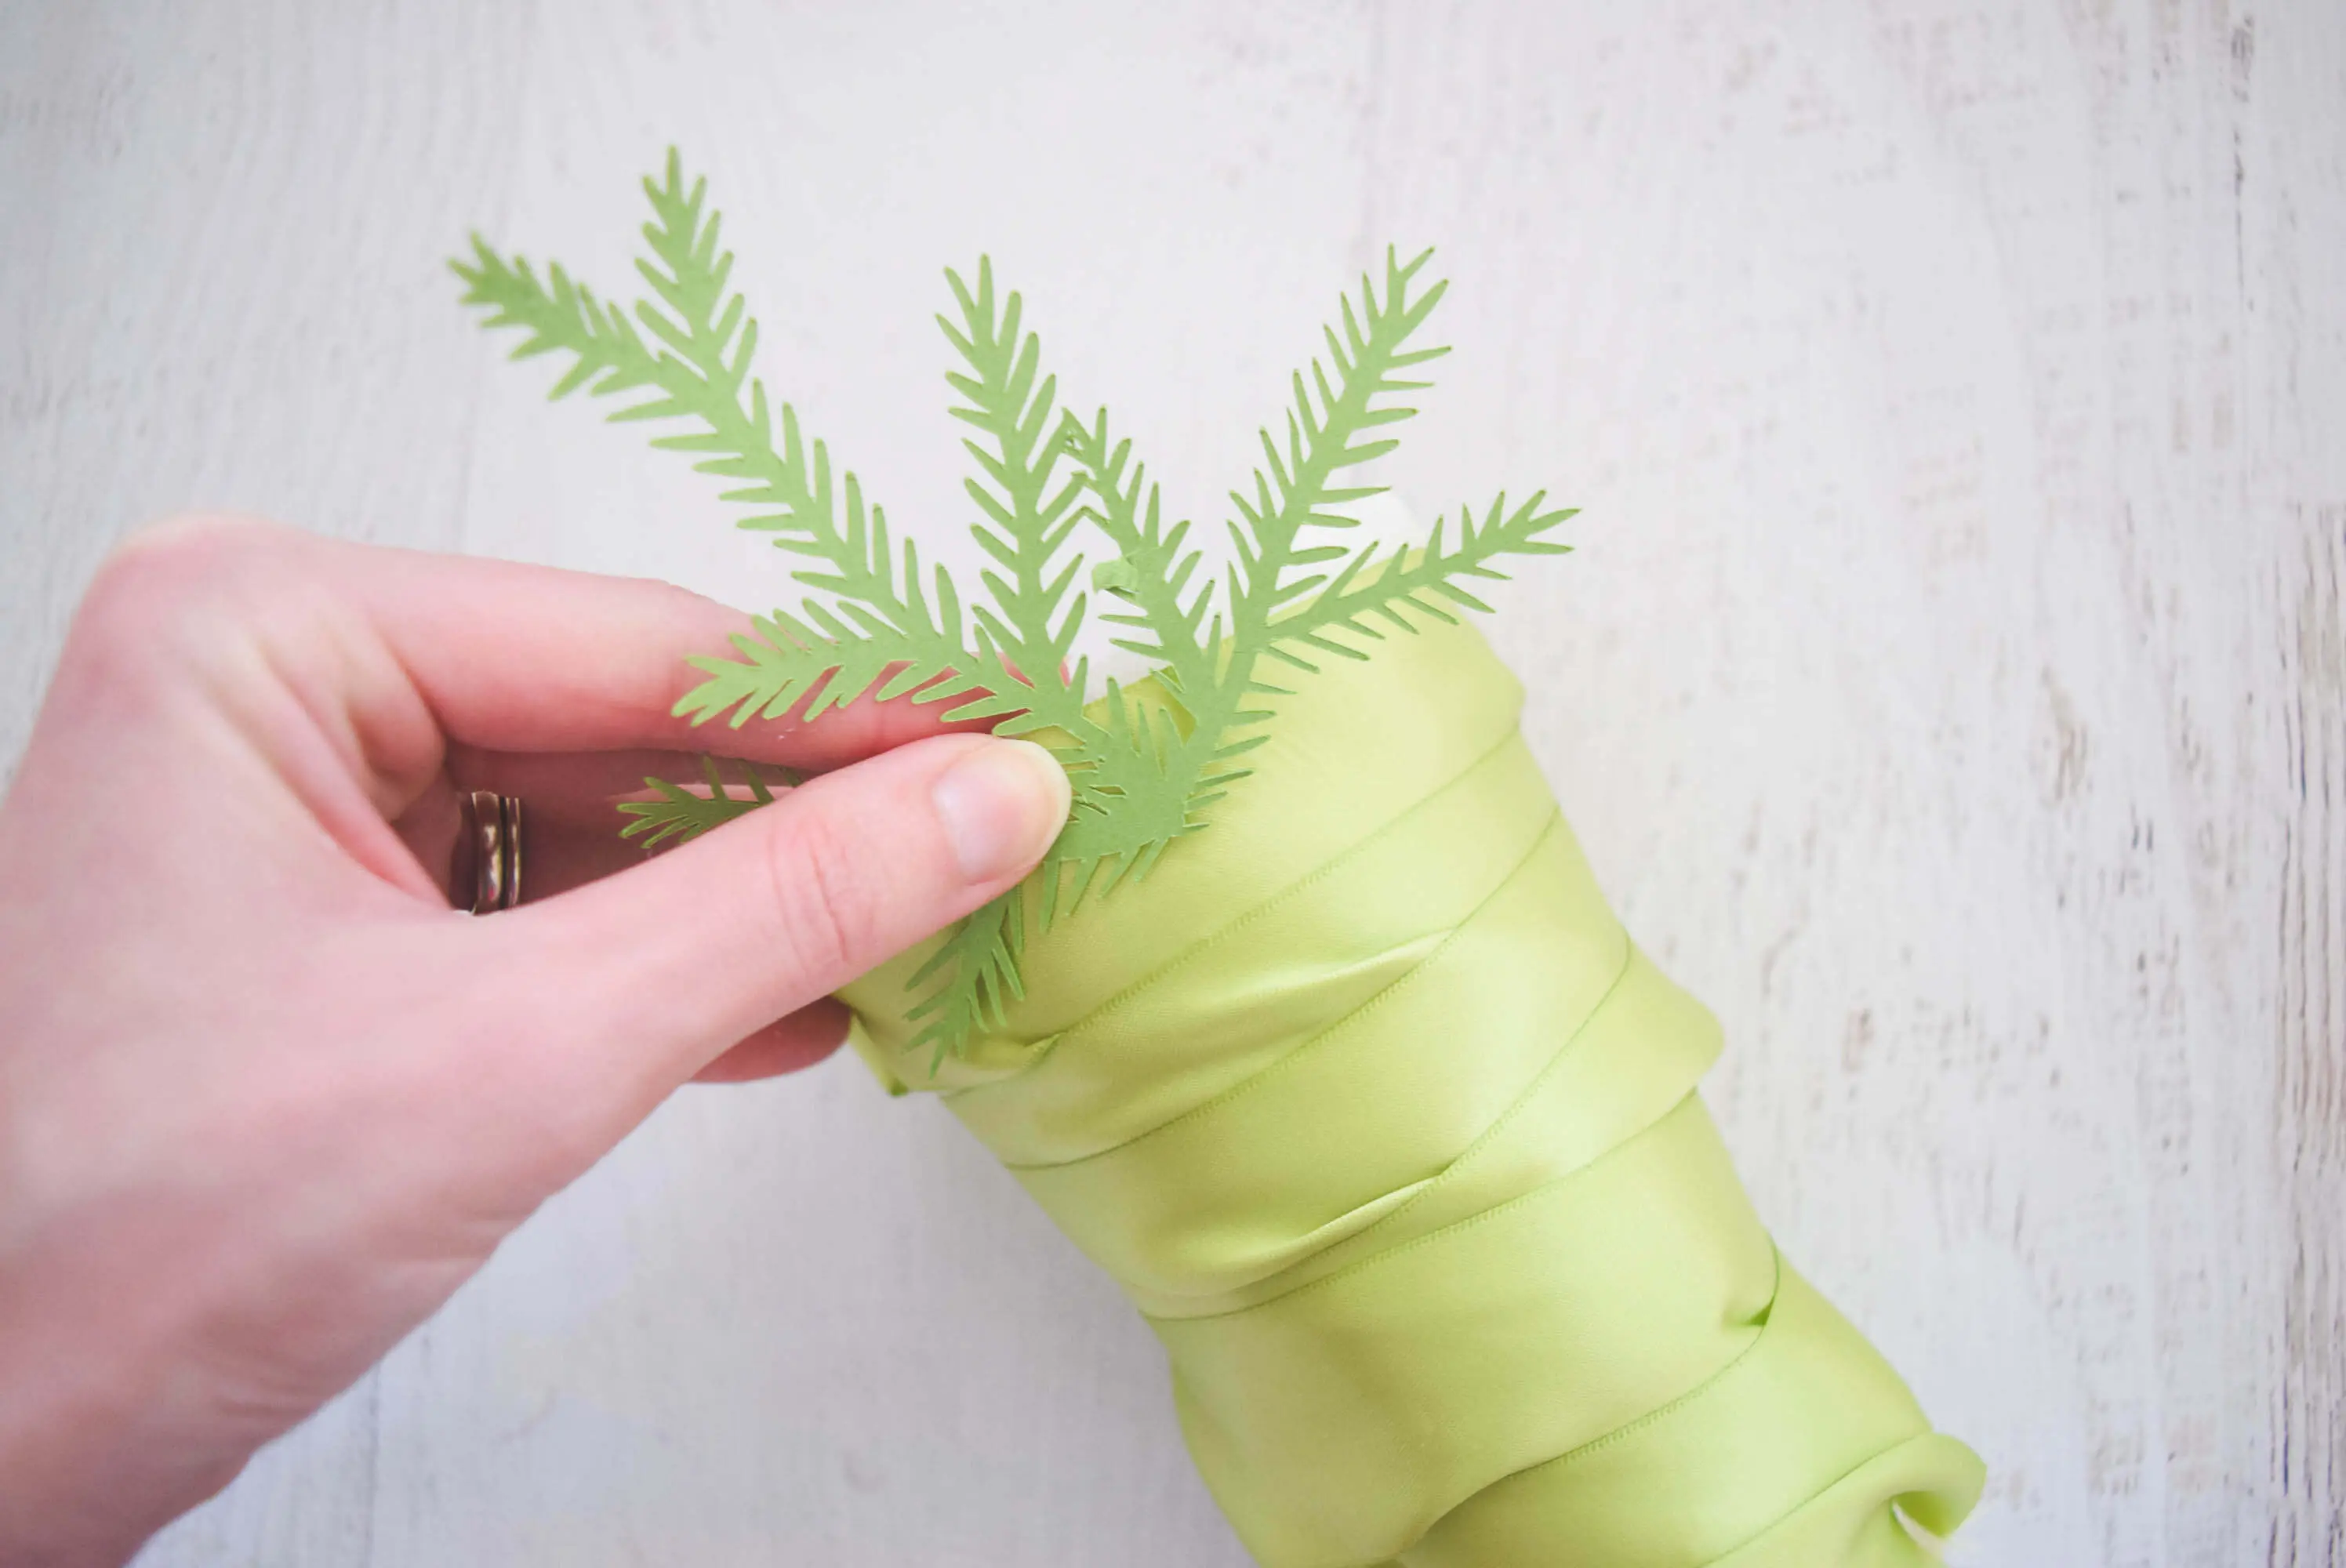
Step 3: Attach the Paper Pine Needles
Starting at the bottom, glue the wider pine needle cuts around in a circle following the foam base. Slightly overlap so that you are achieving good coverage.

Related Posts
Free 12 Days of Christmas Printables
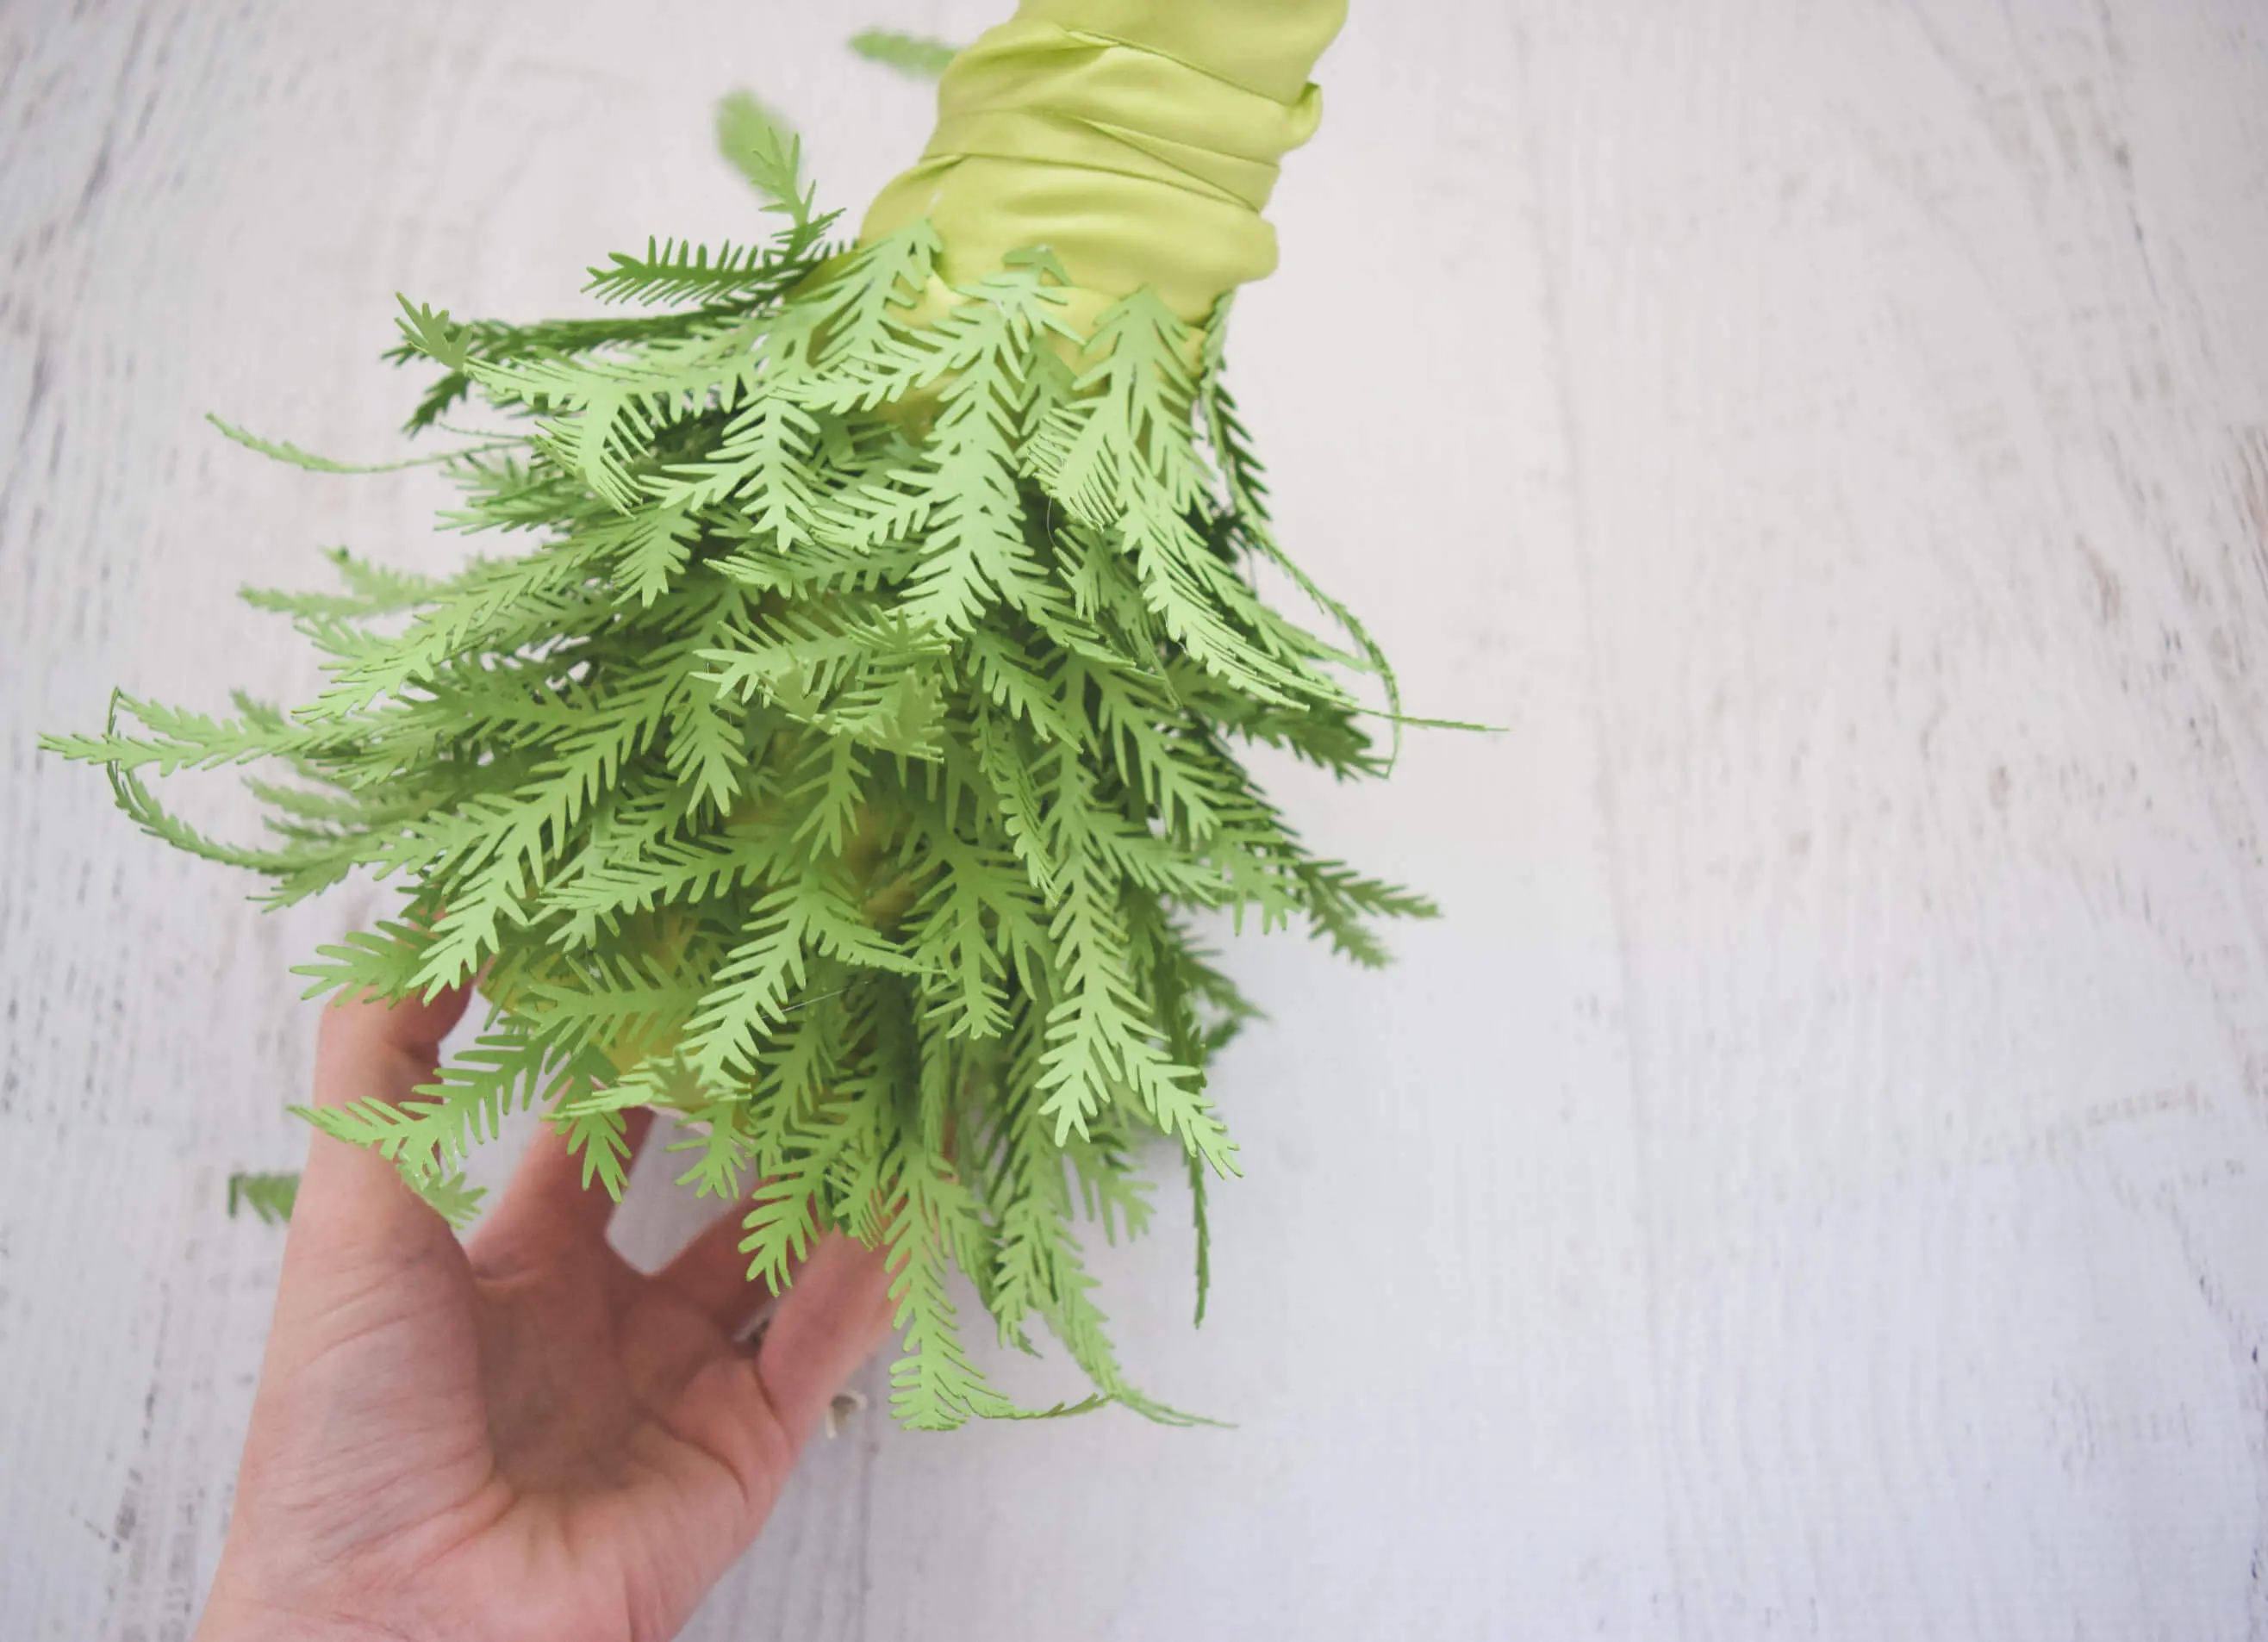
Keep working your way up the entire tree base, gluing each piece on. Like I said before, the tedious part is really waiting for the paper to be cut out but otherwise, it goes pretty quickly. This set of 3 trees took me 2 days to make.
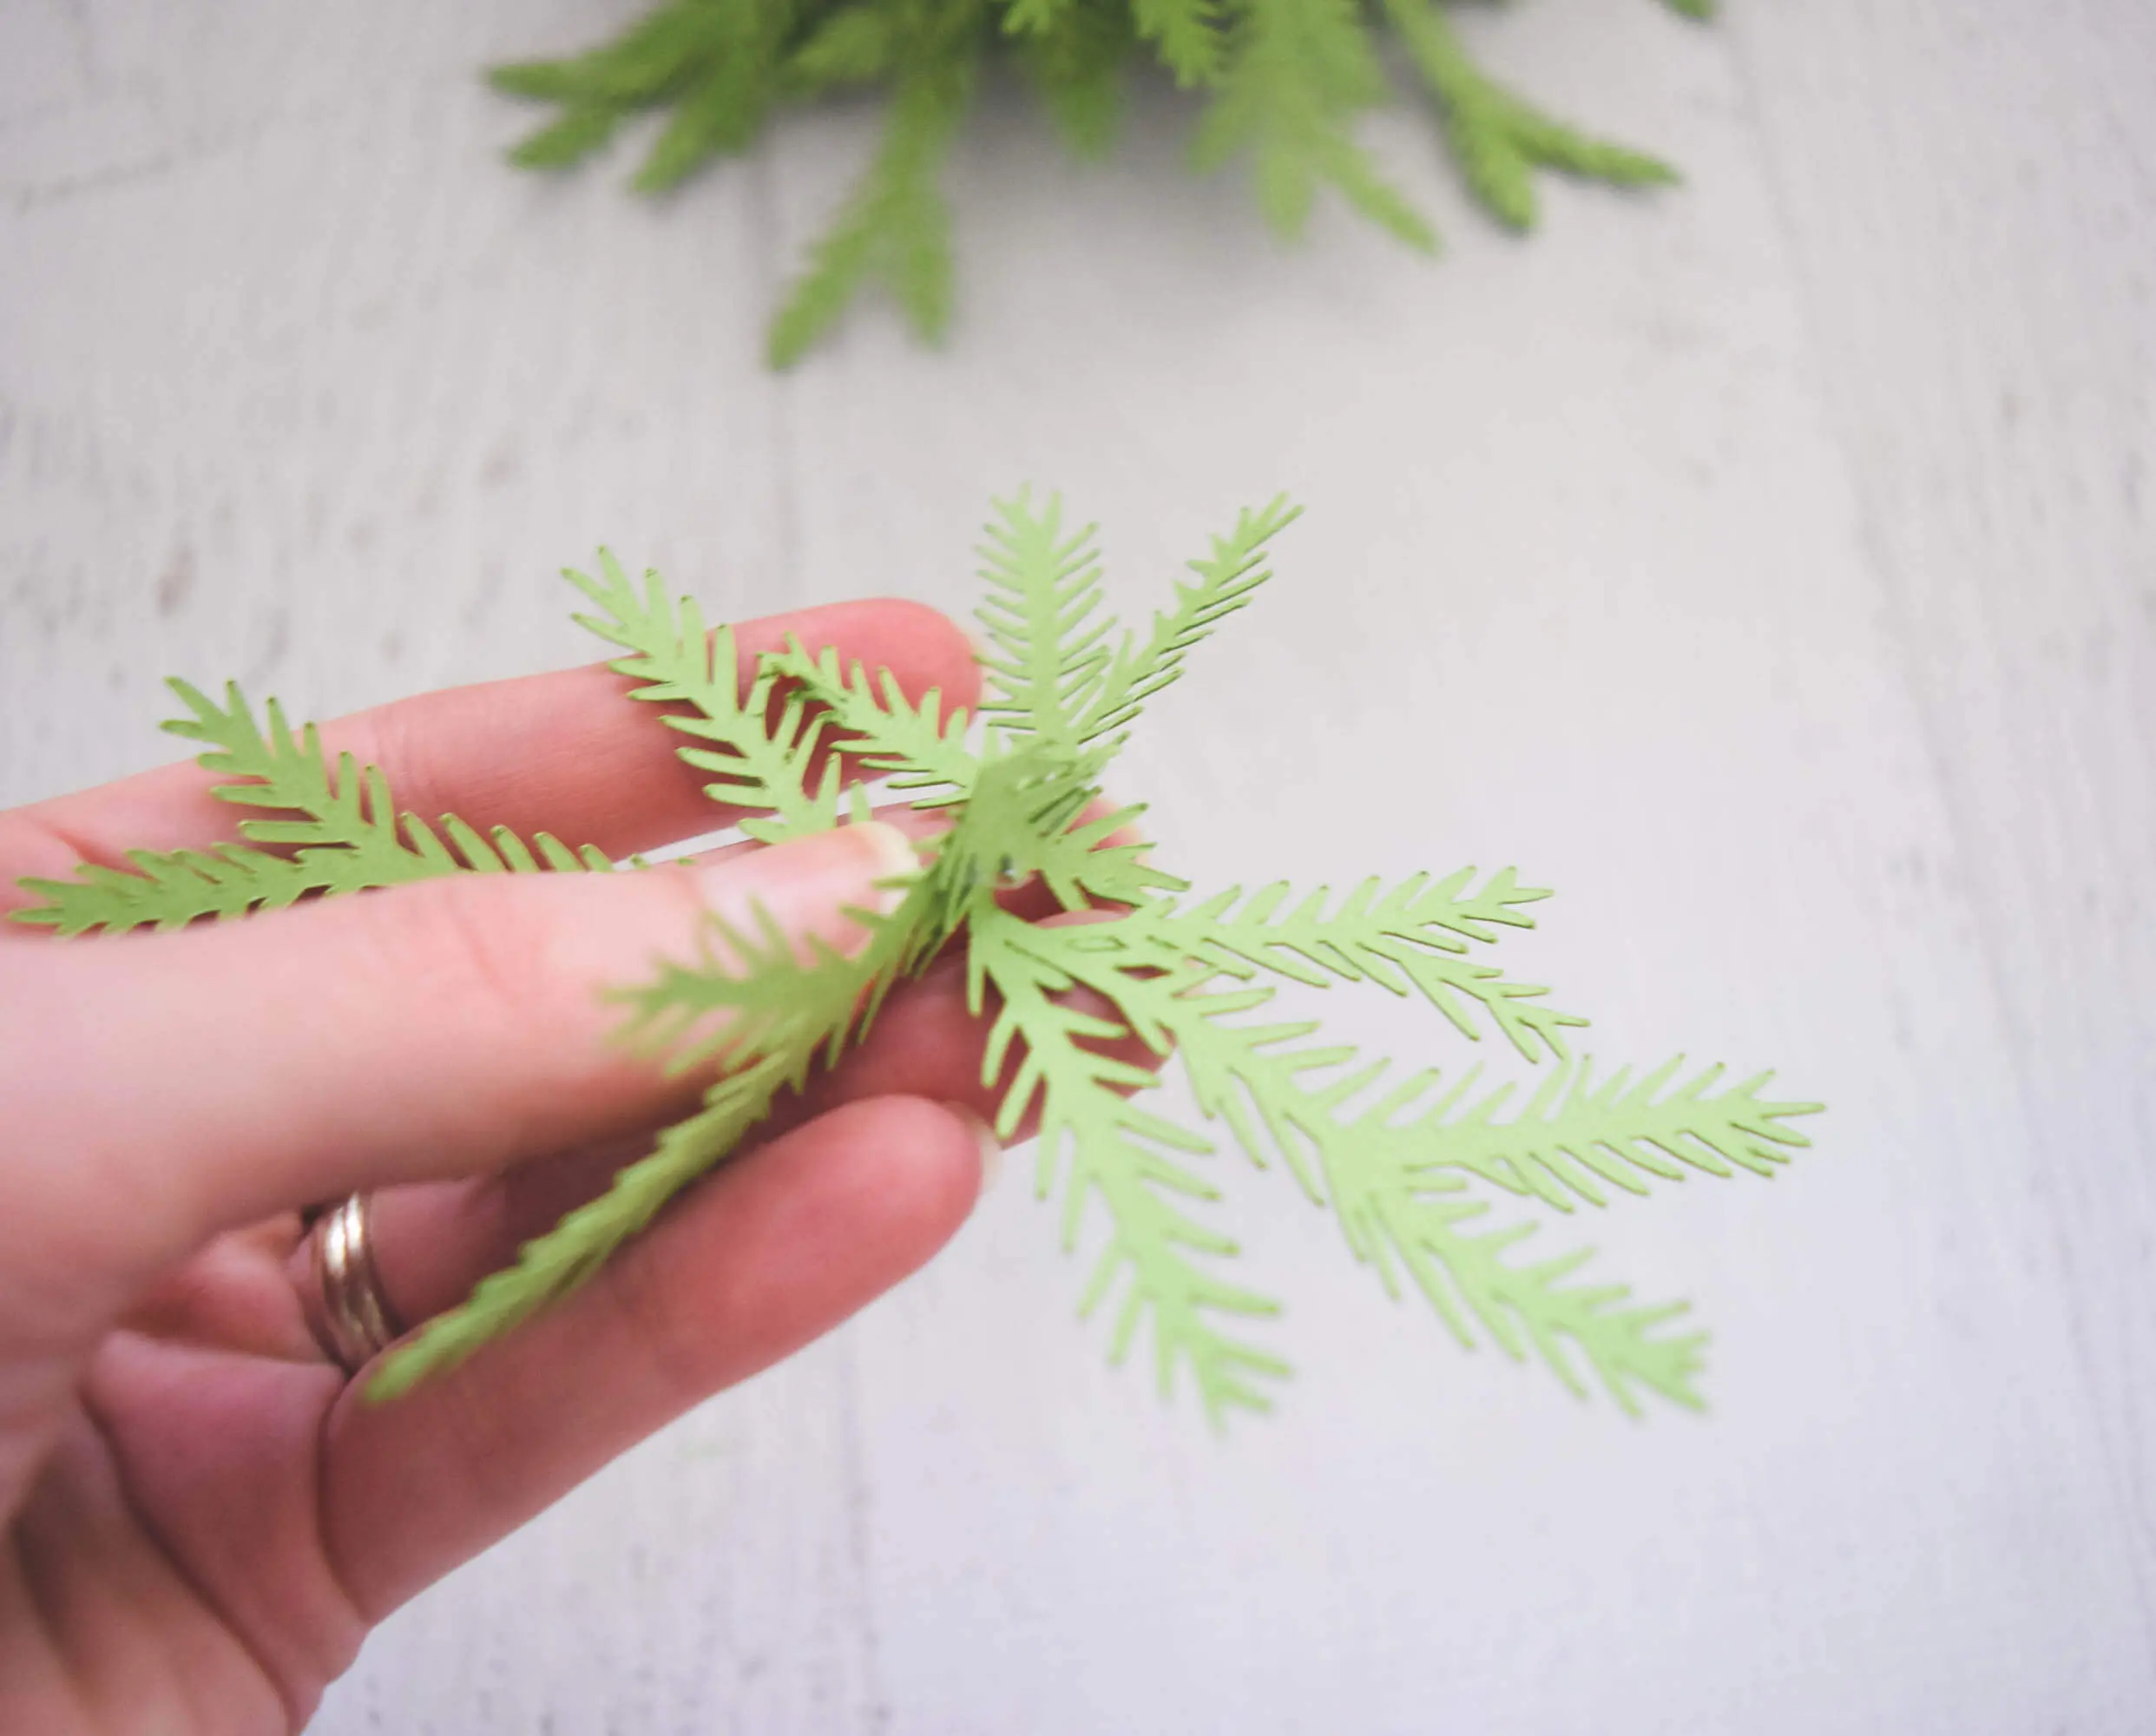
Step 4: Finish the Paper Christmas Tree with a Pointed Top
When you reach the top, you will want to give the illusion that the tree comes to somewhat of a point, like a real tree. Glue 2 pine needle pieces back to back to form a tepee. Then attach it to the tree by the open end of the pine needle tepee.
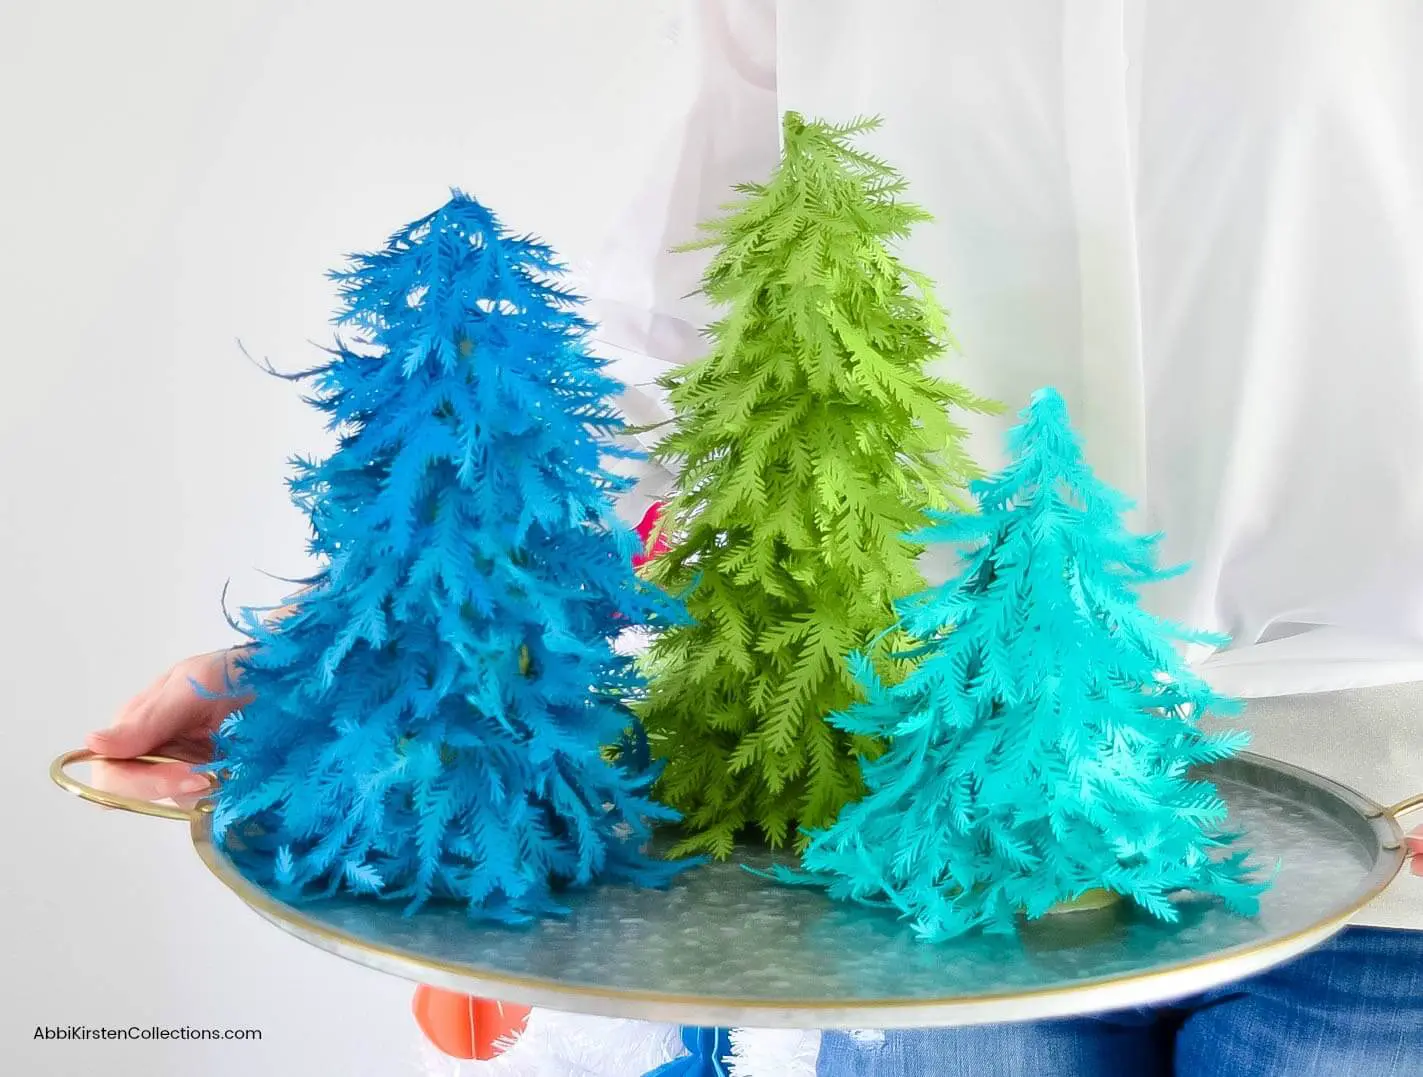
Make just a few of these or a whole forest! These Christmas tree templates are perfect to make holiday decor statement pieces that are guaranteed to be one of a kind. How would you use them?! Tell me below in the comments!
Download Your Christmas Tree Template
Click here to access my resource library with this template!
Don’t forget to pin this for later! You know you will want it!

Small Paper Christmas Trees
These adorable small and colorful paper Christmas trees are perfect for holiday decor! Use your favorite colors to make fun, festive paper Christmas trees for around your home.
Materials
- Foam tree bases in various sizes
- Christmas tree template (in the Freebie Vault)
- 65 pound cardstock in choice colors
- Cutting machine
- Glue gun
- Ribbon
Instructions
Step 1: Cut the Pine Needles
Gather your supplies and start cutting the pine needle branches. This will take lots of time, so be patient! For my largest tree, I used roughly 30-35 pieces.
Step 2: Wrap Tree Base with Ribbon
Wrap your foam tree base with ribbon or tulle close in color to your paper choice.
Step 3: Attach the Paper Pine Needles
Starting at the bottom, glue the wider pine needles around in a circle following the foam base. Slightly overlap so that you are achieving good coverage. Keep working your way up the entire tree base, gluing each piece on.
Step 4: Finish the Paper Christmas Tree with a Pointed Top
Glue 2 pine needle pieces back to back to form a tepee. Then attach it to the very top of the tree by the open end of the pine needle tepee.

Love this craft? How about upgrading to a stress free holiday season with my new 20 page Happier Holiday Planner!


These are gorgeous! I have a Cricut on my Christmas wishlist list. I can’t wait to start making things like this!
Thank you! I am glad you like them!
Wow, I can’t even tell you how excited and grateful I am to find this cut file! And thank you so much for offering it for free! I’m a happy new subscriber! So, I recently made a 3-D red truck on my Cricut for my Christmas décor this year and was dying to find just the right tree for the back of my truck. After an exhaustive search in stores for a realistic-looking one (that was NOT a bottle brush tree), I decided I’d just make a paper tree, but wanted something that looked like a real tree. I searched and searched on Pinterest and while I saw a few cute 3-D ones, none were very real-looking. I got to the point of thinking I’d just cut a bunch of individual pine boughs of varying sizes and design my own tree, but then I saw yours and knew it was just perfect! While I absolutely love yours in those gorgeous bright colors, I’m making mine in varying shades of green. Thanks again and I can’t wait to see how my beautiful 3-D tree looks in my red truck!
Hi Deb! So happy to hear this craft is bringing you so much joy! Merry Christmas!