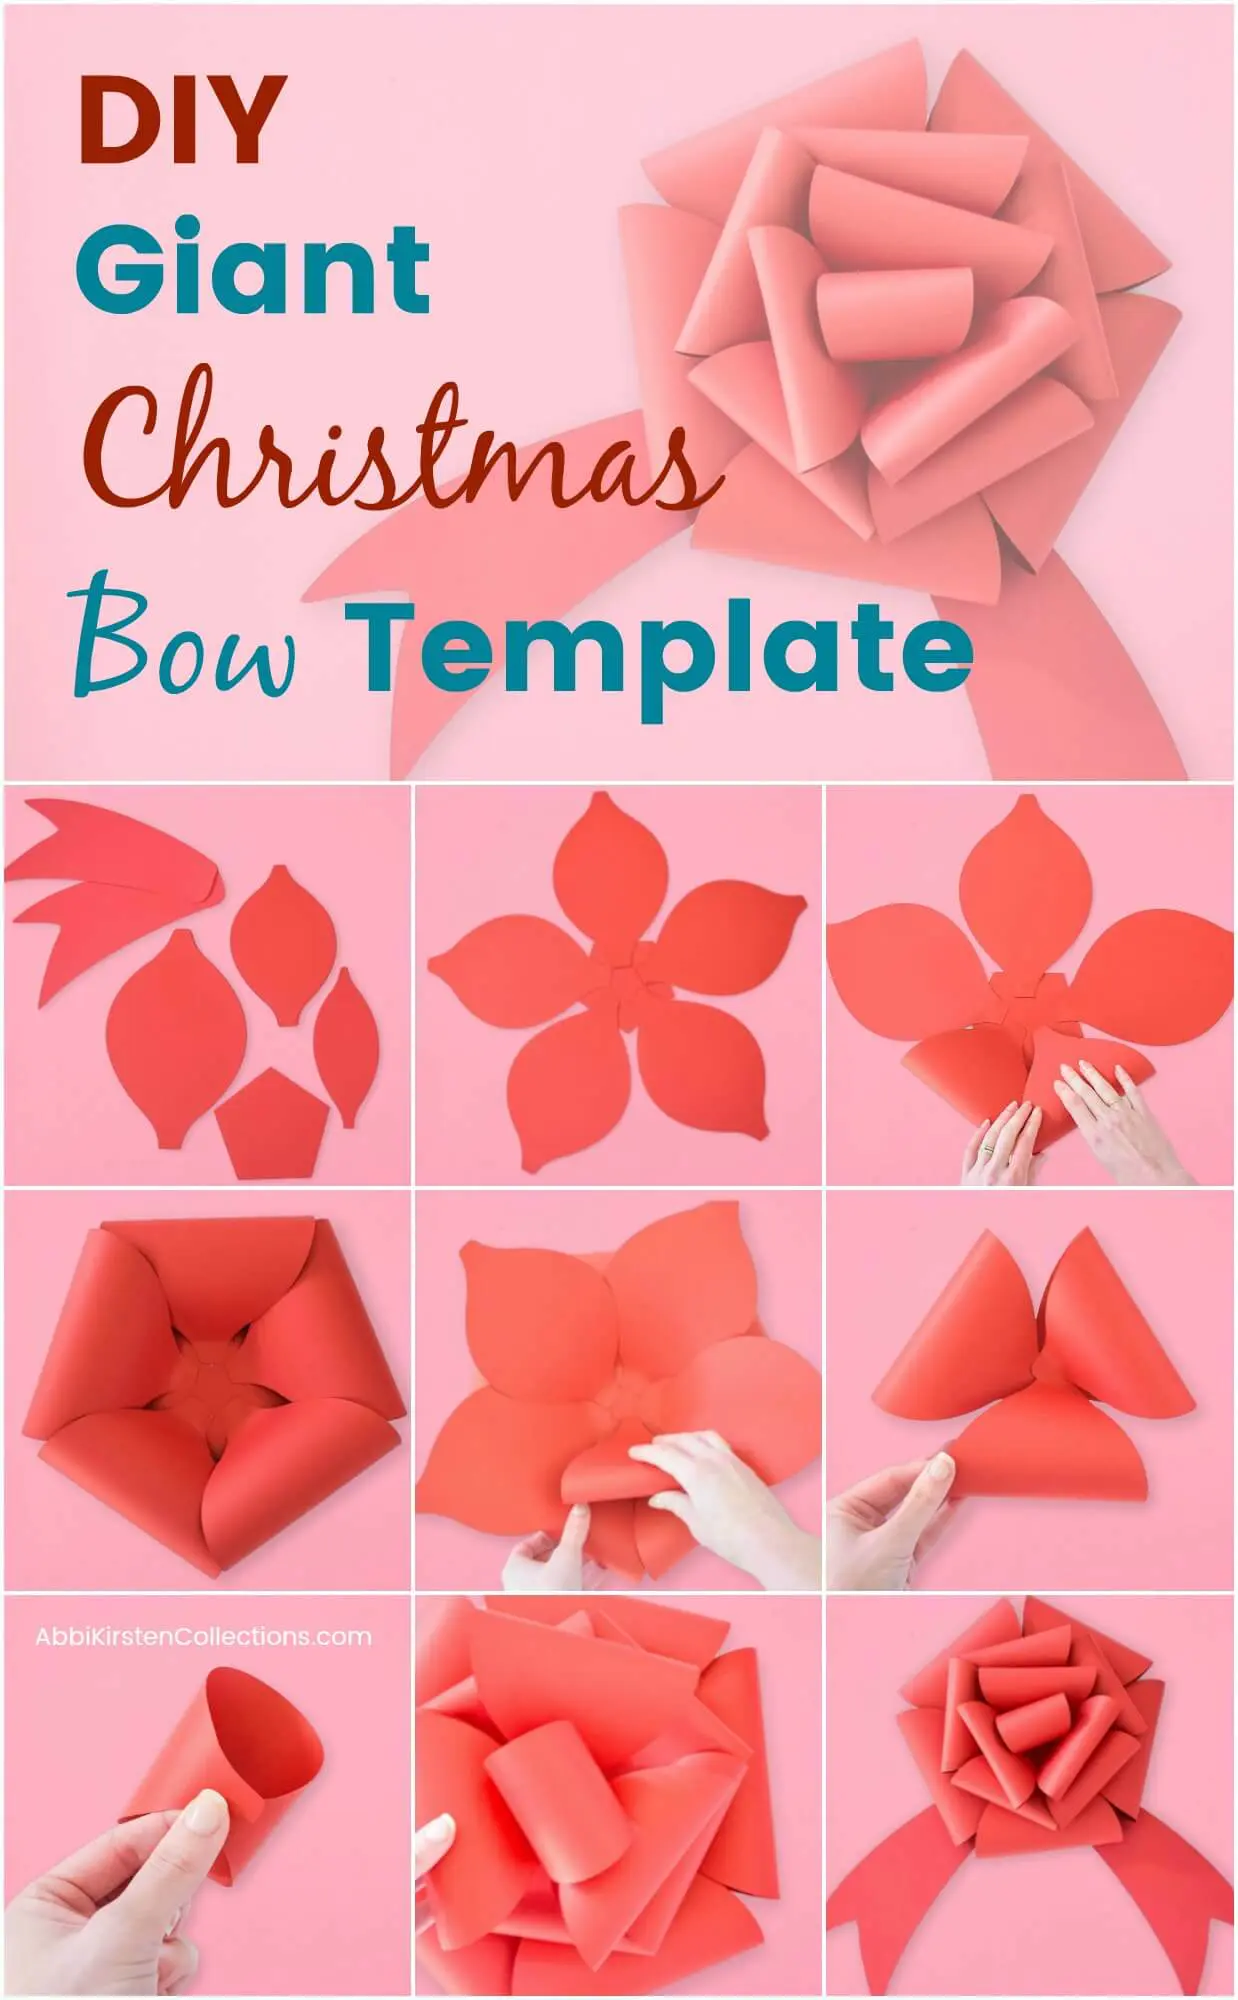
Christmas Bow Template: DIY Giant Paper Gift Bow Tutorial
This post may contain affiliate links that won’t change your price but will share some commission.

Giant Paper Christmas Bow Template & Tutorial
It’s early December right now, and I woke up one morning with a Christmas craft to-do list as long as Santa’s list of gifts to deliver, and suddenly thought about making a giant paper Christmas bow template. I had a clear picture of how to create the design and what it could look like, so I bumped a few things and got to work. An hour later I had this festive beauty!
You could really use these for any occasion, but I went with a red Christmas vibe because ’tis the season, right?!
This giant paper Christmas bow template doesn’t have to be limited in use to just topping large gift boxes. You can hang them in archways, on walls with some holly garland, or even use them as a tree topper (which I totally did till my son came home from school one day and ask me to make a gold paper star topper. Coming next week to the blog!).
This Christmas bow template measures a little over 12 inches wide, and both printable PDFs and SVG cut files are available in my craft resource library at the bottom of the post.
Supplies for making your giant paper bow
- 65-pound cardstock
- Scissors or cutting machine
- Bow template (download below from my resource craft library)
- Glue gun
- Command hooks or mounting tape for hanging
Steps To make A giant paper bow
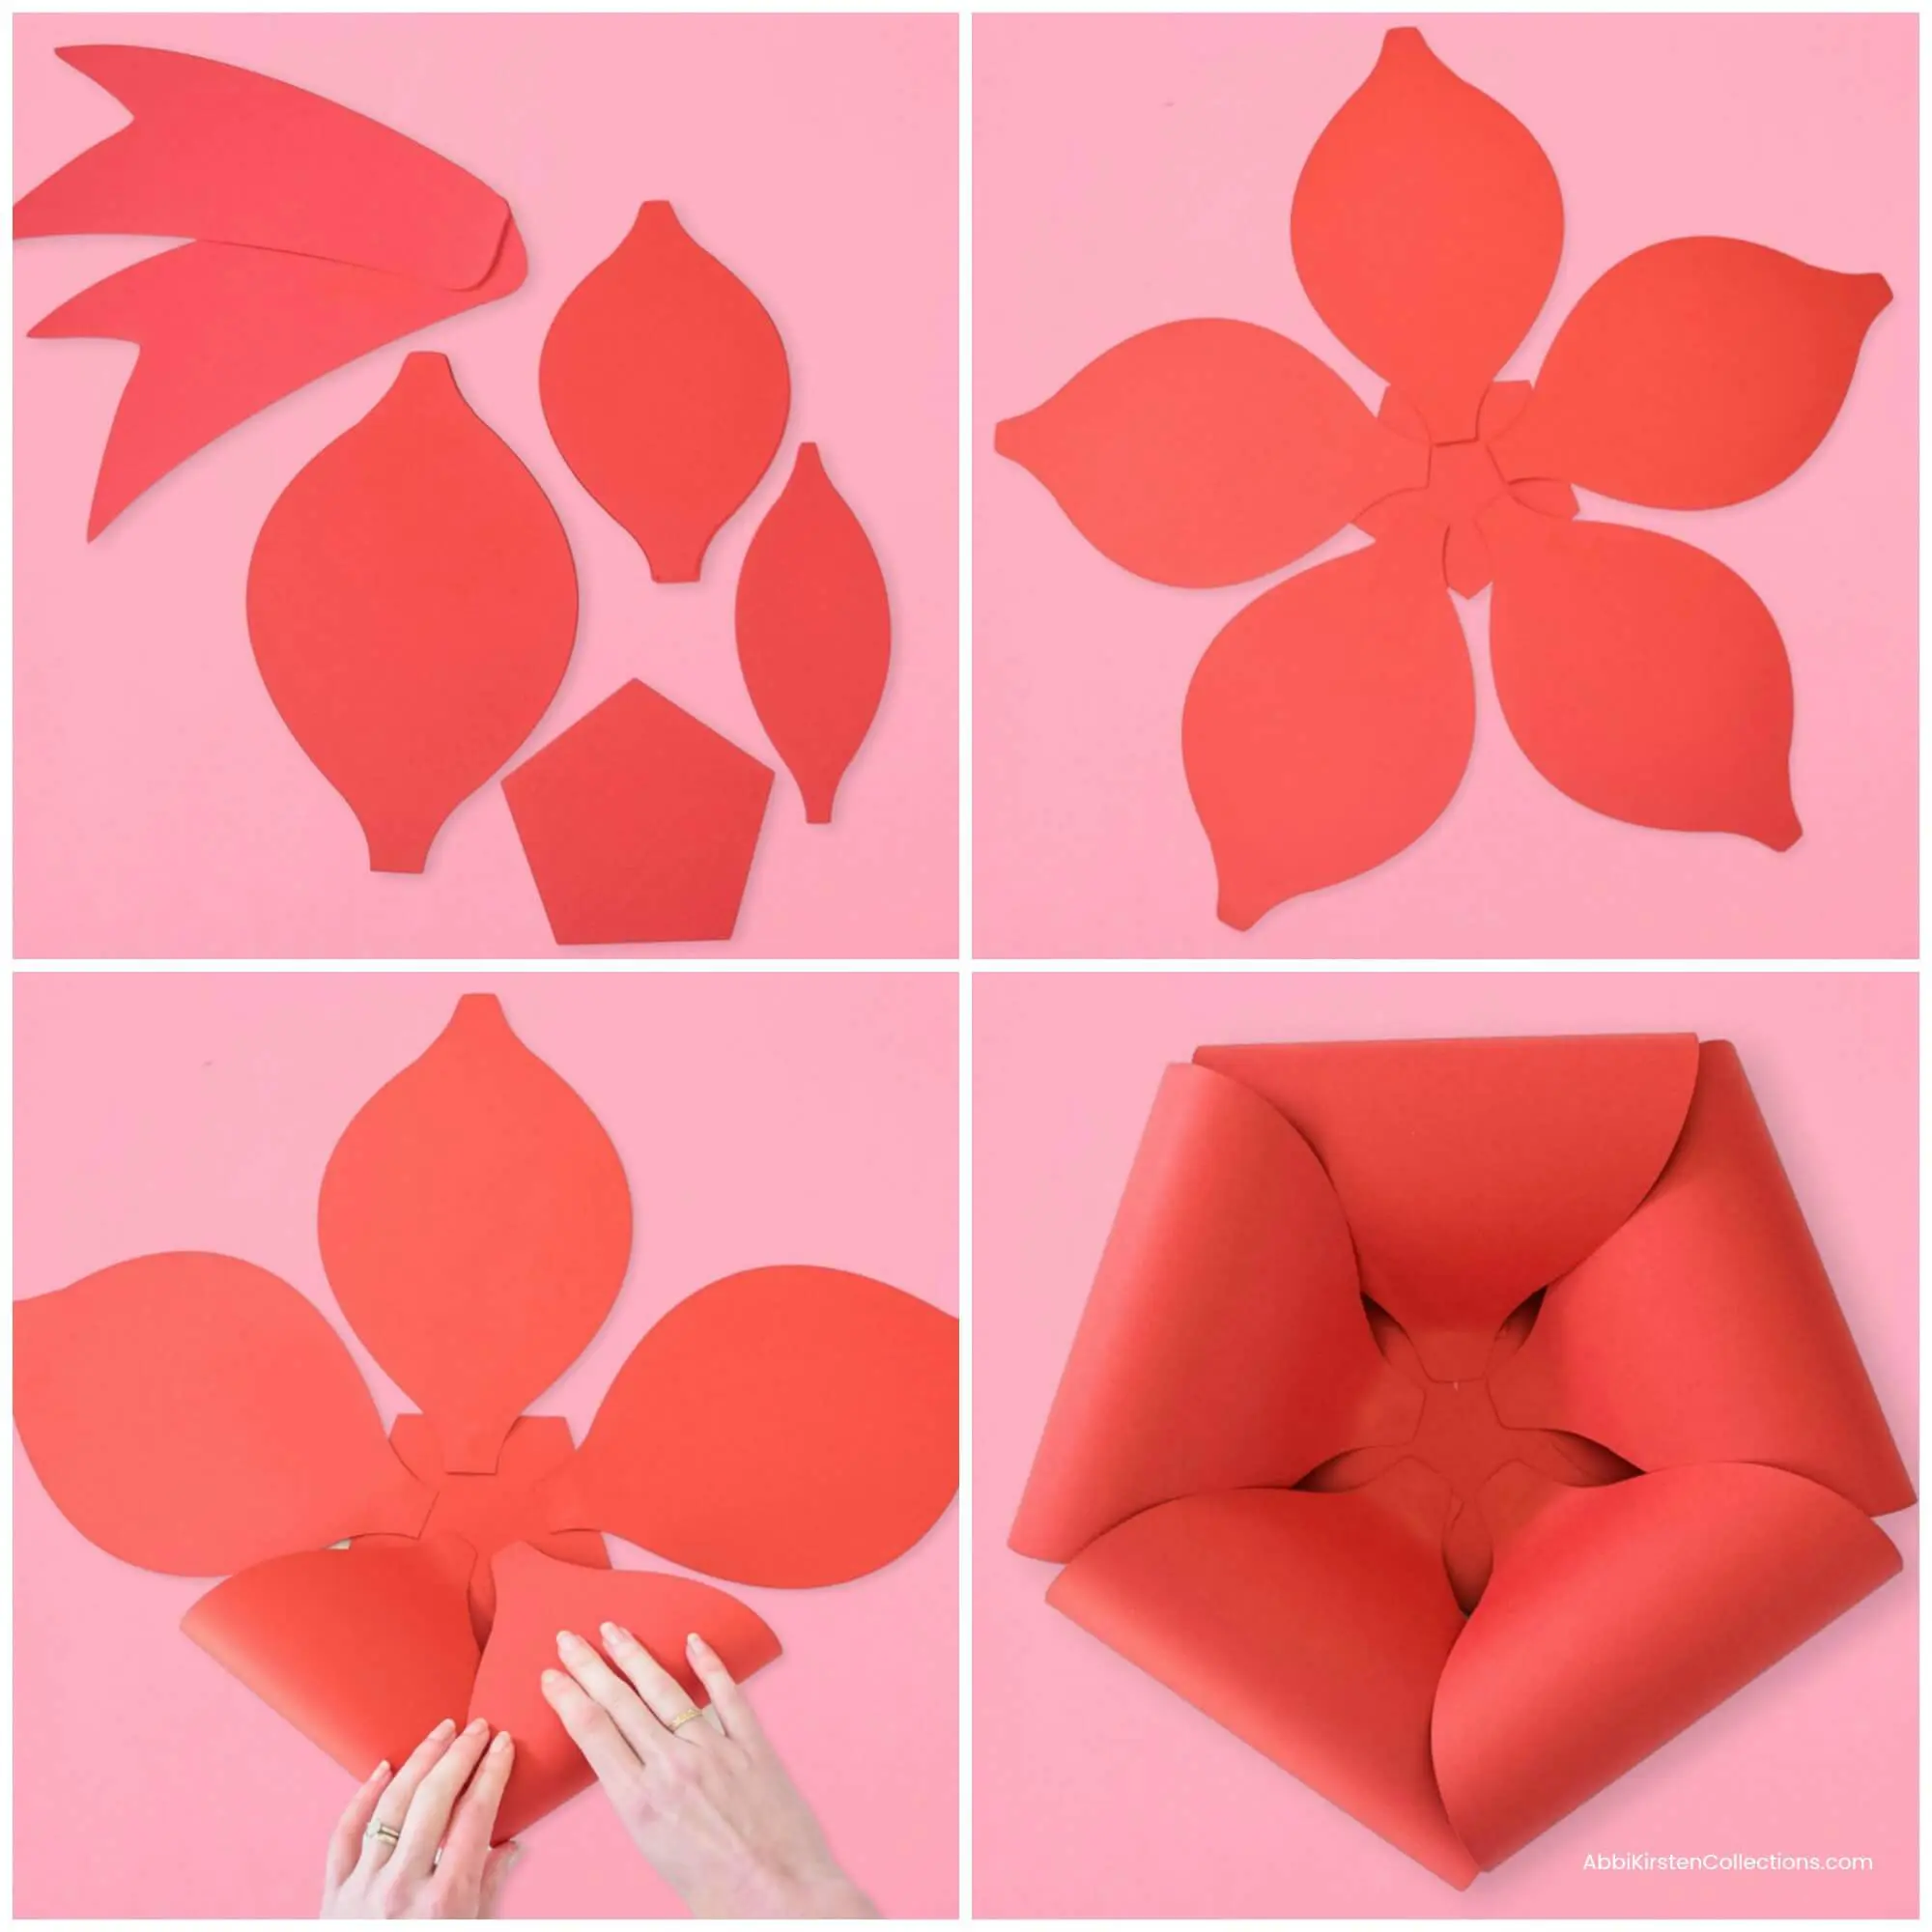
Step 1 – Start by cutting out all your pieces.
I used the following count:
- 1 5-sided base
- 5 extra large bow ribbons
- 8 medium bow ribbons
- 1 small center bow ribbon
- 2 ribbon tails
You can scale these as large as the 8.5 x 11 cardstock will hold, which is what I did here, or you could downsize the templates if you have a cutting machine.
Step 2 – Glue On The Ribbon Cuts
Each side of the pentagon base represents where you will glue 1 of each 5 extra large bow ribbon cuts. Glue all 5 down to each side.
Step 3 – Curl the Ribbon Parts
Gently curl each of the 5 extra large ribbon pieces inwards and glue them down. Do NOT crease. It should look like a fluffy ribbon loop!
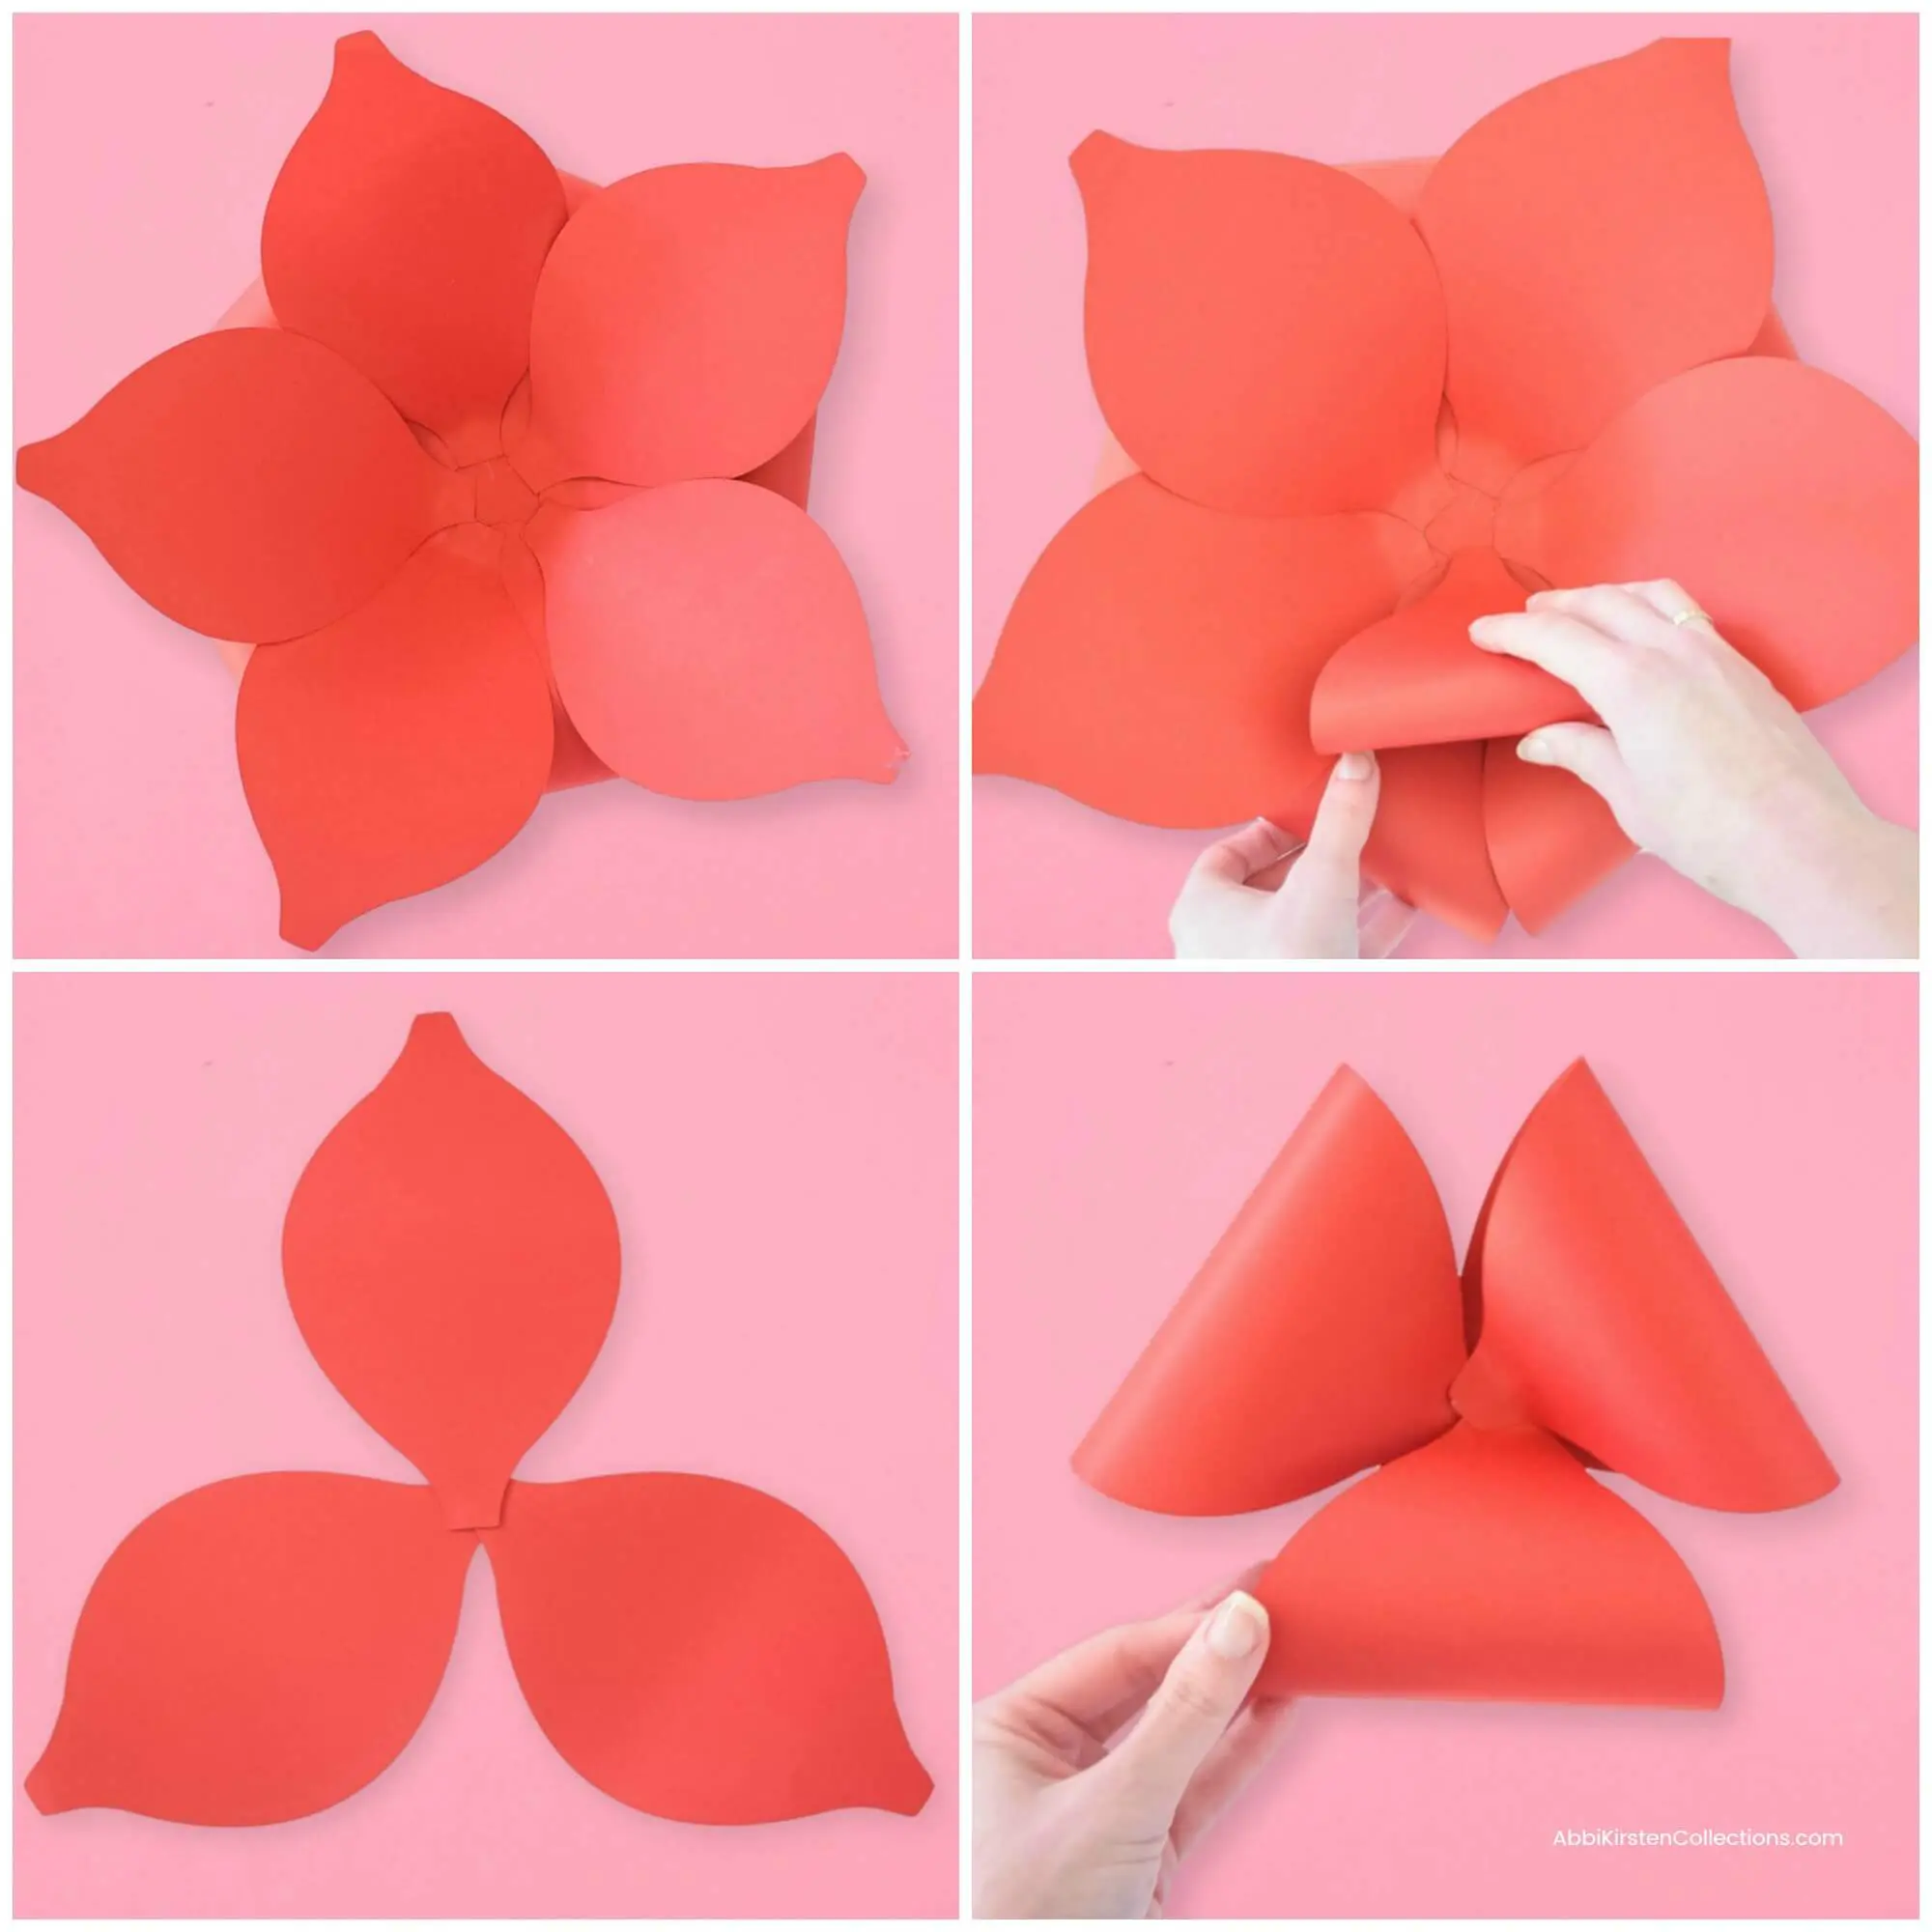
Step 4 – Add Medium Ribbon Pieces
Repeat the last 2 steps again with 5 of the medium ribbon pieces. Be sure to add the medium ribbon pieces in between the extra large bottom ones.
Step 5 – Add the Remaining 3 Medium Ribbon Cuts
With the remaining 3 medium ribbon cuts, overlap them by gluing them together in a sort of triangular pattern as shown in the bottom left image above.
Step 6 – Fold Inwards
Again fold them inwards adding glue to secure. Still no creasing because we want it to look fluffy and full.
Shop Templates
[bigpres skus=”0019,0025,0090,0093,00147,00145,00106,0075″ overlay=”no” animation=”fade” direction=”top” show_img=”yes” show_name=”yes” show_price=”yes” show_arrow=”no” hide_button=”no” link_to=”product” per_row=”4″ size=”medium” type=”card” show_content=”no” drop_shadow=”no” /]
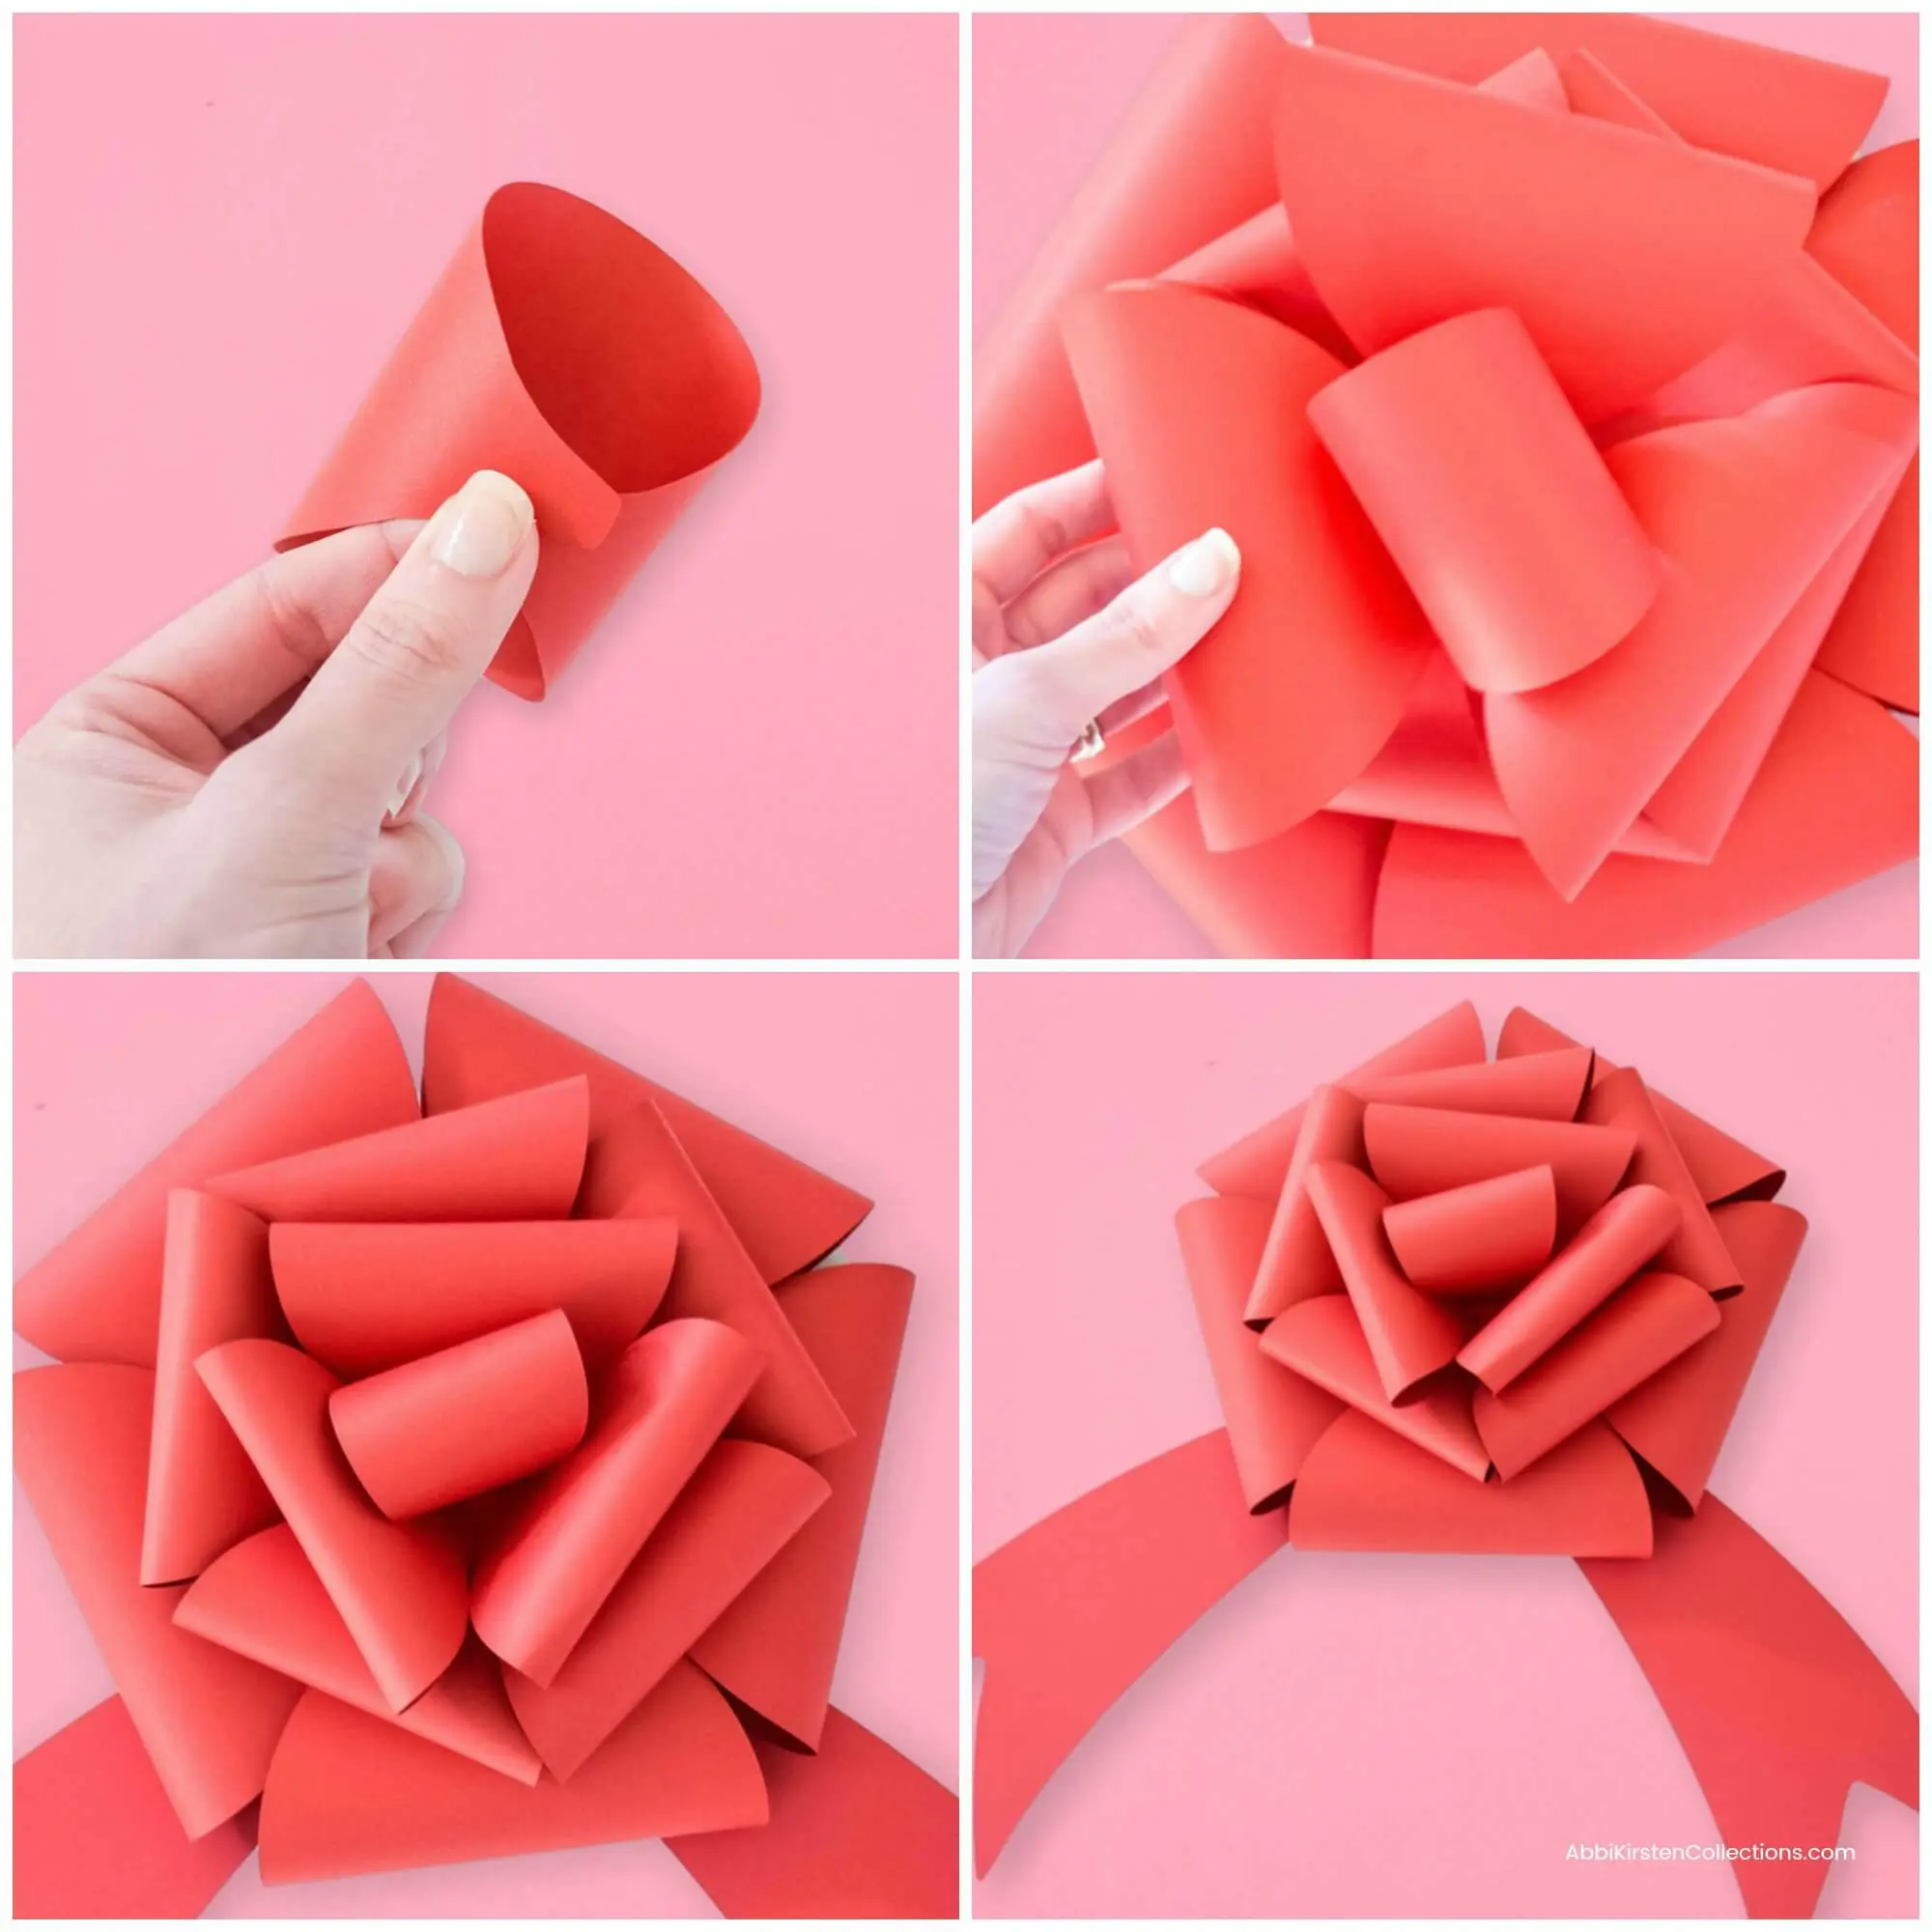
Step 7 – Add The Last Ribbon Cut
For the last small ribbon cut out, glue in into a loop like you would when making a paper chain. Add it to the center of the 3-fold piece. Glue the 3-fold centerpiece into the middle of the bow.
Step 8 – The Finishing Touches
To finish, attach the 2 ribbon tails to the backside of the bow making sure they align evenly in the front.
Find a place to display your bow! I made 2 of these and put one on my pantry door and the other I mixed with some holly leaf garland on my dining room wall to compliment my colorful Christmas tree and ornaments!

Related Posts
Silver and Gold Christmas Ornaments
Download Your Template Here
Find these and dozens of more templates in my craft resource library when you join my craft lovers community! This template can be found in the holiday section of the library. Sign up below and get access to them now!
Video Tutorial


Not only are the flowers designs on the calendar just GORGEOUS! but the true beauty of each month is the meaningful saying you have added at the bottom. I often hunt for the perfect saying or comment to include on my projects but you have found 12 that are just beautiful and add tremendously to the quality of the calendar. Thank you so very much!!
Thank you so much! Glad you love it!
It is a very beautiful, thank you!
hi i cant find the bow template in the freebies.thank you
Thanks for reaching out to us!
Please use our Craft Vault site to search for resources directly. When you visit https://members.abbikirstencollections.com/
you’ll see a search bar where you can type in keywords like “bow” to view all of our related templates and projects.
That should help you quickly locate the design you’re looking for. 🙂