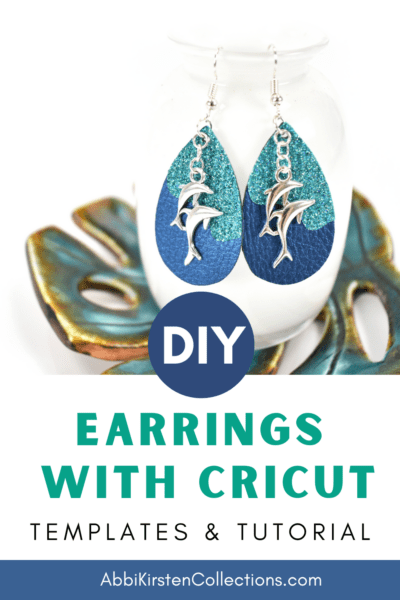
How to Make Faux Leather Earrings with Cricut: Free Earring Templates
This post may contain affiliate links that won’t change your price but will share some commission.
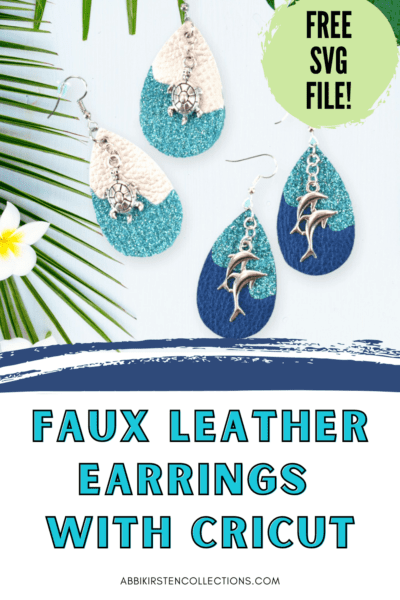
A fun tutorial for faux leather earrings with cricut!
Today I am sharing with you how to make faux leather earrings with Cricut! This is a great project for beginners, and it’s a perfect way to use any extra piece of faux leather that you have lying around.
Leather earrings are a popular accessory, but they can be expensive to buy. In this article, you will learn how to make your own faux leather earrings using a Cricut machine and some basic materials.

The process is simple, and the results are impressive. You can use any color vinyl you like to create unique earrings that perfectly match your style.
Plus, these Cricut earrings also make great gifts! I have made several pairs for friends and family, and they always love them. You can, of course, make these fun earrings for yourself as well!
In this post, I will cover the most important things you need to know when making faux leather earrings with Cricut and give you a full video tutorial step by step! I am also linking several other Cricut earring ideas at the end!
I’ve included templates here for your faux leather earrings. The templates include the earrings’ teardrop shape as well as the overlay. Let’s talk about the supplies you will need for this easy DIY project first!
Faux Leather Crafts With Cricut
If you are looking for more faux leather earring projects to make with your Cricut machine, you will love my Faux Leather Photo Keychain craft, my Faux Leather Glitter Christmas Trees, and my Glitter Faux Leather Bows!

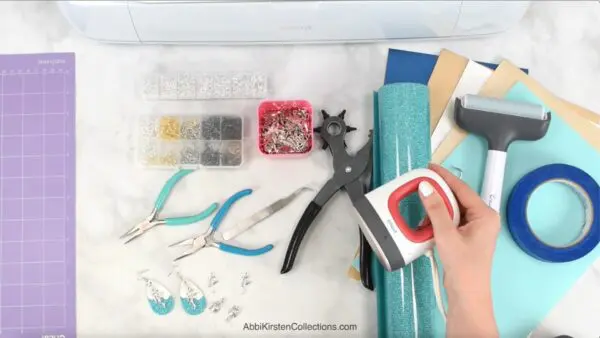
Materials List For Faux Leather Earrings With Cricut
- Cricut Machine: You can use the Cricut Maker, Maker 3, Cricut Explore Air 2, or Explore 3. You can even use the Cricut Joy machine to cut your faux leather.
- Faux Leather: pick colors that match the theme and complement each other. I used Cricut paper thin faux leather.
- Iron-On Vinyl: I used glitter iron-on.
- Weeding tool
- Brayer tool
- Painters Tape
- Cricut Strong Grip Mat or Cricut Standard Grip Mat
- Cricut EasyPress Mini
- Uncoated Butcher Paper
- Leather Punch: This works better for cutting the holes in the earrings since the holes are so small.
- Earring Charms
- Earring Hooks
- Jump Rings: At least 3 4mm jump rings and 1 6mm jump ring for each earring.
- Needle Nose Pliers
Free Template: Leather Earring SVG Templates
To get access to the free leather earring SVG templates, log into the Freebie Vault and search the keyword “earrings” or design #590.
If you are not yet a part of the Abbi Kirsten community, you can easily join to create a free account via the form below! Once you set your password via the link sent to your inbox, find the leather earring templates by searching “earrings” or design #590 at the top.
For more fun Cricut projects, check out all my Cricut tutorials and templates on Abbi Kirsten Collections!
Faux Leather Earrings Video Tutorial
Watch the full step-by-step YouTube video tutorial to learn how to make DIY leather earrings with Cricut. Keep reading for more instructions and more Cricut earring ideas!
Step 1: Uploading And Cutting The Files In Cricut Design Space
The first step is to upload your earring SVG file to Design Space. Remember, you can get the faux leather earring templates for free inside my Freebie Vault!
If you are new to Cricut, visit my in-depth post on uploading your own SVG cut files to Cricut.
Step 2: What Size Do You Need For A Faux Leather Earrings?
Next, decide on the size of your earrings template. I scaled mine to 1.7 inches in height, but you can go a bit bigger if you wish. Just be sure to scale your template as a group, so everything stays proportional.
Step 3: Creating Your Earring Design
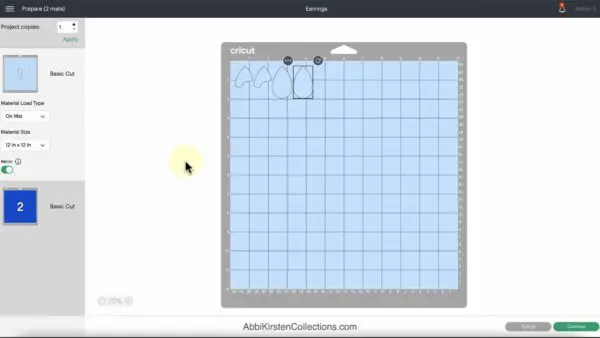
- After uploading your template and sizing it in the Design Space, save your project and click the “Make It” button. Now your projects are separated out on the mats.
- Select the Mirror button on the iron-on vinyl mat since your iron-on vinyl will be cut in reverse. Then select the faux leather mat and move your cuts down a bit away from the corner to make room for the painter’s tape that you’ll be using. This ensures a cleaner cut.
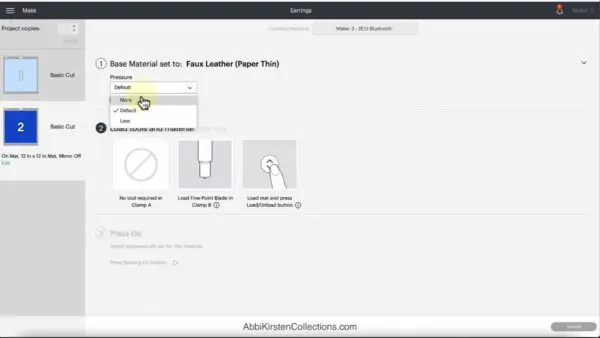
- Click the continue button to connect to your Cricut cutting machine. Then click on “Browse All Materials” to see your faux leather options. I suggest selecting the “faux leather paper thin” option in the material settings unless you have a thicker canvas-like faux leather, then, you may want to choose the glitter canvas setting. For your iron-on mat, select the iron-on setting or the glitter iron-on setting according to what you decide to load.
Hint: change the pressure setting to “more” if you need more pressure to get your material cut all the way through.
Step 4: Cutting Faux Leather With Cricut
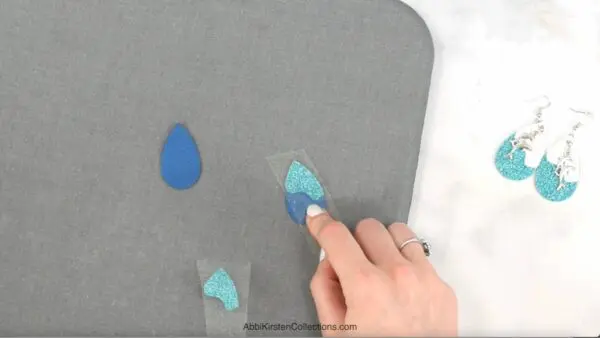
- Take your strong grip mat and your iron-on material and place the material’s shiny side down on the mat. Use your brayer tool to push the material onto the mat.
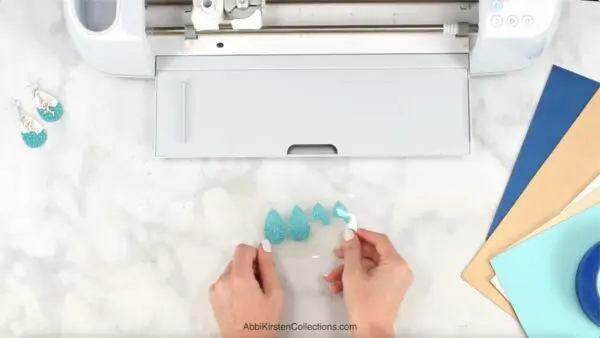
- Load the mat into your Cricut machine using the standard fine-point blade. Once the Cricut is done cutting, peel your mat away from the material. Use your weeding tool to weed out the cuts of your heat transfer vinyl.
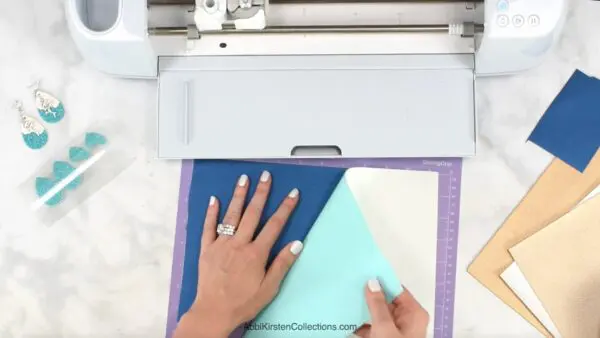
- Put your iron-on vinyl aside and place your faux-leather material down on your mat. You can use painter’s tape if needed to hold it in place. Usually, paper-thin leather does not require this. Load your mat into your Cricut machine.
Step 5: Pressing Your Cut Pieces Together
- Peel your cut faux letter pieces off your mat and flip them over so that the colored side faces down. Set your EasyPress Mini to the lowest setting.
- Take a pair of scissors and trim the liner of your iron-on vinyl to separate the pieces. Line up the backs of the teardrop-shaped vinyl and faux leather pieces so that each cut is perfectly aligned on top of the other.
- Take your heated-up EasyPress Mini and hold it for about 15 seconds on the vinyl side of the design. Let it fully cool before pulling it away from the liner. Repeat steps 8 and 9 for the other teardrop-shaped cuts.
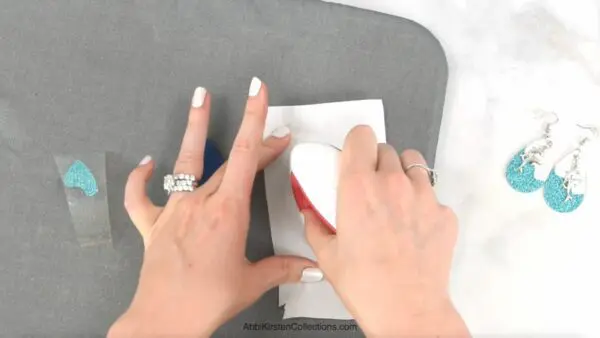
- Pull the cuts away from the liners. Press them again for another 10 seconds if they are not fully sealed together.
- Take a water’s edge-shaped vinyl cut and press it to the faux leather side of one of the teardrop-shaped pieces you just created. This will be the top layer of the earring in the front.
- Cover the design with uncoated butcher paper. Take your heated-up EasyPress Mini and hold it for about 15 seconds on top of the butcher paper. Repeat step 5 for the other teardrop piece.
Step 6: Adding Hardware to Your Earrings
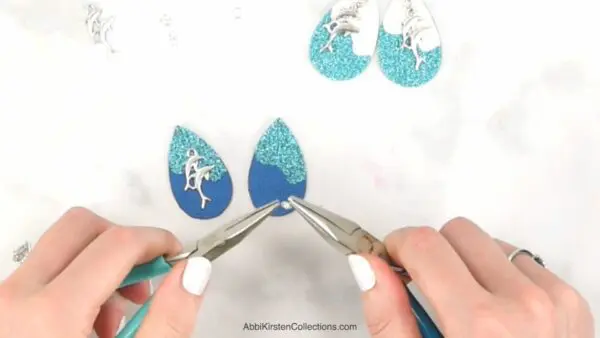
- You should now have two teardrop-shaped earring pieces with faux leather and a vinyl water’s edge on one side and vinyl on the other. Take your leather punch on the smallest setting and punch a small hole at the top of the earring for each one.
- Use jewelry pliers to open up a 4mm jump ring. Add two more of the 4mm jump rings to the open ring and then use the pliers to close it.
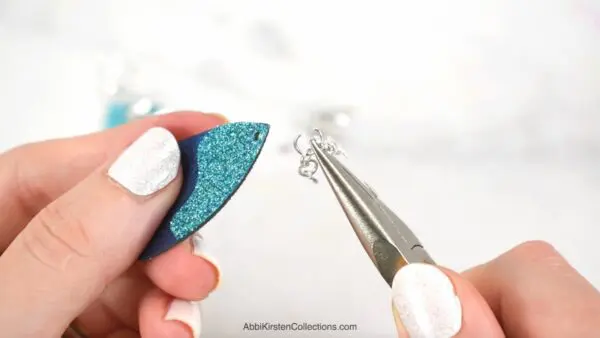
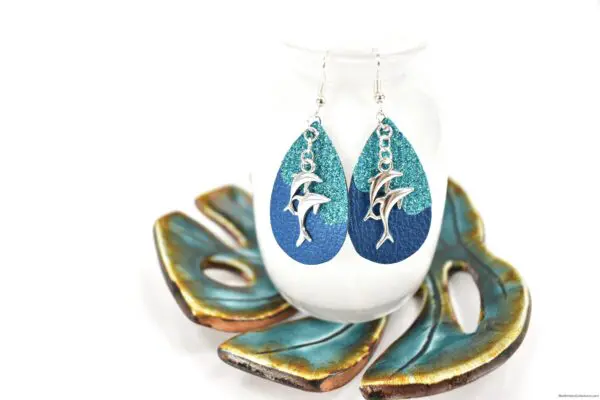
- Now, open up the 6mm jump ring and add it to the chain of three 4mm jump rings that you just made. While the 6mm jump ring is still open, add an earring hook and a faux leather piece and close the ring.
- Reopen the bottom-most 4mm jump ring with your pliers, add an earring charm to the open ring, then close the ring again. Repeat steps 2-4 for the other earring. This is the final step!
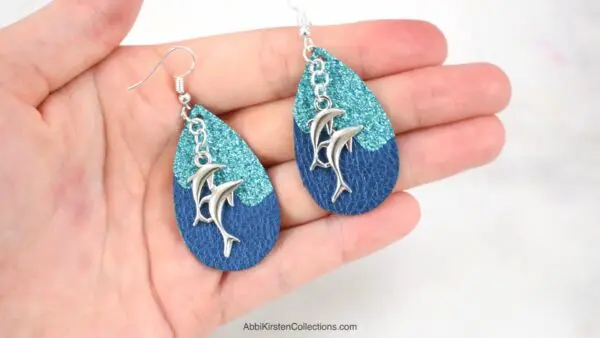
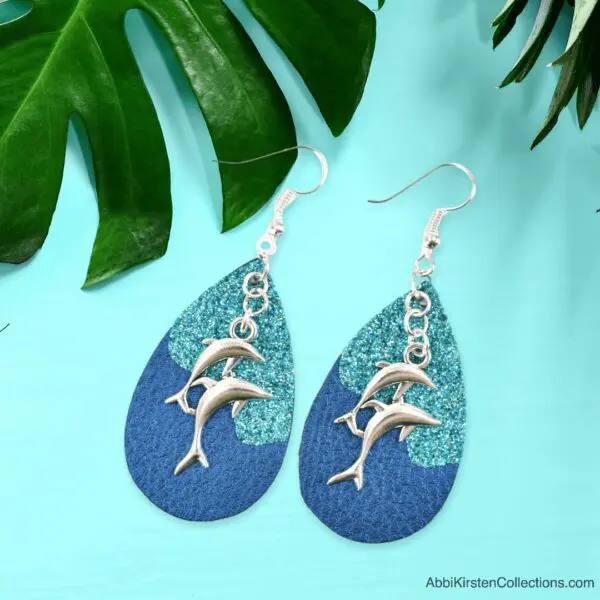
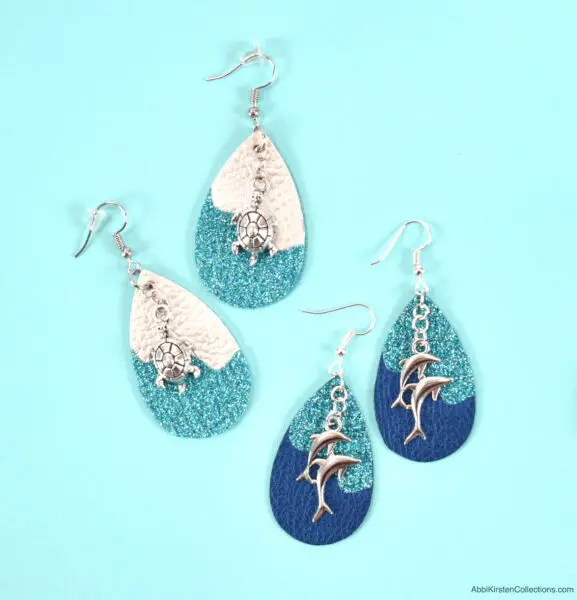
You now have a lovely pair of earrings that you made yourself! Be sure to show off your new DIY faux leather earrings to your family and friends!
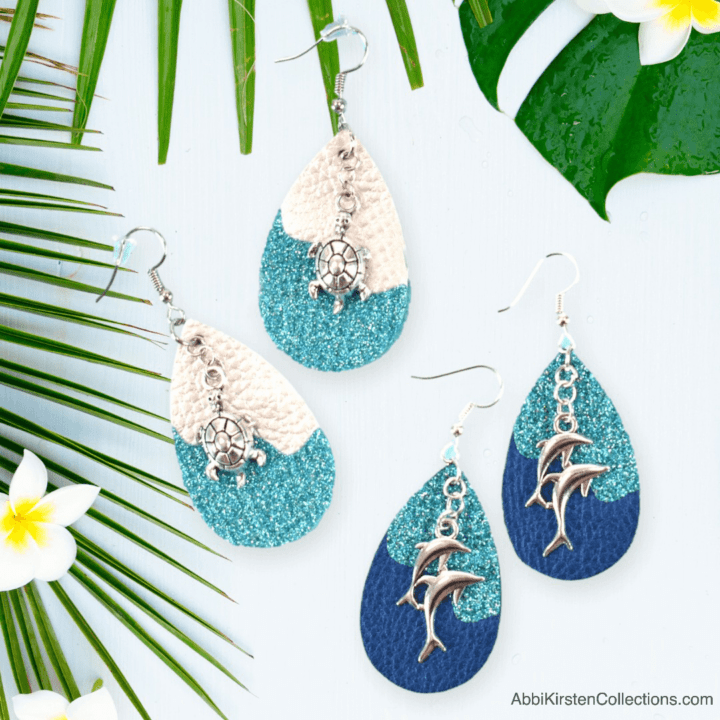
Faux Leather Earrings with Cricut
Create sea-inspired faux leather earrings with your Cricut! Templates are provided along with a step-by-step guide. Simple, cute and fun!
Materials
Tools
Instructions
1. Upload and cut the files in Cricut Design Space.
2. Decide on the size of your earrings template.
3. Create your earring design.
- Upload your template and size it in the Design Space, save your project and click the "Make It" button. Now your projects are separated out on the mats.
- Select the Mirror button on the iron-on vinyl mat since your iron-on vinyl will be cut in reverse. Then select the faux leather mat and move your cuts down a bit away from the corner to make room for the painter's tape that you'll be using.
- Click the continue button to connect to your Cricut cutting machine. Then click on "Browse All Materials" to see your faux leather options. I suggest selecting the "faux leather paper thin" option in the material settings unless you have a thicker canvas-like faux leather, then, you may want to choose the glitter canvas setting. For your iron-on mat, select the iron-on setting or the glitter iron-on setting according to what you decide to load.
4. Cut the faux leather with Cricut.
- Take your strong grip mat and your iron-on material and place the material's shiny side down on the mat. Use your brayer tool to push the material onto the mat.
- Load the mat into your Cricut machine using the standard fine-point blade. Once the Cricut is done cutting, peel your mat away from the material. Use your weeding tool to weed out the cuts of your heat transfer vinyl.
- Put your iron-on vinyl aside and place your faux-leather material down on your mat. You can use painter's tape if needed to hold it in place. Usually, paper-thin leather does not require this. Load your mat into your Cricut machine.
5. Press your cut pieces together.
- Peel your cut faux letter pieces off your mat and flip them over so that the colored side faces down. Set your EasyPress Mini to the lowest setting.
- Take a pair of scissors and trim the liner of your iron-on vinyl to separate the pieces. Line up the backs of the teardrop-shaped vinyl and faux leather pieces so that each cut is perfectly aligned on top of the other.
- Take your heated-up EasyPress Mini and hold it for about 15 seconds on the vinyl side of the design. Let it fully cool before pulling it away from the liner. Repeat steps 8 and 9 for the other teardrop-shaped cuts.
- Pull the cuts away from the liners. Press them again for another 10 seconds if they are not fully sealed together.
- Take a water's edge-shaped vinyl cut and press it to the faux leather side of one of the teardrop-shaped pieces you just created. This will be the top layer of the earring in the front.
- Cover the design with uncoated butcher paper. Take your heated-up EasyPress Mini and hold it for about 15 seconds on top of the butcher paper. Repeat step 5 for the other teardrop piece.
6. Add hardware to your earrings.
- You should now have two teardrop-shaped earring pieces with faux leather and a vinyl water's edge on one side and vinyl on the other. Take your leather punch on the smallest setting and punch a small hole at the top of the earring for each one.
- Use jewelry pliers to open up a 4mm jump ring. Add two more of the 4mm jump rings to the open ring and then use the pliers to close it.
- Open up the 6mm jump ring and add it to the chain of three 4mm jump rings that you just made. While the 6mm jump ring is still open, add an earring hook and a faux leather piece and close the ring.
- Reopen the bottom-most 4mm jump ring with your pliers, add an earring charm to the open ring, then close the ring again. Repeat steps 2-4 for the other earring. This is the final step!
If you liked this project, be sure to check out my other tutorials on my blog. I have plenty of other Cricut projects that are perfect for beginners as well as more advanced crafters. Read on for some more great Cricut earring ideas, including free SVGs!
More Cricut Earring Ideas You Will Love
Make sure to check all these pretty Cricut earrings, many with free SVG files!
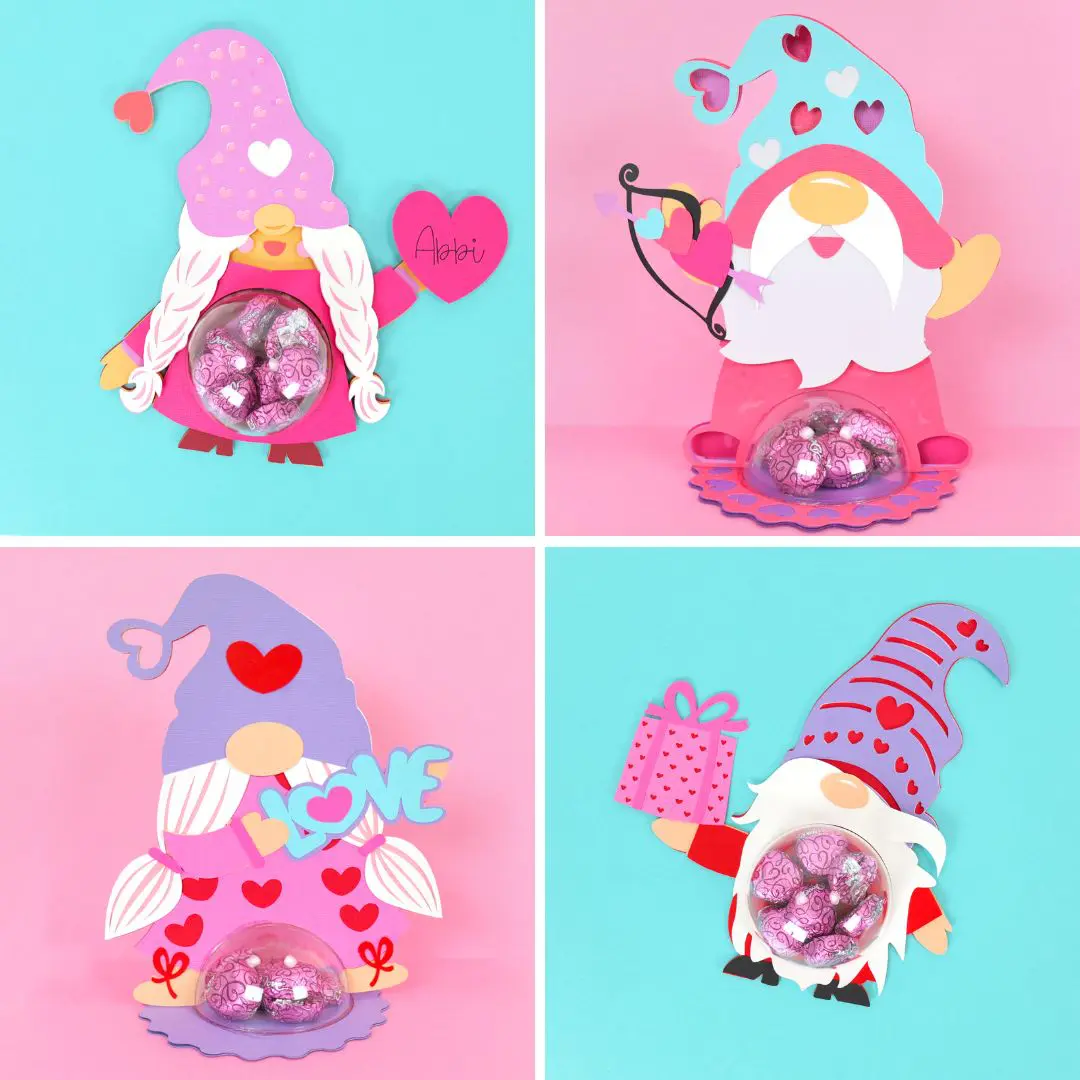
- DIY Christmas Poinsettia Faux Leather Earrings on Abbi Kirsten Collections in collaboration with Amy Romeu
- How to Make Butterfly Earrings with a Cricut Joy by Amy Romeu Crafts
- Earring SVG – Split Circle by That’s What Che Said
- DIY Teacher Apple Earrings by Artsy Fartsy Mama
- Easy DIY Cricut Joy Earrings – Summer Starfish by Amy Romeau Crafts
- Leather Earrings with a Cricut Explore Air 2 by That’s What Che Said
- DIY Geometric Earrings by Artsy Fartsy Mama
Make These Gorgeous Earrings Today!
I hope you enjoyed these gorgeous earrings and are inspired to make your own earrings using the Cricut Explore Air 2 or any other Cricut machine.
With a little bit of creativity, you can create beautiful Cricut jewelry in any style you like. Be sure to check out my other posts for more Cricut project ideas, and don’t forget to snag your free SVG cut file for these faux leather earrings. Happy crafting!
What did you think of this Faux Leather Earrings tutorial with Cricut? Don’t earrings make lovely statement pieces to add to your outfits or to make as gifts for family or friends? Tell me your thoughts below!
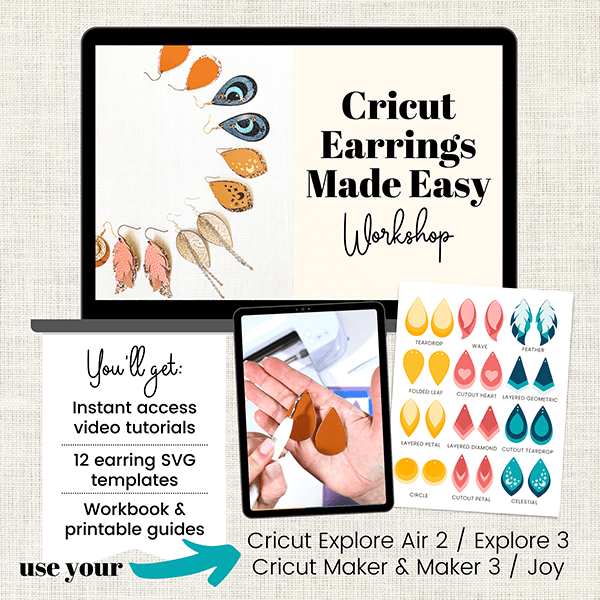
Master Faux Leather Jewelry with Amy Romeu
Do you enjoy learning how to make earrings with Cricut? Maybe you are still struggling and need an expert to guide you or just want to make more faux leather crafts! My friend, Amy Romeu, is the queen of making earrings with your Cricut! She has so many great hacks and tips when working with faux leather. Check out her Cricut Earrings Made Easy workshop here. You will be blown away by Amy’s knowledge and insight into her workshop!
More Beach-Inspired SVG Files For Cricut and Silhouette
If you loved this earring tutorial with a summer beach theme, you will enjoy all the free beach SVG cut files by my fellow creatives!

Dolphin Ocean Earrings | Abbi Kirsten Collections
Beach Bound | Brooklyn Berry Designs
Baby It’s Hot Ice Cream Logo | The Listed Home
I’m Super Jawsome | Hello Creative Family
Layered Beach Sign Wreath | Like Love Do
Summer Vibes Frame | Little Miss Eden Rose
Here Comes The Sun | Color Me Crafty
Life is Better at the Beach | The Denver Housewife
Beach Vibes | 100 Directions
Eat. Sleep. Beach. Repeat. | The Quiet Grove
Sand Castle | Kiy’s Craftroom
Sunrise to Sunset | Crafty Life Mom
I Need Vitamin Sea | Artsy Fartsy Mama
Palm Tree Sunset | Liz on Call
Wild Ocean Child | Simple Made Pretty
On the Beach Layered Paper Craft | The Bearded Housewife
Layered Beach Wreath | Extraordinary Chaos
Happiness Comes In Waves | Sunshine and Munchkins
Take Me To The Beach | Crafting in the Rain
Sandy Toes & Salty Kisses | Tried & True Creative
About Abbi Kirsten
Welcome to my colorful corner of the internet, where we play with vibrant crafts and unlock your creative magic! Hang out with me and get lost in a fun array of projects, tutorials, and products, from stunning papercraft ideas to flower templates, Cricut help for beginners, and endless crafter’s hacks.
Join A-Star Crafters and participate in monthly Craft-Alongs in our community Facebook group!