How to Make A Paper Cactus: Prickly Pear, Aloe Vera, and Ferocactus
This post may contain affiliate links that won’t change your price but will share some commission.
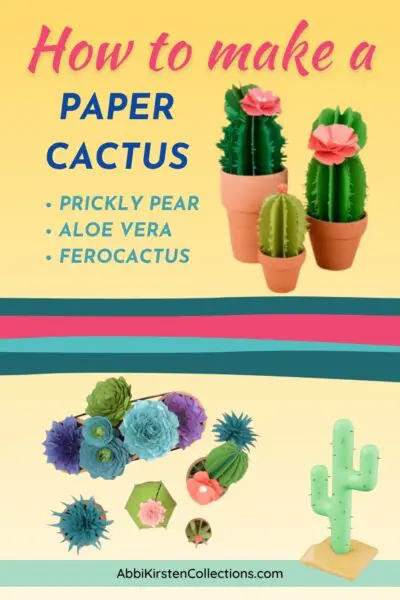
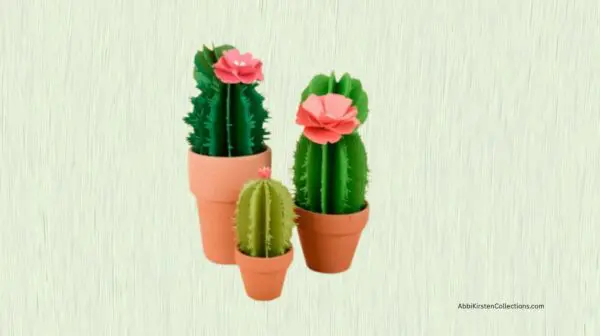
If you’ve been wanting to learn how to make a paper cactus but aren’t sure where to start, this beginner-friendly craft is perfect for you! Included with this tutorial are templates for three paper cacti styles: a beautiful prickly pear cactus with flowers, a realistic aloe vera, and a charming ferocactus. These fun and easy designs are perfect for home décor, office shelves, party decorations, or gifts, and can be made with either a Cricut cutting machine or cut by hand.
Don’t miss the other botanicals in this collection, especially our popular Cali paper poppies!
Create a Realistic Cactus With These A-Star Crafter Designs
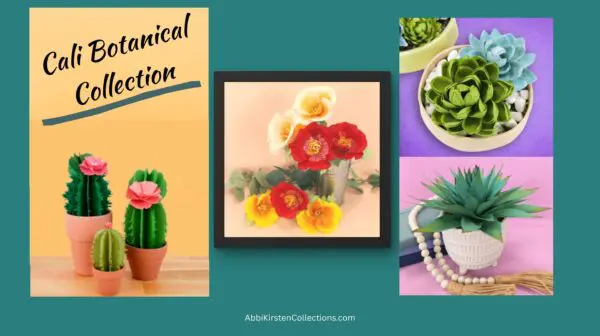
These lifelike 3D Paper Cacti Designs are part of the Cali Botanical Collection within Abbi Kirsten Collections. When you become an A-Star Crafter, you have access to each design’s templates for uploading, a follow-along video, and step-by-step instructions to give you all that you need to create these realistic paper cactus creations!
Access The Cactus Design Templates
You can find the templates, which include three different cactus designs, linked below, available for instant download as an A-Star Crafter. The templates are designed to work seamlessly with your cutting machine.
- If you’re an existing A-Star Crafter, log in to access and download the cactus templates here.
- If you haven’t yet joined A-Star Crafters, click JOIN A-STAR CRAFTERS below, create your account, log in, and go directly to the Paper Cactus designs here. Join A-Stars to get access to the templates for this fun project and so much more!
Get This And Hundreds More Craft Templates By
Becoming an A-Star Crafter!
Supplies and Materials
Before getting started, gather the following supplies:
- 65 lb cardstock in shades of green
- Pink cardstock for the cactus flowers
- Cricut cutting machine (optional but recommended)
- Scissors (for hand cutting)
- Hot glue gun and glue sticks
- Thin wooden dowel, pencil, or glue stick for curling
- Terracotta pots or small decorative pots
- Floral foam or tissue paper (optional)
- Distress ink (optional for shading)
- Paper Cactus Templates (3 designs: Prickly Pear, Aloe Vera, and Ferocactus)

Paper Cactus Video Instructions
The video below shows how easy it is to create these realistic prickly pear, aloe vera, and ferocactus plants. You can also read on for the step-by-step process in assembling this craft.
Steps for Making The Paper Cactus Designs
1. Download the Templates.
Download the Paper Cactus templates from the Craft Vault, then upload them to Cricut Design Space. The cacti are part of a collection of botanical designs within Abbi Kirsten’s A-Star Crafters and include three different styles along with coordinating flower pieces. Prefer cutting by hand? Printable templates are also included with simplified shapes that are easy to cut with scissors.
If you’re new to Cricut, read my tutorial on uploading an SVG file to Design Space. I also offer a free Cricut Freedom Workshop on how to master your Cricut with real, actionable steps – but without the tech confusion and overwhelm!
2. Cut Out Your Cactus Pieces.
Begin by cutting all of the template pieces for the cactus style you’d like to make.
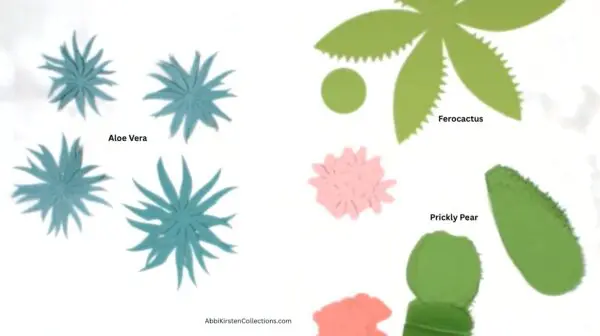
For each cactus/plant, cut the following:
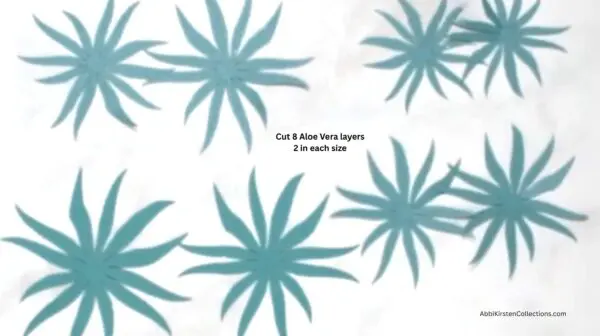
Aloe Vera:
- 2 large layers
- 2 medium layers
- 2 small layers
- 2 extra-small center layers
Ferocactus:
- 1 cactus body
- 1 circle base
- 6 flower layers
Prickly Pear:
- 12 large cactus pads
- 12 small cactus pads
- 4 flower layers
- 1 small flower center
You can cut everything with a Cricut machine or by hand using the printable templates.
3. Assemble the Aloe Vera.
Since it’s the simplest of the three designs, let’s begin with the aloe vera. It comes together by layering the cardstock pieces in a rotating fashion.
- Starting with the largest layers, bend up the sides to create some dimension.
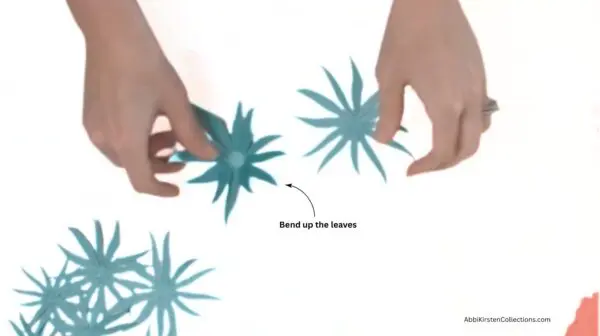
- Bring the sides of a layer fully together and pinch the bottom just a bit.
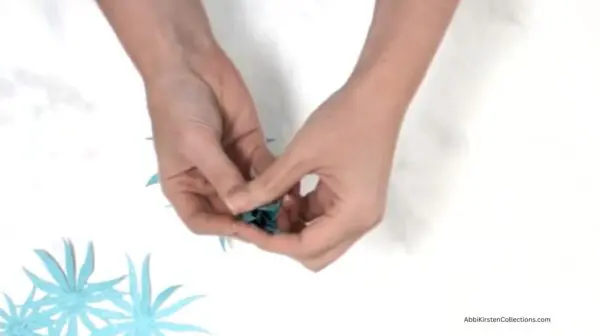
- Add hot glue to the center and attach it to the first large layer.
- Continue stacking each layer from largest to smallest, rotating each one so the leaves alternate.
Pro Tip: As you add layers toward the center, the work area gets tighter, so it helps to flatten out the outermost layers to give room, then bend them back after everything is glued.
- For the final two center layers, glue these together first before placing into the middle of the plant. Don’t worry about making every leaf identical. Slight variations make the finished cactus look more natural.
- If desired, place the completed aloe vera inside a small terracotta pot. You can simply rest it inside the pot or secure it with floral foam for extra stability.
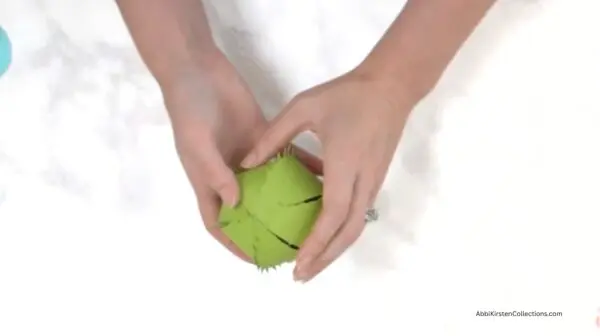
4. Assemble the Ferocactus.
Our next cactus design, the ferocactus, has a rounded shape that’s surprisingly easy to create. Start by bending every cactus spine outward to approximately a 90-degree angle.
- Next, fold each cactus section upward.
- Use the included cardstock circle as the base.
- If helpful, fold the circle into quarters to create guide lines for even placement.
- Glue each cactus section to the center of the circle, working around until the shape closes.
- Slightly overlap each section as you go to create a full, rounded cactus.
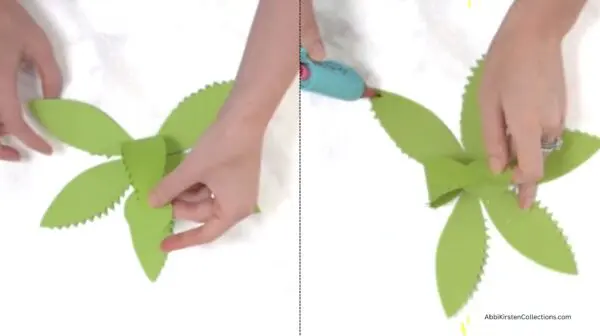
Once assembled, fluff the cactus spines if needed to restore their shape.
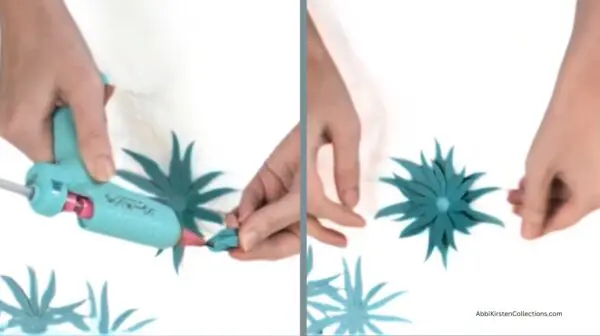
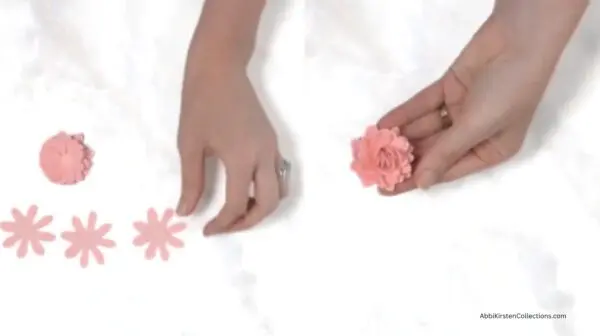
Make the Ferocactus Flower.
The colorful flower adds the perfect finishing touch to the top of the cactus.
- Gently bend each flower petal upward.
- Layer all six flower pieces together, rotating each layer so the petals alternate. For the final center layers, pinch them slightly before gluing them into the middle.
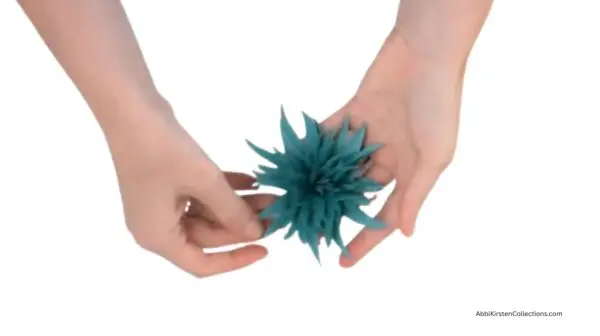
- Fluff the petals until you’re happy with the shape.
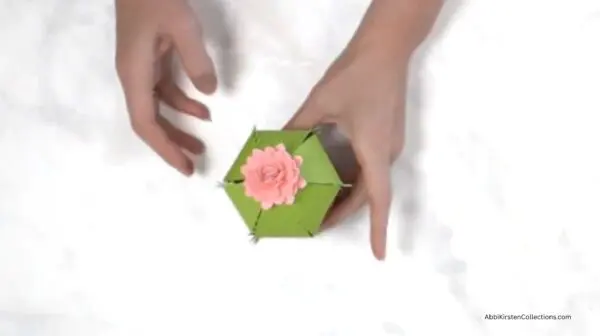
- Glue the finished flower directly to the top of the cactus. Set the ferocactus into a terracotta pot for a finished display.
5. Assemble the Prickly Pear Cactus.
Next, on to the prickly pear cactus, another beautiful design in our Cali Botanical Collection.
Fun facts: Did you know, for the live version of this cutie, that this hardy little plant can survive in below-zero temps and is also a rich source of nutrients and medicinal help as well as having sweet edible fruit within its pads? Amazing!
Add Shading (Optional).
Before assembling the prickly pear cactus, consider adding shades of color for a realistic look by using distress ink. This step creates beautiful depth once all the layers are assembled. To add the shading:
- First, protect your work surface, then apply ink down the center of each cactus pad using an ink blending tool. Blend outward slightly to create a soft gradient.
- Fold each pad in half to give it dimension, making a crisp fold, especially at the bottom of each pad.
Create the Cactus.
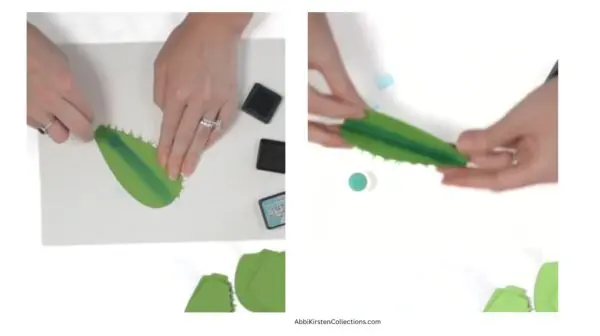
For my prickly pear, I used 12 larger and 12 small cactus cutouts. Of course, you can add more pads to create a fuller cactus. A real prickly pear has cactus pads with one smooth side and one side with cactus spines, so to assemble:
- Glue the smooth side of one cactus piece to the spiny side of the next. Continue stacking all twelve pieces together. For my cactus, I glued 3 sets of 4 pads together and then glued the sets together as one.

Pro Tip: Working in groups of three or four pieces at a time helps keep everything aligned.
- Once all pieces are stacked, glue the first and last pieces together to close the cactus shape. Optionally, if you’d like your cactus to have a stem, you can glue a wooden dowel or floral wire into the center before closing the final seam.
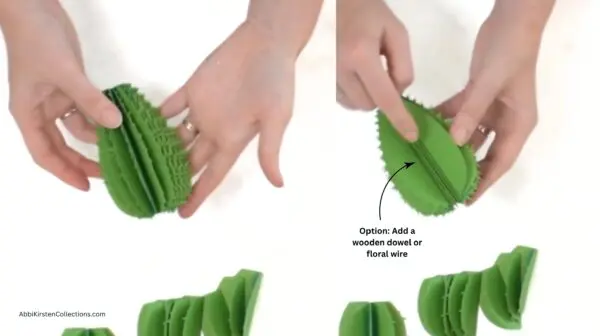
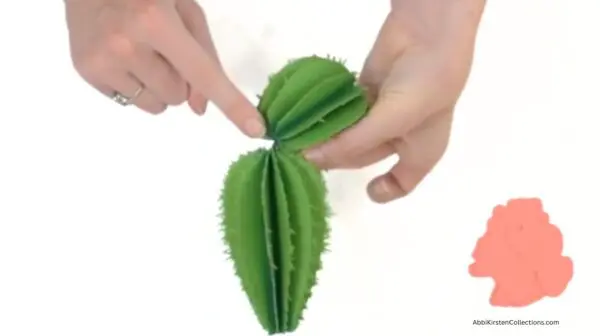
Attach A Top Section To The Bottom Cactus Shape.
- If you’re adding a smaller top section, repeat the assembly process you followed for the bottom section by gluing the smooth side of one cactus piece to the spiny side of the next.
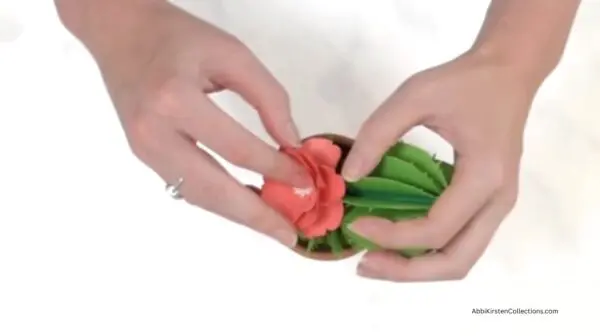
- Next, position the smaller cactus slightly off-center on top of the larger cactus. To attach, add hot glue at the base and hold the top section in place until secure. This angled placement creates a more natural-looking prickly pear cactus. (Any visible seam will be hidden with the flower that we add in the next step.)
Create the Flower for The Prickly Pear.
As a finishing touch of color, let’s assemble and add our pink desert flower.
- Curl each flower petal around a thin dowel, glue stick, or pencil.
- Layer four flower pieces together, rotating each layer so the petals alternate.
- Glue the small center piece into the middle.
- Fluff the petals for a full bloom.
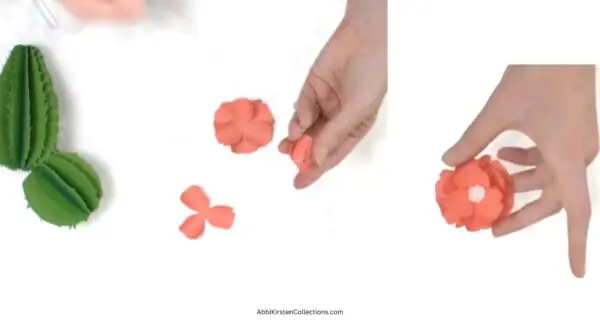
- Attach the flower to the top of the cactus where the two sections meet. Hold it in place for 15-20 seconds while the glue sets.
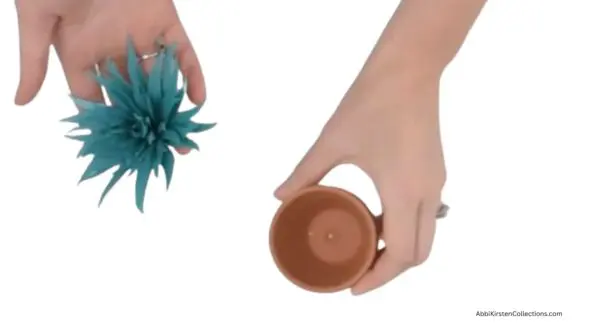
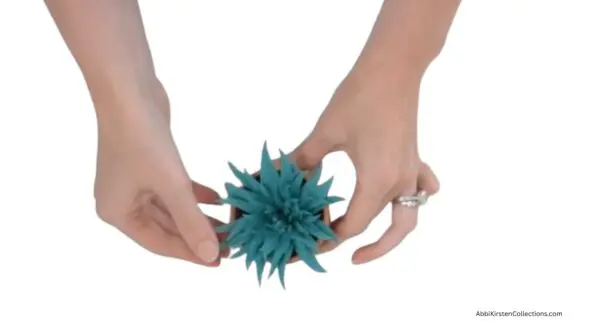
6. Display Your Finished Paper Cactus Creations.
Place each finished cactus into a small terracotta pot. For added stability, you can:
- Fill the pot with floral foam.
- Use crumpled tissue paper to raise the cactus higher inside the pot.
- Glue the cactus in place if you plan to display it permanently.
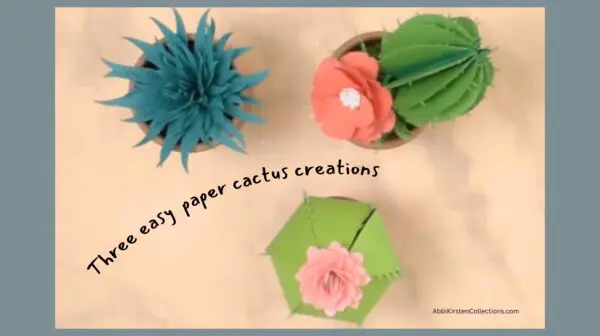
There you go! Three easy paper cactus creations, super beginner-friendly with various styles for creating a fun desert-inspired display you’ll enjoy for years to come!
Other Botanicals and Succulent Plants
These DIY paper cacti are proof that you don’t need a green thumb to enjoy beautiful plants. They also look beautiful next to the other designs in the Cali Botanical Collection, which includes the Cali paper poppies and the paper agave plant.
We’d love to see your finished paper cacti, so be sure to share your creations with the Abbi Kirsten Collections community and tag us on social media!
Looking for More Creative Crafting?
We have so many paper flower creations, gift ideas, holiday decorating fun, and more at Abbi Kirsten Collections, with free Cricut workshops and our free 3-part series on creating your own SVGs from Scratch. And if it’s more paper flower creations you’re looking for, here are a few crafters’ favorites!


Find Hundreds Of Free Templates In The Craft Vault!
Did you make this craft?
We would love to see what you have created! Tag @abbi_kirsten_collections on Instagram so we can see your creations!