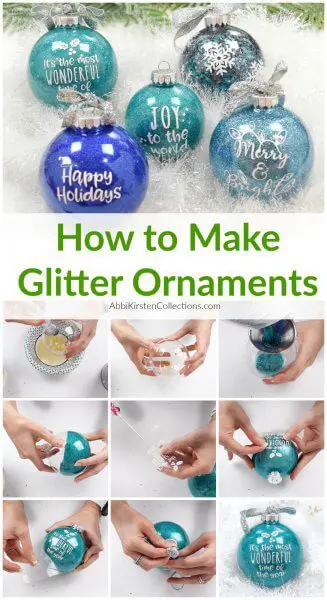
DIY Glitter Christmas Ornaments: The Easy Way to Make Your Own Custom Ornaments
This post may contain affiliate links that won’t change your price but will share some commission.

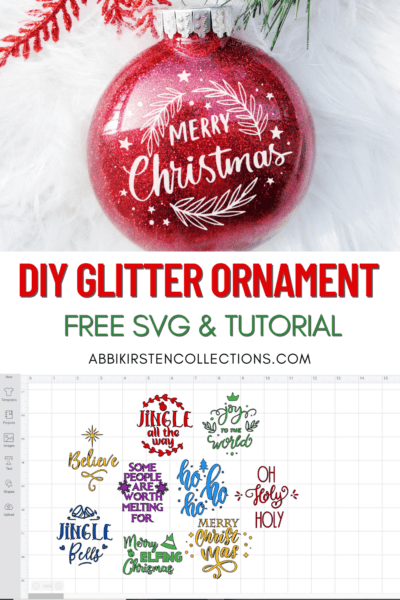
Glitter Christmas ornaments are a holiday classic—and surprisingly easy to make! You can customize these with any color glitter and add a festive Christmas saying (15 free SVGs included), cut from your Cricut machine.
Follow my straightforward step-by-step tutorial and video where I’ll guide you through the full process, from learning how to evenly coat the inside of the ornaments with glitter to applying the vinyl and adding your personal holiday phrase to the curved surface. Several crafty pro-tips are included, making this a fun, kid-friendly craft and merry family tradition.
Free SVGs With Festive Christmas Sayings
In addition to the DIY glitter ornament tutorial, I’m sharing 15 FREE Christmas word SVG cut files to use on your ornaments. These joyful sayings will add a beautiful finish to this fun holiday craft.
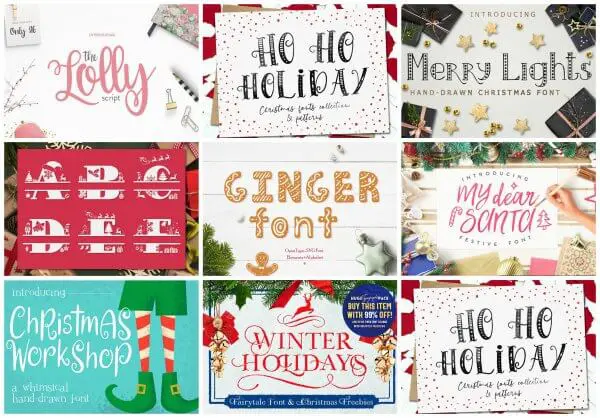
Find And Create Your Own Holiday Fonts
Learn how to find and create the best holiday fonts and create your own unique phrases in Cricut Design Space.
- Check out my ultimate guide on how to install and use fonts in Cricut Design Space, including where to get the best free fonts, and find specialty characters and glyphs.
- And discover this collection of the cutest holiday fonts that work well within Cricut Design Space.
Want to design your own SVGs? I design all my own SVG cut files and love teaching other cutting machine crafters to do the same. So, check out my FREE Magic of SVGs workshop here!

DIY Glitter Ornament Supplies
Your first step is to gather your supplies. Here are my recommended supplies for Christmas glitter ornaments.
- Clear plastic ornaments. Find these at craft stores during the holiday season. I prefer plastic because they’re shatterproof (kiddo proof).
- Fine glitter or fine/chunky glitter mix
- Clear polyurethane (found at Home Depot) or polycrylic
- Funnel or rolled-up piece of cardstock
- Syringe (30 ml)
- Mini plastic cups
- Vinyl in choice colors. I recommend white for most of the wording; black works well if you are making white glitter ornaments. I also love to use glitter vinyl for the details.
- Transfer tape
- Cricut scraper
- Cricut cutting machine (or any cutting machine that works with SVG files)
- Ribbon (optional)
- FREE Christmas SVG word designs and how to download the designs

FAQs for Making the Glitter Ornaments
Here are some helpful tips to know before crafting these ornaments.
What Liquid Glue Do You Use to Make Glitter Ornaments?
I’m often asked which glue is best for making handmade glitter ornaments – polycrylic or polyurethane. As my first choice, I prefer using polycrylic due to its ease of use and lower fumes, and I think it dries a little faster. That said, I’ve also used polyurethane. Both work equally well, and I’ve found they do not yellow, even two Christmases later!
Can I Use Glass Instead of Plastic Ornaments?
Yes, glass ornaments work just as well as plastic ones. The only difference is potential breakage with glass (and plastic being kiddo-proof).
Should I Use Fine or Extra Fine Glitter?
Either will work, but I prefer extra fine.
Do I Need to Seal the Ornament?
No, no need to seal since you’ll be using Cricut permanent vinyl.
How Many Ornaments Does a Bag of Glitter Make?
That depends on the size of the ornaments and ounces of glitter purchased. Typically, a 3.5-oz bag of glitter is enough to make 10-12 ornaments that have a 5-inch diameter.
What Size Should I Make My Holiday Phrase?
That also depends on the size of the ornament you’re using and your personal preference. As a gauge, in this tutorial, I used 5-inch diameter ornaments and made each phrase around 2.75 inches wide.
Download the Free Ornament Designs
You can access the Christmas Glitter Ornament SVG collection with a free account or simply sign up for a free account using the form below, and once inside the Vault, use the keyword ‘ornament’ to find and download these templates.
How to Make Glitter Ornaments – Video Tutorial
Once you’ve gathered your supplies and downloaded the free Christmas SVG templates for these ornaments, watch the full video below and follow the step-by-step tutorial.
Steps for Making Your Own Christmas Glitter Ornaments
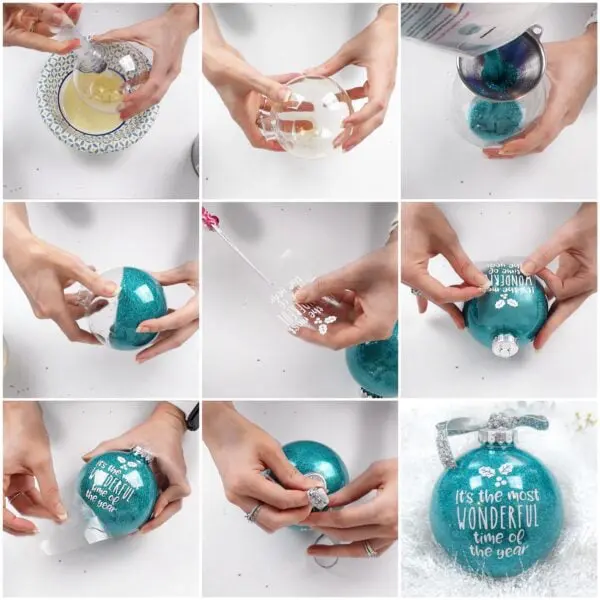
1. Coat the Ornament.
- Open the ornament. Carefully remove the top cap and hanger piece from the ornament. Fill a 30 ml syringe with polycrylic or polyurethane.
- Add the liquid. Push the syringe into the top of your ornament. You only need enough to coat the inside completely.
- Coat the inside. Swirl the liquid around so that it’s fully coated. Hold the ornament and slowly swirl and turn it in your hand until the entire interior surface is coated.
2. Drain the Excess.
- Start draining. Next, tip the plastic ornament upside down on a cup to drain the excess.
- Keep rotating. As the excess drips out, slowly rotate the ornament in your hand. This prevents pooling at the bottom and ensures the coating stays even.
- Final drain. Once most of the liquid has dripped, place the ornament upside down on a mini cup and let it drain for at least one minute.
Pro Tip: Allowing the ornament to fully drain is important to prevent uneven distribution of glitter.
3. Add the Glitter.
- Add glitter. Flip the ornament right-side up and set it on a cup. Place your small funnel into the opening.
- Pour. Dump a generous amount of glitter into the ornament. Don’t worry about using too much; the excess can be poured back later. Gently tap the funnel to clear any trapped glitter.
- Coat the interior. Slowly start turning and rotating the ornament in your hand. Make sure to coat the bottom first, then work your way up the sides until the entire lower and middle section is covered.
- Coat the top. The top edge is the trickiest. To cover it, fold up a paper towel and place it over the opening. Hold it securely, then shake the ornament vigorously, doing quarter turns in your hand as you shake. Continue until the top interior is fully coated.
- Remove excess. Pour any excess glitter out of the ornament and back into your bag or container to reuse later. (I’ve never had any issues with reusing this glitter; it keeps quite well!)
- Dry. Now, place the ornament upside down on another cup and let it dry for at least 30 minutes before applying vinyl. Once dry, you can replace the top cap/hanger.
4. Cut And Prep the Vinyl.
- Design and cut. Use your Cricut machine to cut out your selected Christmas phrase from adhesive vinyl. Many great SVG files with holiday sayings are available for free on my and other crafter blogs.
- Weed. Remove all the excess vinyl around and inside the letters (weeding).
- Apply the transfer tape. Place a piece of transfer tape over the weeded vinyl design and use your scraper to burnish it well, ensuring the vinyl adheres to the tape.
- Add “give” to the transfer tape. Applying vinyl to a curved surface while preventing wrinkles and bubbling can be a little tricky, so check out my hack below for the best results.
Pro Tip: With your scissors, cut several small, short slits all the way around the edges of the transfer tape that holds your design (top, bottom, right, and left edges). Do not cut into the vinyl design itself. These slits allow the transfer tape to overlap and flex on the curved surface, making it easier to lay the vinyl flat.

5. Apply the Vinyl to the Ornament.
- Center the design. Estimate the center of your ornament and position the vinyl design where you want it.
- Press from the center. Press the design down firmly, starting first with the absolute center.
- Work outward. Using your thumb, slowly work outwards from the center, pressing the vinyl down firmly. The slits you cut will naturally overlap as you smooth the design onto the curve.
- Remove transfer tape. Slowly peel back the transfer tape. If any part of the vinyl lifts, stop, press it back down firmly with your thumb, and then continue peeling.
6. Complete with Ribbon or Hook.
- Embellish. Add an ornament hook or festive ribbon through the top loop to complete your custom glitter Christmas ornament.
- Display your ornaments! Showcase your custom ornaments on your holiday tree, arrange in a decorative bowl for sparkling table decor, or weave them into a wreath or garland. I love the idea of personalizing the saying with a name or endearing phrase, then attaching the ornament to the gift as a special keepsake!

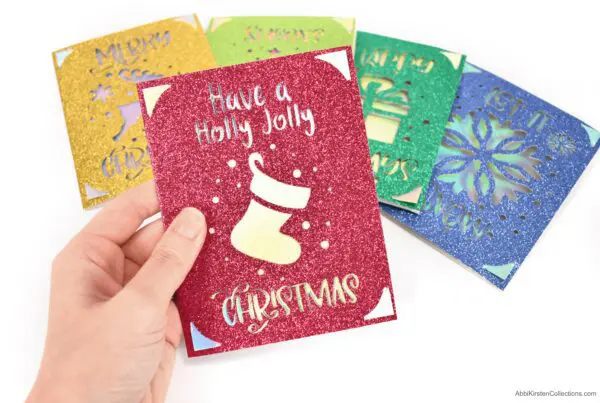
More Holiday Crafts to Love!
Looking for more Christmasy Cricut crafts? Check out these favorites below and more festive projects on the blog.

About Abbi Kirsten Collections
I have spent the last 9+ years building my creative skills and sharing them with others. My flower designs are created with simplicity, color and crafty fun in mind. If you haven’t yet, be sure to join the subscriber community to gain access to all my freebies or visit my signature design shop here!
Want to join my Facebook community to share your crafts and learn from the best? Click here to request access to my group, Crafters and Cricut Lovers.

Hi Abbi – I just came across your account – I just received a cricut maker for Christmas and looking for ways to use my new machine. I liked your Christmas ornaments with the glitter – I tried to download the sayings – but they are on a letter size page and it looks like you might have created these on a larger page or using landscape or something…. Could you please let me know how I can download all of the Christmas Fonts – I must be doing something silly here…. Thank you looking forward to hearing back from you Lucy
Hi Lucy,
Have you uploaded the SVG file to Design Space? The preview image will only show part of the words. Once uploaded to design space you should see the full imagery appear. 🙂
OK – I got it…. I was just seeing the image on the download screen so to speak and did not even think about putting it in the design space…. I knew I was doing something silly….
Thanks… I feel like a toddler…. So much to learn….
Lucy
What size are your vinyls for the ornaments inches wise? I want to make some but not sure how big to make the vinyls.
Hi! This will depend on your ornament size. I used a 4-inch ornament with a 2.75-inch wide design. 🙂
I love this idea of glitter ornaments. I have glass ornaments now I know what I will do with them. I was going to try and mix two colors of glitter and put them in an ornament. Love this website.
Hi thinking about making valentines ornaments. I only found the disc clear plastic ornaments not round. Any special tips when working with these.
Thanks
Hi! The disk ornaments should work very similar to the round ones. You may need to get creative with the process of draining the polyacrylic. Maybe try sandwiching the disk inside a flexible plastic cup.
So helpful, thank you! I’m new to the Cricut and am excited to make some ornaments. Your pst was so helpful!
I’m so happy it helped you!
Hi! Do you use oil or water based polyurethane?
Either can work but I prefer water-based! 🙂
Thank you so much for having this for us. I was asked by my boss to cut (with my Cricut) some ideas for C’mas ornaments. THIS has made my evening SO much easier. Thank you!! Thank you!!
You’re so welcome!
Thank you so much for this whole tutorial it was so easy and my ornaments turned out beautifully!
You are so welcome! 🙂
I love theses designs! Is it ok to use your designs to sell at a church bazaar or are they personal use only and not to be used when selling for any reason?
Yes, you are welcome to use my free designs to create items to sell at your church bazaar 🙂
Absolutely love this video. You are so talented. After having my daughter I am viewing life in a whole new way. I woke and decided I want to make my own decorations this year. Something that will one day be on her tree. I have one question being that I have a new baby. Does the polyurethane have fumes or odor during and after they are completed?
You’re welcome! Once the polyurethane is dried, there is no odor. 🙂
Is there a smell of polyurethane doing process. Would mod podge work?
Yes!
I didn’t use enough glitter and there are bare spots. Can I use more polyacrylic and glitter or are they just going to have to stay that way? Are your designs compatible with Silhouette Cameo 4?
Hi Amy!
You can add more polycrylic in an attempt to build up the glitter. Just make sure it drains well first to avoid clumps. Yes, these designs are compatible with Cameo. You will need to have the designer edition to upload the SVG format to the cameo software. 🙂
You mentioned that there was no yellowing even after 2 Christmases, was that with the polyurethane or polyacrylic? Also, which do you prefer?
Hi Carrie! I did not experience any yellowing with the polycrylic. The polyurethane only shows a slight yellowing with white glitter two years later (for darker colors I did not see any yellowing).
Can you use glass ornaments instead of plastic?
Yes, absolutely! 🙂
This is great. For the ornament I did as above and it is having cracks and small spots
So sorry that happened! Make sure you are getting it completely coated with the glue inside, and don’t wait more than a 1-2 minutes before adding the glitter in. Also fine glitter is best! 🙂
Hi! I just did this tutorial and they came out so great!
I made a few this weekend and a few last weekend and they all looked perfect; except there were a couple from last weekend it seemed like the glitter had clumped and fallen off the sides.
It was perfectly coated last weekend and i let them sit upside down all night to make 100% sure they were dry.
Could this just be bc the glitter itself is not the best quality? It’s all the extra fine
It’s possible. I would look at how well the ornament was coated before adding glitter and also make sure not to wait too long before adding the glitter in. I wait 1-2 minutes.
Do you mind sharing the exact polyurethane you used in the video? I think the video showed Minwax but did you use oil or water based?
Water based! But polycrylic also works really well!
These are nice!
Abbi, I missed your live tutorial as I was called into work but none the less I have just watched the tutorial on Glitter Ornaments. Just wanting to download the ornament box but cannot find the template in design space. Does this have to be purchased, if so could you tell where I may be able to do so. Enjoyed the tutorial, off to try my hand at making these Christmas Ornaments, thanking you.
We’re so glad you enjoyed the Glitter Ornaments tutorial and hope you have fun making them. Here is the link to the SVGs:
https://members.abbikirstencollections.com/crafts/ornament-gift-box-design-1139
https://members.abbikirstencollections.com/category/all?sortBy=recent&page=2