How To Make Small Paper Flowers: Camellia Rose Template & Tutorial
This post may contain affiliate links that won’t change your price but will share some commission.
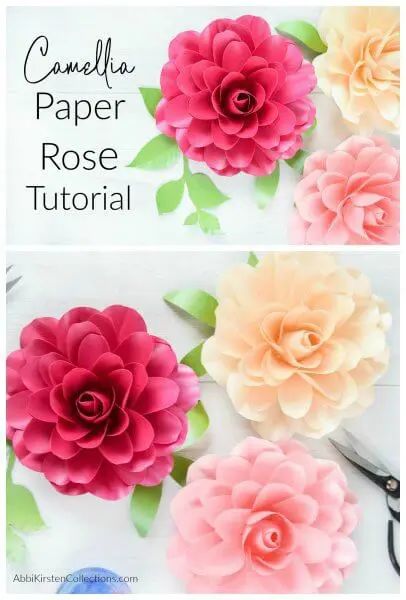
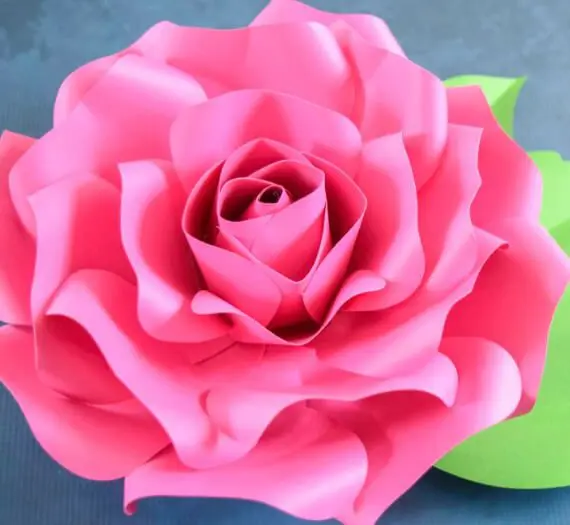
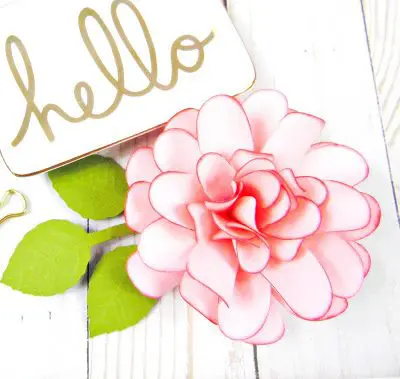
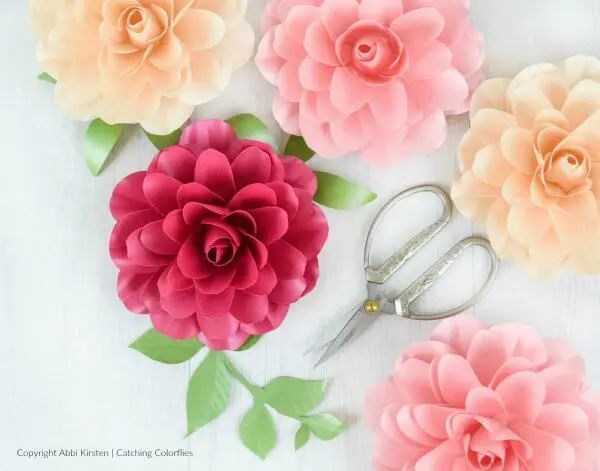
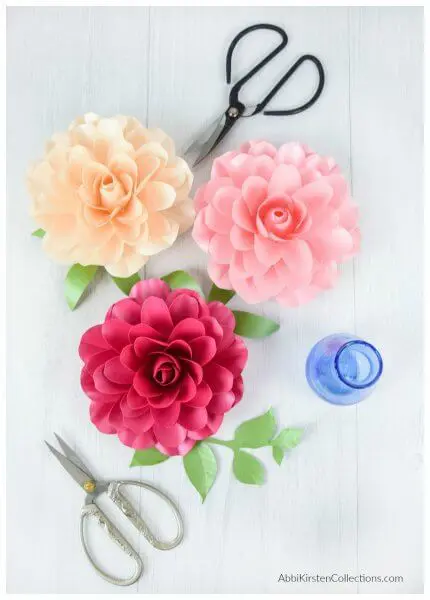
My signature template for a free giant paper Camellia rose was so popular I wanted to know if we could make small paper Camellia roses in the same style – and we can! I had to do a lot of troubleshooting when scaling down the extra-large petals, but I did find a way to get the delicate petal point layers to look like a beautiful, realistic Camellia rose flower using metallic paper!
I’ve been loving metallic cardstock paper lately. I first used it with my Anabelle classic rose paper flower. This metallic, frosted-looking paper adds a pretty shimmer to the flower’s petals! I also recommend using my leafy vine templates in the supply list to contrast with the pink shades of the flower’s petals.
Why Make Camellia Rose Paper Flowers?
I love creating paper flowers and small, large, and giant paper flower templates so everyone can join the fun! Paper flowers last longer than real flowers and are used for many special occasions. Plus, they allow crafters to use their creative magic to create realistic blooms in sizes ranging from small paper flowers to go in a vase to giant paper flowers you can hang on a wall as a backdrop!
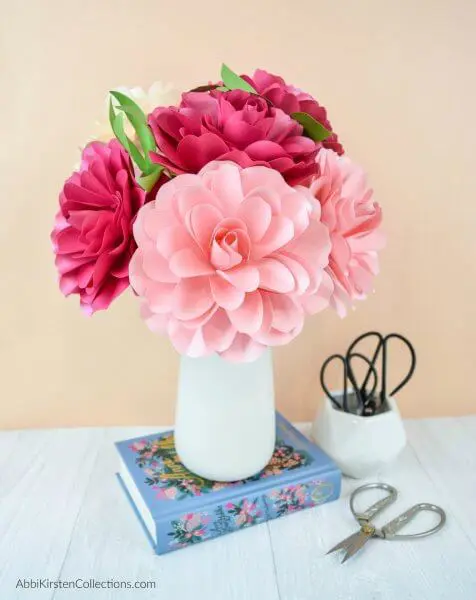
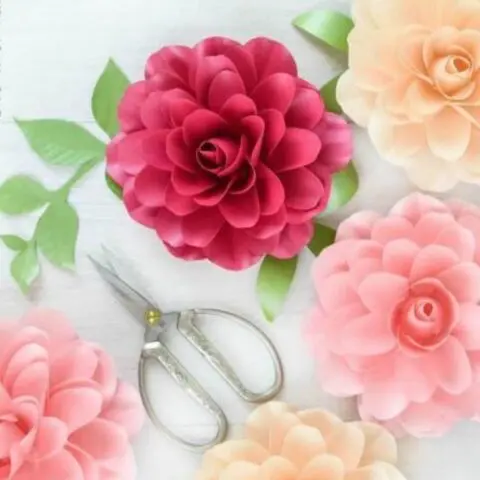
My new paper Camellia rose flowers work fabulously for arrangements, bouquets, and wreaths! Since Camellia roses symbolize love and affection, they are an excellent gift for Mother’s Day and Valentine’s Day.
Check out how I use my design methods to build a paper flower bouquet!
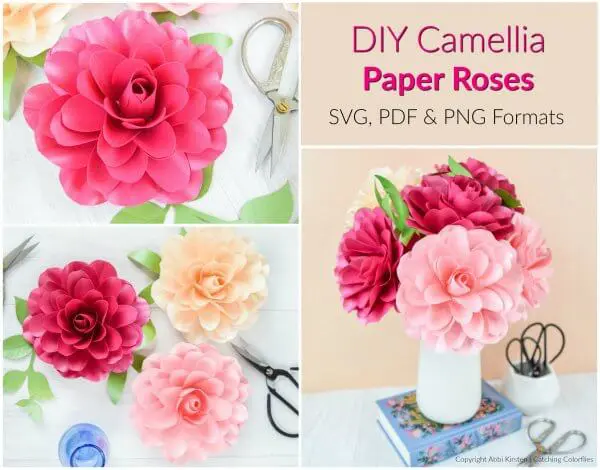
Download The Camellia Rose Templates
These paper rose flower templates and leaves come with both SVG cut files to use with cutting machines like Cricut and Silhouette, as well as PDF printables for cutting with scissors by hand.
Grab the complete Camellia rose template here in the shop, or if you are a premium member of AKC, then find them in the Craft Vault as a part of your membership!
Supplies for Small Paper Camellia Roses
Choosing the right supplies to make small paper flowers is essential. You want supplies that are easy to work with, contribute to the blossom’s beauty, and enhance the realism of the flower. Here are the supplies you will want/need to successfully make these lovely Camellia small paper roses.
- 50 lb text-weight metallic cardstock
- Glue gun
- Wood dowel
- Cricut machine (Explore or Maker)
- Scissors
- Camellia rose template at Catching Color Flies or the Camellia rose template on Etsy.
- Leafy Vine templates (optional)
- Paper Blooms Shaping Mat and Tool Set (optional) – I created this product especially to help with small paper flowers!
- 18 gauge wire (optional flower stems)
Do you want to add a stem? Check out my small paper flower stem tutorial!
Are you interested in becoming a paper flower crafting pro? Check out my complete paper flower supply list!
How to Make Small Paper Camellia Rose: Video Tutorial
Are you ready to make small paper roses for yourself? Grab your supplies and hit play on the video below, or keep reading for pictures and written instructions.
How To Make Small Paper Camellia Roses: Step-by-Step Instructions
Gather all the supplies needed on a spacious, clean work table. Before starting, cut out all your petals (and leaves if you add them). Use the SVG cut files with your cutting machine, or use scissors for hand cutting the PDF paper Camellia template. Ok, let’s dive in!

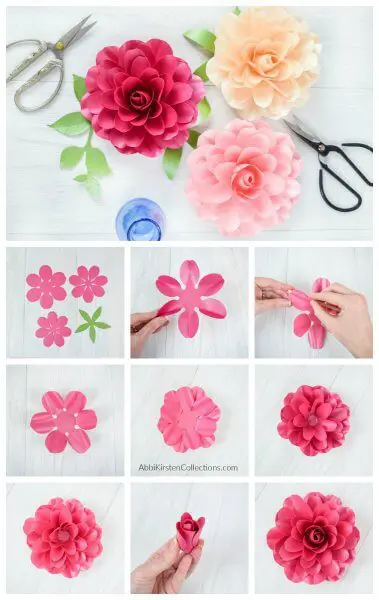
Step 1: Cut Out Your Paper Flower Parts
Cut out the Camellia rose petals in these quantities:
- Two of the six-point petals
- Five of the seven-point petals
If you are adding leaves or greenery, cut out those pieces as well.
Step 2: Shape Both Six-Pointed Petal Pieces
We use the two six-pointed petal pieces to create the Camellia rose’s blossoming outer petal layers.
- Crease each petal slightly down the middle on each of the six-petal points.
- Curl each side of the creased petal points backward with a wood dowel.
- Layer together the two 6-point petals by alternating the petal points.
- Glue the outer layer of petals to the inner layer using a small amount of glue to the inside base of the outer petals.

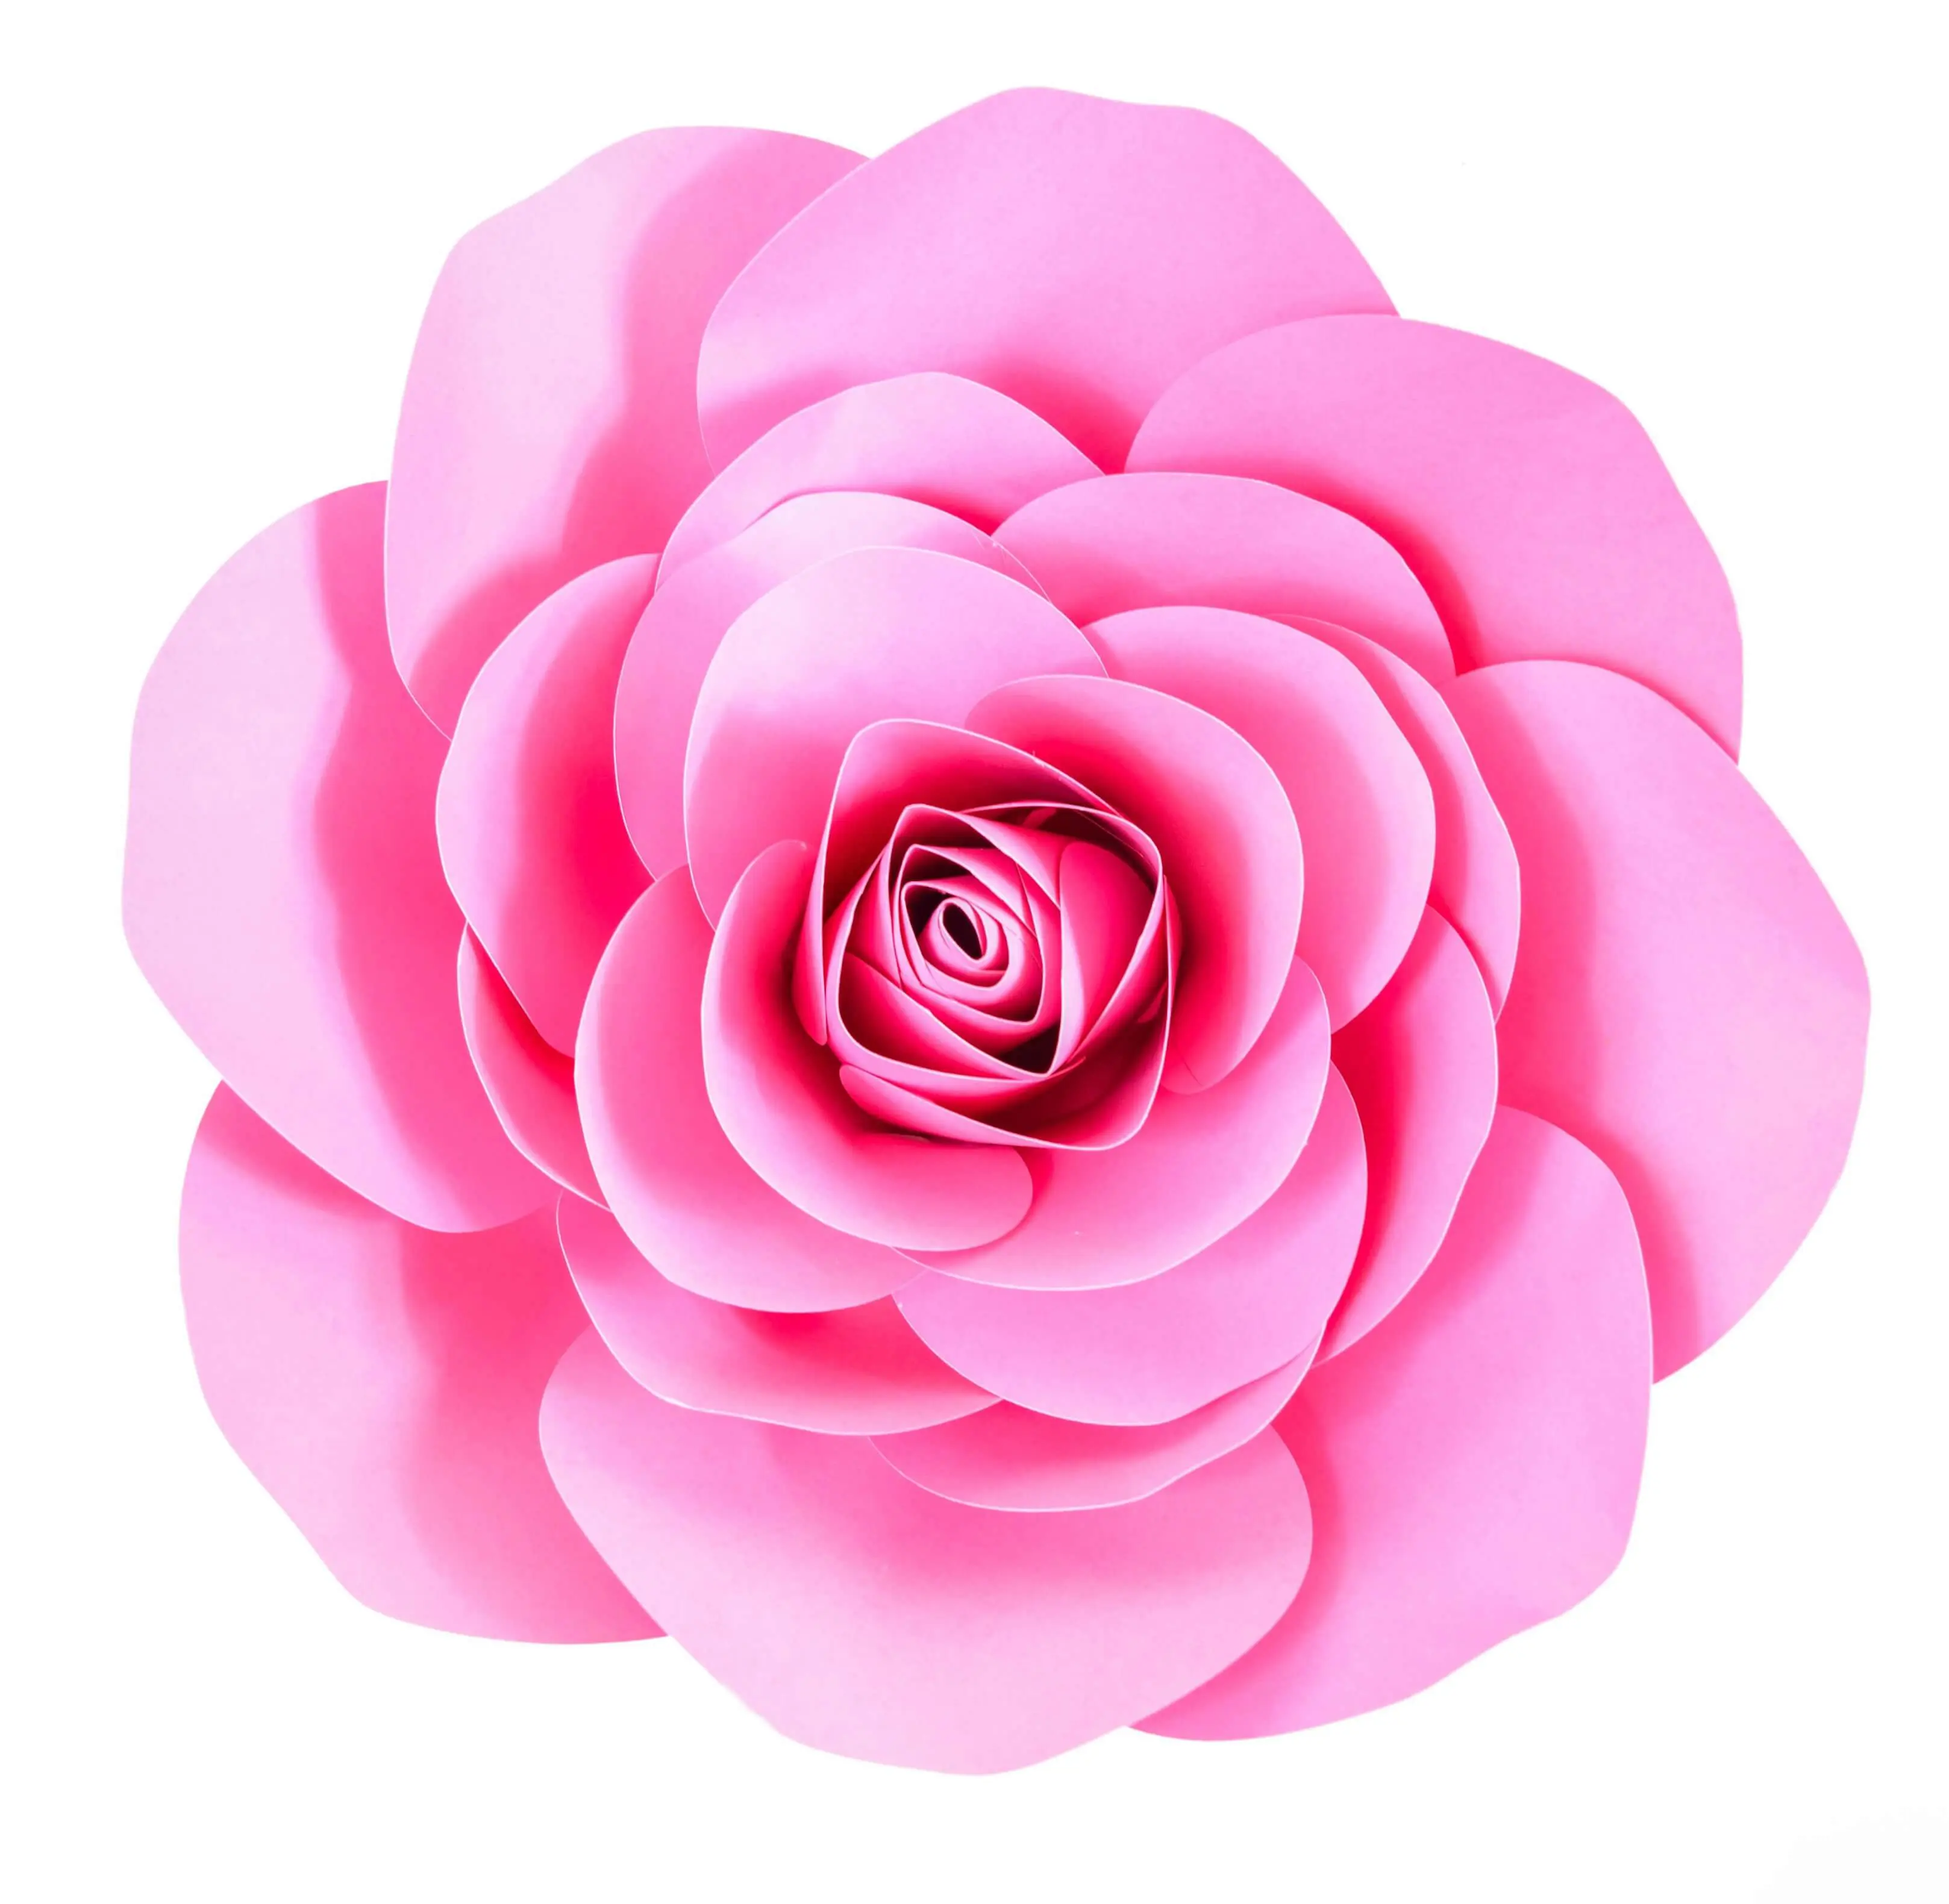
Step 3: Create the Rosebud Center
Two of the five seven-pointed petal pieces will create the central rosebud of the paper Camellias.
- Curl all of the 7-point petals upward around your dowel.
- Select ONE seven-pointed petal piece. Choose two petals opposite each other and fold and wrap them around each other as if they were hugging.
- Secure these tight rosebud petals with glue.
- Fold up the other five petal points around the center just created.
- Attach these remaining petals with a bit of glue to the inside base of each petal point.
Step 4: Assemble the Outer Rosebud Layers
- Layer in the remaining FOUR 7-point petals, being sure to alternate petal points.
- Secure these petals using a small drop of glue to the inside base of the petals like before.
Step 5: Assemble the Paper Camellia Rose
- Add a bit of glue to the center of the 6-pointed petal pieces.
- Glue in the rosebud center and its additional layers.
- Shape the petals as needed to bloom around the rosebud base.
If you opted for greenery or stems, be sure to read those instructions BEFORE starting to assemble the final Camellia rose.
Did you love learning how to make small paper roses? What questions do you have? Ask me in the comments below!
Interested In Freebies?
In addition to a blooming shop of flower templates, I have many fun freebies in the blog! Want to see what is waiting for you inside the Freebie Vault? I’ve got free templates, SVGs, printables, and more!
Do You Want More Paper Flower Templates and Tutorials?
I love making paper flowers, and I know you will, too. Instructions come with SVG cut files, PNG files, and PDF printable templates. Walk through my paper garden and find templates for these flowers and many more!
- Wild Roses
- Southern Magnolias
- Autumn Sunburst Dahlia
- Cherry Blossoms
- Sunflowers
- Giant Sunflowers
- Poinsettias
- Alora Garden Rose
How to Make Small Paper Roses: Camellia Rose Template & Tutorial
These beautiful, delicate Camellia small paper roses are easy and quick to make. Use the tutorial and templates to create these timeless, simple flowers that make great decorations for any room, party, Valentine’s Day or as wedding centerpieces.
Materials
Instructions
Step 1: Cut Out Your Paper Flower Parts
Cut out the Camellia rose petals in these quantities:
- Two of the six-point petals
- Five of the seven-point petals
If you are adding leaves or greenery, cut out those pieces as well.
Step 2: Shape Both Six-Pointed Petal Pieces
We use the two six-pointed petal pieces to create the Camellia rose’s blossoming outer petal layers.
- Crease each petal slightly down the middle on each of the six-petal points.
- Curl each side of the creased petal points backward with a wood dowel.
- Layer together the two 6-point petals by alternating the petal points.
- Glue the outer layer of petals to the inner layer using a small amount of glue to the inside base of the outer petals.
Step 3: Create The Rosebud Center
Two of the five seven-pointed petal pieces will create the central rosebud of the paper Camellias.
- Curl all of the 7-point petals upward around your dowel.
- Select ONE seven-pointed petal piece. Choose two petals opposite each other and fold and wrap them around each other as if they were hugging.
- Secure these tight rosebud petals with glue.
- Fold up the other five petal points around the center just created.
- Attach these remaining petals with a bit of glue to the inside base of each petal point.
Step 4: Assemble The Outer Rosebud Layers
- Layer in the remaining FOUR 7-point petals, being sure to alternate petal points.
- Secure these petals using a small drop of glue to the inside base of the petals like before.
Step 5: Assemble The Paper Camellia Rose
- Add a bit of glue to the center of the 6-pointed petal pieces.
- Glue in the rosebud center and its additional layers.
- Shape the petals as needed to bloom around the rosebud base.
About Abbi Kirsten
Welcome to my colorful corner of the internet, where we play with vibrant crafts and unlock your creative magic! Hang out with me and get lost in a fun array of projects, tutorials, and products, from stunning papercraft ideas to flower templates, Cricut help for beginners, and endless crafter’s hacks.
Join A-Star Crafters and participate in monthly Craft-Alongs in our community Facebook group!

More Crafts to Love